How to Enable Screen Record on iPhone
Enable Screen Record iPhone makes creating tutorials, making YouTube videos or even capturing gaming sequences easier than ever. It also works great when troubleshooting an issue on your app.
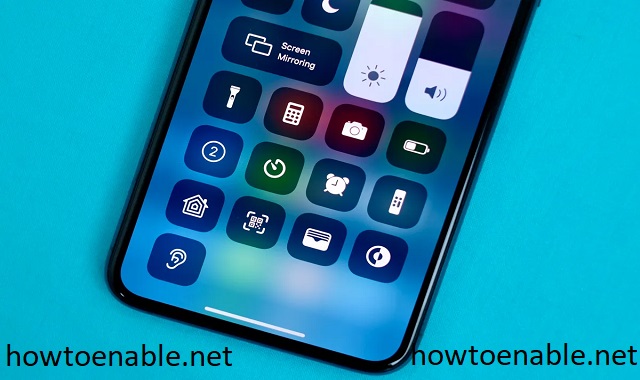
To start recording, open your Control Center (iPhone X and later devices swipe down from the top right corner; older models tap and hold on the power button). If it’s not already included, add it.
Enabling screen recording on an iPhone is a straightforward process that allows you to capture your device’s display activity. Follow these steps to enable screen recording on your iPhone.
Follow These Steps
Step 1: Check Compatibility Ensure that your iPhone model supports the screen recording feature. Screen recording is available on iPhones running iOS 11 and later. To check your iOS version, go to “Settings,” tap on “General,” and then select “About.”
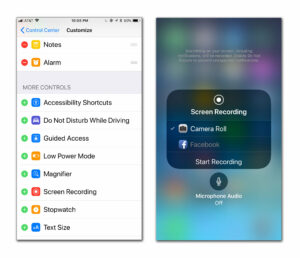
2: Add Screen Recording to Control Center Screen recording is accessed through the Control Center. To add the screen recording icon to the Control Center: a. Open “Settings.” b. Scroll down and tap on “Control Center.” c. Tap “Customize Controls.” d. Find “Screen Recording” in the list and tap the green plus icon to add it to the “Included Controls” section.
3: Access Control Center Swipe down from the top-right corner of the screen (or swipe up from the bottom on iPhones with a Home button) to open the Control Center.
4: Start Screen Recording Locate the screen recording icon (a circle within a circle) in the Control Center. a. Press and hold the screen recording icon until the control options appear. b. Tap the microphone icon to enable or disable audio recording (optional). c. To start recording, tap the red “Start Recording” button. There will be a three-second countdown, giving you time to navigate to the screen or app you want to record.
5: Stop Screen Recording
While recording, a red bar appears at the top of the screen, indicating that the screen recording is in progress. To stop recording: a. Tap the red bar at the top of the screen. b. Alternatively, return to the Control Center and tap the screen recording icon again. Confirm the action if prompted.
6: Access Recordings Recordings are saved in the Photos app by default. To access your screen recordings: a. Open the “Photos” app. b. Go to the “Albums” tab. c. Look for the “Screenshots” album, where screen recordings are automatically stored.
7: Customize Screen Recording Settings You can customize screen recording settings by going to “Settings” > “Camera” > “Record Video.” Here, you can choose the preferred video resolution and frame rate for screen recordings.
8: Use Third-Party Apps If you need additional features or more control over your screen recordings, consider using third-party apps available on the App Store. These apps may offer advanced editing tools, annotations, and other functionalities.
9: Troubleshooting Tips a. If screen recording is not working, ensure that it is enabled in the Control Center and that your device has enough storage space. b. Restart your iPhone if you encounter any issues with screen recording. c. Update your iOS to the latest version to access new features and improvements.
1. Open the Settings app
Whether you’re explaining how to do something on the iPhone or showing off some game skills, screen recording is a handy feature. It’s also useful if you have a friend that has a problem with an app or needs help troubleshooting a specific issue. A video is much easier to understand than a series of text instructions, so you can use screen record to create a step-by-step guide.
To record your screen, open Control Center by swiping down on an iPhone X or later or by swiping up on an older iPhone. You’ll see a grey Record button that starts a three-second countdown before the iPhone begins recording its screen.
Once the countdown ends, you can tap the button again to stop the recording or exit Control Center. Your recorded video will be saved to the Photos app unless you change the default storage location.
Apple added the quick, easy-to-use screen recording tool with iOS 14 in 2020. To enable it, open the Settings app and go to Control Center. Then scroll down to the Screen Recording option and tap the green addition symbol. From now on, you can quickly access this feature by opening the Control Center by swiping down or by tapping the red clock or bar at the top of the iPhone’s display. You can even record yourself talking while you record your phone’s screen.
2. Tap Control Center
Enable Screen Record iPhone lets you capture in a video everything that happens on your iPhone. Whether you’re giving an explanation for a how-to or want to record gameplay, this feature can be useful when used properly.
To enable the feature, open Settings and scroll down to Control Center. Tap the green plus button next to “Screen Recording,” and the button will be added to your iPhone’s Control Center options.
Once you’ve done this, you can use your iPhone to record audio and video with a simple tap on the button. The button looks like a solid white dot surrounded by a circle. When you’re recording, the button will turn red and a three-second countdown will appear. The countdown will stop when you close your Control Center or you tap the red status bar at the top of your iPhone (iPhone X and later) or clock (iPhone 8 and earlier).
Keep in mind, however, that long recordings can quickly fill up your iPhone storage. Consider using a cloud storage solution or backing up your iPhone before you start recording. Also, be aware that your microphone is active during a screen recording, so anyone nearby can hear your voice and any sounds from your phone’s speakers. If you want to disable your microphone for a specific app, go to Settings > Privacy > Microphone and toggle it off.
3. Tap Screen Recording
Screen recording is an iPhone feature that lets you share helpful instructional videos, gaming sequences and other media with friends, colleagues and loved ones. It can also be useful in troubleshooting problems with an app or other iOS features. When something goes wrong with an app, it’s often easier to explain the issue via video than to describe it verbally.
To enable this feature, open the Settings app and navigate to Control Center. Tap Customize Controls, then scroll down and find the Screen Recording option. Once you’ve found the option, tap Add on iPhone and then again on iPad and iPod touch to ensure it is added to the Included Controls list.
Once this feature is enabled, open the Control Center by swiping down from the top of the iPhone’s display (iPhone X or later) or swiping up on an older model. Tap the screen-recording icon (a circle surrounded by another circle) to begin recording your device’s screen. Once you’ve completed your recording, tap the screen-recording icon again to stop it.
Your screen recordings will save to your iPhone’s photo library, assuming that you have enough space available. You can edit, share and trim your screen recordings within Photos, just like any other video clip. If you’d like to access your screen recordings from a separate location, you can create a folder for them by selecting File > New Folder in the upper-right corner of Photos.
4. Tap Save
Enable Screen Record iPhone is a useful tool that lets you capture and share footage on your iPhone. Whether you want to demonstrate an issue with an app, show off your gaming skills or just record something for fun, the feature allows you to do so easily. If you’re having trouble getting the feature to work or find that it turns off after a short period of time, there are a few things you can try to resolve the problem.
The feature works by adding a button to the Control Center that users can use to start recording their device’s screen. Those whose devices don’t already include this shortcut can add it by going to Settings > Control Center > Customize Controls. Once the shortcut is added, the user can begin screen recording by swiping down from the top of their iPhone’s screen to open the Control Center and tapping the button.
When users tap the button, they’re given three seconds to prepare before the recording–indicated by a highlighted and blinking recording icon–begins. Once the recording begins, a red status bar appears at the top of the iPhone’s screen.
Users can trim their recordings and save them to the Photos app to share. If the recording includes microphone audio, users can select a setting to decide whether they want system or external audio.
Conclusion:
Enabling screen recording on an iPhone is a user-friendly process that enhances your ability to capture and share your device’s screen activities. By following these steps, you can take advantage of this built-in feature to create tutorials, capture gameplay, or share important information with others. Remember to explore additional settings and third-party apps for a more tailored screen recording experience.
Leave a Reply