How to Enable Screen Record on iPhone
Enable Screen Record On iPhone you’re creating a tutorial video or just want to capture some gameplay, iPhone screen recording is a handy feature. Swipe down (iPhone X or later) or up to access Control Center, then tap the red Screen Recording button—it will display a three-second countdown before your recording begins.
Your recordings will save to the Photos app by default, but you can change where they go in Settings.
Enable Screen Record On iPhone is a straightforward process that allows you to capture and share your device’s screen activity. Follow the steps below to enable screen recording on your iPhone.

Step 1: Confirm Compatibility
Before you start, ensure that your iPhone is running iOS 11 or later. Screen recording is a feature introduced in iOS 11, so if you have an older version, consider updating your device.
2: Access Control Center
- Unlock Your iPhone: Ensure your iPhone is unlocked and on the home screen.
- Swipe Down or Up (depending on the iPhone model): Access the Control Center by swiping down from the top right corner (iPhone X and newer) or swiping up from the bottom of the screen (iPhone 8 and earlier).
3: Add Screen Recording Button to Control Center
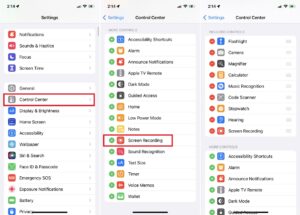
- Open Settings: Navigate to the Settings app on your iPhone.
- Select Control Center: Scroll down and tap on “Control Center.”
- Customize Controls: Choose “Customize Controls.”
- Add Screen Recording: Locate “Screen Recording” in the list of available controls and tap the green plus icon next to it to add it to the “Include” section. This adds the screen recording icon to your Control Center.
4: Start Screen Recording
- Access Control Center: Swipe down or up to open the Control Center.
- Locate Screen Recording Icon: Identify the screen recording icon, which looks like a solid circle inside another circle.
- Tap Screen Recording Icon: Tap the screen recording icon. A countdown will appear, giving you a few seconds to prepare.
- Record Your Screen: Once the countdown reaches zero, your iPhone will start recording the screen. You’ll see a red bar at the top of the screen, indicating that the recording is in progress.
Step 5: Stop Screen Recording
- Access Control Center: Swipe down or up to open the Control Center.
- Tap Red Recording Indicator: Tap the red recording indicator at the top of the screen.
- Confirm Stop: Confirm that you want to stop the recording by tapping “Stop” in the popup that appears.
6: Access Recorded Videos
- Open Photos App: Go to the Photos app on your iPhone.
- Locate Screen Recordings Album: Find the “Screen Recordings” album in the Albums tab. Your recorded videos will be stored here.
Additional Tips:
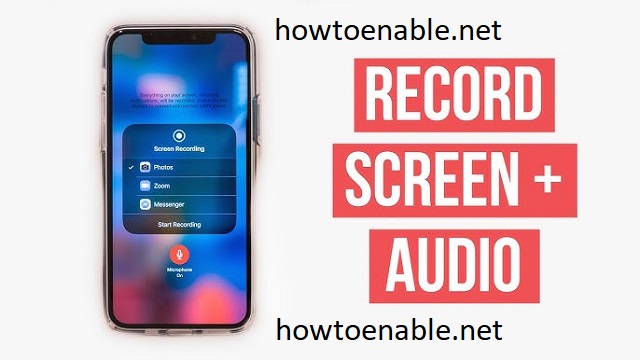
- Enable Microphone Audio (Optional): If you want to record audio along with your screen, long-press or 3D Touch the screen recording icon in Control Center. Enable the microphone icon to capture external audio.
- Adjust Settings: In the Settings app, you can customize screen recording settings, such as video resolution and frame rate. Navigate to “Settings” > “Camera” > “Record Video” to adjust these settings.
- Edit and Share Recordings: Use the editing tools in the Photos app to trim or enhance your recordings. Share them directly from the Photos app or through other platforms.
By following these steps, you can easily enable and use the screen recording feature on your iPhone, capturing and sharing your device’s screen activity with others.
How to enable screen record
Enable Screen Record On iPhone is a feature that can be useful in many situations. Whether you want to record an instructional video to show friends and family how to use an app or simply document how you did something on your phone, this handy tool is quick and easy to enable and use.
To get started, you’ll need to make sure that the screen recording option is actually available on your iPhone. To do this, swipe down from the top (iPhone X and later) or up (iPhone 8 and earlier) to access Control Center. You should see a “Screen Recording” button in this menu. If it doesn’t appear, open the Settings app, scroll down to More Controls and tap on the green plus icon next to “Screen Recording.” This will add the control to your list of Included Controls, meaning that you can now access it via Control Center.
When you are ready to start recording, just tap the button and hold it until the three-second countdown completes. Your device will now be recording any sound from your system and external apps, as well as anything that is picked up by your microphone. The screen record button will turn white and any text within the button will be surrounded by red, indicating that your recording is active.
You can stop your recording at any time by tapping the screen record button again or by using the red clock in the top-left corner of the Control Center menu (if you are in a full-screen app). Your recording will then be saved to your Photos app and can be shared however you wish.
Getting started
You can use a variety of third-party apps to screen record on an iPhone or iPad. But the easiest option is to enable the built-in iOS feature. It’s easy to use and works with any model of iPhone X or later, as well as most older models. To get started, make sure the Screen Recording shortcut is added to your Control Center (swipe down from the top right corner of any screen on an iPhone X or newer model; swipe up from the bottom on an older iPhone).
Next, ensure that the icon is highlighted in white, meaning it’s active. It will also be accompanied by a red status bar and clock when it’s recording.
If you’re not seeing either of these indications, it means something is interfering with the screen recorder. Try restarting your iPhone or changing the app you’re using and see if it fixes the issue.
You can start recording your screen by tapping the screen record button in your Control Center. This will start a three-second countdown before your iPhone starts recording. If you want to stop the recording before the countdown expires, you can do so by tapping the screen record button again or by pressing hard on the iPhone (if your phone has 3D Touch, that’ll work; otherwise, a long press will do). Your recording will save to the Camera Roll and can be edited in the Photos or iMovie app on your computer.
Recording your screen with sound
Screen recording is a great feature for iPhone users. It can be used in many different ways, such as to document an app experience or to show someone how to do something on the device. It can also be helpful when troubleshooting an issue with an app. Using screen record can help you communicate problems with the app creator and get your problem fixed.
To use the feature, open your Control Center. This can be done by swiping down on the iPhone X and later models or by swiping up from the bottom of the screen on the iPhone 8 and earlier models. Once you’re in Control Center, tap the Screen Recording button (which looks like a circle with a white dot). You’ll be given a three-second countdown before the recording begins.
Once the recording has started, you can press the red bar across the top of the screen to stop it. The video will then be saved to the Photos app on your device.
It’s important to keep in mind that your microphone is turned on when the recording is active. This means that if you have your ringer turned on, the sounds of your ringer will be recorded along with anything you record on your screen. If you want to limit what’s recorded, make sure to turn off your ringer before starting a recording.
Stopping your recording
Whether you want to document your friend’s reaction to great news or show off the latest game update, screen record is an incredibly useful tool. But, if you don’t want the recording to start automatically when you swipe down from the top of your iPhone, there’s an easy way to prevent it.
The best method is to disable the feature in Settings. To do so, tap on “Control Center,” then toggle off the option for Screen Recording. Once the setting is off, you won’t be able to access it without opening Control Center. If you want to re-enable it later, simply return to the Control Center settings and enable it again.
Another method is to use the Side Button, or Sleep/Wake button on older models. This will immediately stop the recording. You’ll still receive the banner notification that says “Screen Recording video saved to Photos” but it won’t start automatically!
Alternatively, you can also use the red status bar in the upper left corner of your device. If you don’t have a 3D Touch-enabled iPhone, a hard press on the shortcut in Control Center will also work. To view your recording, head to the Photos app and select your newly created video. If you’d like to share it, simply press the Sharing button (which looks like two photos with arrows) and choose an option, such as Messages or AirDrop.


