How to Enable Screen Recording on iPhone
Enable Screen Recording On iPhone you want to record a video tutorial for your employees, or you need to explain how your software works, screen recording is an invaluable tool. This feature is easy to enable and doesn’t interfere with regular iPhone functions.
To enable it, swipe down from the top right corner of your screen (iPhone X and later) or up (iPhone 8 and earlier). A three-second countdown will appear before recording begins.
Enabling screen recording on your iPhone is a straightforward process, allowing you to capture and share activities on your device. Follow these step-by-step instructions to enable screen recording on your iPhone.

Step 1: Check Compatibility
Ensure that your iPhone model is running iOS 11 or later, as screen recording was introduced in iOS 11. To check your iOS version, go to Settings > General > About > Software Version.
2: Customize Control Center Screen recording is accessed through the Control Center, so you need to make sure the Screen Recording icon is available. To do this:
- Open Settings.
- Scroll down and tap on Control Center.
- Select Customize Controls.
3: Add Screen Recording to Control Center In the Customize Controls section:
- Locate “Screen Recording” in the list of available controls.
- Tap the green ‘+’ icon next to “Screen Recording” to add it to the Control Center.
4: Access Control Center Now that you’ve added Screen Recording to the Control Center, you can access it by swiping down from the top-right corner of the screen (or swipe up on iPhone models with a Home button).
5: Start Screen Recording
- Open the app or screen you want to record.
- Swipe down or up to access the Control Center.
- Locate the Screen Recording icon, which looks like a circle inside another circle.
- Tap the Screen Recording icon.
6: Customize Recording Settings Before starting the recording, you can customize certain settings:
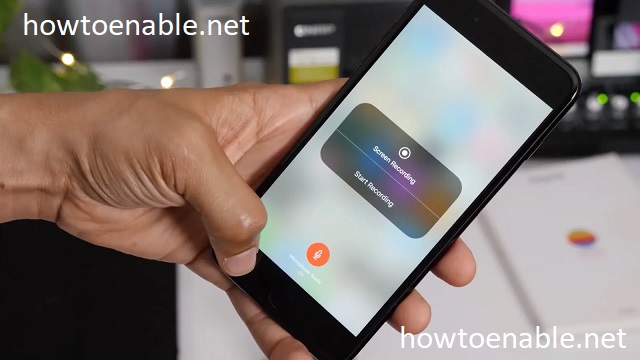
- Microphone Audio: To record audio while capturing the screen, press and hold the Screen Recording icon until a menu appears. Toggle on the microphone icon to enable audio recording.
- Screen Recording Options: To adjust settings like microphone audio and include/exclude external audio, 3D Touch (press firmly) on the Screen Recording icon.
7: Start Recording After customizing your settings:
- Tap the red recording button, and a countdown will begin.
- After the countdown, the status bar at the top of your screen will turn red, indicating that the recording is in progress.
8: Stop Recording To stop recording:
- Tap the red status bar at the top of the screen.
- A pop-up will appear confirming the end of the recording. Tap “Stop” to finish the recording.
9: Access Recorded Videos Once you’ve stopped the recording, the video is automatically saved to your Photos app. You can find it in the “Recents” album, or you may need to navigate to the “Videos” folder, depending on your iOS version.
10: Edit and Share the Recording If desired, you can edit the recorded video before sharing it. Open the Photos app, select the recorded video, and tap “Edit” to make adjustments. Once satisfied, tap “Done” and choose the sharing option, such as messaging, email, or social media platforms.
Congratulations! You’ve successfully enabled and utilized screen recording on your iPhone. This feature is incredibly useful for creating tutorials, showcasing app functionalities, or simply capturing memorable moments on your device.
How to enable screen recording
Whether you need to walk a friend through an iPhone setup or you want to capture your victory in a video game, screen recording is a great feature to have on your device. It saves time and energy compared to writing instructions in a text message. Plus, it gives you more control over what you’re recording.
To enable the feature, open Settings and tap “Control Center.” Then, select the green “+” icon next to Screen Recording to add it to your iPhone’s list of included controls. Once added, the shortcut is easily accessible from any app that supports it by swiping down on your iPhone’s display. After a three-second countdown, your device will begin recording. Its status bar will turn red when it’s recording. You can stop the recording at any time.
If you’re using a 3D Touch-enabled device or you have the option enabled, a hard-press on the Screen Recording shortcut in Control Center will display additional options. Here, you can choose to toggle microphone audio on or off for your recordings and decide if you want to show touches on the screen.
If your screen recording is black, it could mean that there’s something interfering with the functionality of your iPhone. Try restarting the device or updating the operating system to see if that fixes the problem. If not, you may need to contact Apple support for further assistance.
Enabling screen recording
Whether you’re trying to demonstrate a bug to tech support or you’re creating a tutorial for a new app, the ability to screen record on an iPhone is a valuable tool. However, the process can be frustrating if your screen recording isn’t working properly. Fortunately, there are several ways to troubleshoot this issue and get it back up and running quickly.
To enable screen recording on an iPhone, open the Settings app. Scroll down and select “Control Center”. Tap the green plus icon next to Screen Recording. This will move the button up to the top of the list under Included Controls. You can also drag the three-line icon to reposition other buttons in the same way.
Once you’ve enabled the screen recording feature, you can use it to capture video and audio from your iPhone. To start recording, swipe down from the top right corner of your iPhone’s screen (or swipe up from the bottom of the screen on older devices) and tap the screen recording icon. The icon will appear with a countdown of three seconds before recording begins. If you want to disable the microphone while recording, simply click the red status bar at the top of your device’s screen.
You can also add the screen recording shortcut to your iPhone’s Control Center by swiping down from the top of the screen (on iPhone X and later) or swiping up (on earlier iPhone models). Once the button is in your Control Center, you can access it by swiping down from the corner of your screen or tapping the green button in the top right corner of the home screen.
Recording video
Screen recording allows you to capture what’s happening on your iPhone or iPad, including system and external audio. You can also edit your videos in the Photos app. This is a great feature to have for troubleshooting an issue or explaining how to use an app.
You can access screen recording by swiping down from the top of your iPhone or iPad (or swipe up from the bottom on older models) to open Control Center. Then, tap the screen record button, which looks like a dot inside a circle. A three-second countdown will appear before the screen recording begins, and the button will turn red when it’s recording. On newer iPhones, a red clock will appear in the upper-left corner of the screen when recording is active.
Once your recording is complete, you can share it with anyone. You can send it via email, iMessage, or social media. You can also trim and edit the video in the Photos app. If you’re concerned about your storage, consider backing up your iPhone or clearing it before recording a long video.
If the Screen Recording icon isn’t available in Control Center, it may be because you’ve enabled restrictions that prevent this feature from working. To resolve this issue, visit Settings and navigate to Content Restrictions. Tap the green plus sign next to Screen Recording to add it to Included Controls.
Recording audio
The iPhone screen recording feature is useful for a number of reasons. For example, if you want to walk someone through how to use an app or device setting, a video is more helpful than just sending instructions via text. Similarly, if you’re about to beat a boss level in a game, it can be helpful to record the event.
You can enable this functionality by enabling the “Screen Recording” option in the Control Center menu. You can access the Control Center by swiping down from the top of the screen (iPhone X and later) or swiping up from the bottom of the screen (iPhone 8 and older). Once you’ve enabled the feature, you’ll see a button that looks like a solid circle inside a circle. To start recording, simply tap the icon.
The screen recording will save to the Photos app by default. To change the default destination, open Settings and tap on More Controls. From there, select the Screen Recording option and tap on the green plus icon to add it to the Included Controls section.
You can also share your screen recordings with friends or coworkers through Messages, AirDrop or email. However, keep in mind that your device’s storage may fill up quickly if you create lots of videos. For this reason, it’s a good idea to back up your iPhone or clear its storage periodically.
Leave a Reply