
How to Enable Screen Recording on the iPad
Enable Screen Recording is a popular way to create tutorial videos, product demos, how-to guides and video presentations. It’s also a great way to live stream games or create commentary and reaction videos.
To enable screen recording on a Mac, open System Preferences > Security & Privacy. Select the “Allow app or browser to record screen” switch.
Enabling screen recording can be a useful feature for various purposes, such as creating tutorials, capturing gameplay, or troubleshooting technical issues. The process may vary slightly depending on the operating system you are using. In this guide, I’ll cover the steps for enabling screen recording on Windows, macOS, and mobile devices (iOS and Android).
Windows:
1. Use Xbox Game Bar:
- Windows 10 comes with the Xbox Game Bar that includes a screen recording feature.
- Press
Win + Gto open the Game Bar. - Click on the camera icon to start recording.
2. Use built-in Screen Recorder:
- Windows 10 also has a built-in screen recorder called “Steps Recorder” or “PSR.”
- Type “Steps Recorder” in the Start menu, and open the app.
- Click “Start Record” to begin capturing your screen.
3. Third-Party Apps:
- Various third-party applications are available for screen recording, such as OBS Studio, Camtasia, or ShareX.
- Download and install the preferred application, follow the setup instructions, and start recording.
macOS:
1. Use QuickTime Player:
- Open QuickTime Player (you can find it in the Applications folder).
- Go to
Fileand selectNew Screen Recording. - Click the red record button to start capturing your screen.
2. Use Command + Shift + 5:
- macOS Mojave and later versions have a built-in screen recording tool.
- Press
Command + Shift + 5to open the screen recording toolbar. - Click on the record button to start recording.
3. Third-Party Apps:
- Similar to Windows, there are third-party applications like ScreenFlow or Camtasia for macOS.
- Download and install the desired application, follow the setup instructions, and initiate screen recording.
iOS:
1. Use Control Center:
- On iOS devices with iOS 11 or later, screen recording is built into the Control Center.
- Swipe up (or down, depending on the device) to open the Control Center.
- Tap the recording button to start capturing your screen.
2. Use the Screen Recording Widget:
- Add the Screen Recording widget to the Today View by swiping right on the home screen.
- Tap the recording button in the widget to start screen recording.
Android:
1. Use Built-in Screen Recorder (if available):
- Some Android devices come with a built-in screen recorder in the Quick Settings or Accessibility menu.
- Swipe down the notification shade and check for a screen recording option.
2. Use Third-Party Apps:
- If your device doesn’t have a built-in screen recorder, you can use third-party apps like AZ Screen Recorder, DU Recorder, or Mobizen.
- Download and install the chosen app, follow the setup instructions, and begin screen recording.
General Tips:
1. Set Recording Parameters:
- Before recording, configure settings like audio source, video quality, and frame rate for optimal results.
2. Save and Share:
- After recording, save the file in a suitable format and location. Share it directly or edit it as needed.
3. Check System Requirements:
- Ensure your device meets the software requirements for screen recording applications to function smoothly.
4. Respect Privacy:
- Be mindful of privacy concerns when recording, especially when capturing sensitive information or interacting with others.
By following these steps, you should be able to enable screen recording on various platforms, enhancing your ability to capture and share content effectively.
How to enable screen recording on a Mac
If you’re using a Mac with macOS Mojave or later, you can use the built-in QuickTime player to make a screen recording that captures audio and includes a mouse click visual. To use this feature, open QuickTime Player from your Applications folder, then select File in the menu bar and choose New Screen Recording. In the resulting window, click the red Record button to start recording your computer’s screen. If you’d like to include audio in the recording, click the arrow next to the record button and select your preferred microphone. You can also customize the settings for the recording by clicking the Options button and choosing whether to show a circle around mouse clicks or not.
Once your recording is complete, a thumbnail appears in the bottom right corner of your screen. You can drag the thumbnail into a document, an email, a note, or a Finder window to save it and open it for editing, viewing, or sharing. Alternatively, you can click the stop recording button in the menu bar or press Command + Shift + Escape to stop the recording.
You can enable audio recording with the built-in screen recorder in macOS or download a more advanced application, such as CleanShot X. If you’re using a third-party screen recorder, it’s important to ensure that the software has been properly configured to capture system audio and isn’t blocking the microphone.
How to enable screen recording on a Windows PC
Whether you’re creating an online tutorial, a walk-through of your favourite software or a video game review, screen recording is a powerful tool. Using the free Microsoft Stream app you can record your screen and webcam with audio, making it easy to create engaging videos for personal or professional use.
To start recording your screen, click the red circular record button. You will then be prompted to choose what you want to record, whether that’s the whole screen, a specific window or a browser tab. You can also select whether you want to include your microphone audio. Once you’re happy with your recording, click Share. Your recording will then be available in the Microsoft Stream screen recording tab, where you can review and edit it.
Screen recordings can be saved as MP4 videos, which you can then upload to an online platform or download to your computer. Alternatively, you can use third-party screen capture tools such as TechSmith’s Snagit or Camtasia, which offer more advanced recording features.
Windows has a built-in screen recording tool called Xbox Game Bar, which is included in both Windows 10 and 11. It’s designed primarily to record video games, but it can be used to record any type of screen activity. To start a screen recording, press the Windows key + G combination keys to open Game Bar and then click the Record button. A small panel will appear on the screen to display your gameplay, and a notification will pop up to confirm that a game clip has been recorded.
How to enable screen recording on an iPhone
If you have an iPhone, you can enable screen recording by following these steps:
1. Make sure that your device is updated to the latest version.
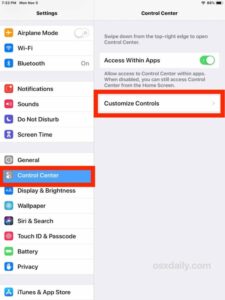
The screen recorder feature on an iPhone requires iOS 14 or later to function. You can check whether your iPhone is up to date by tapping on the Settings app and selecting Control Center. Once you have the latest version of iOS, you should be able to use the screen recorder function without issue.
2. Tap the screen recorder icon in Control Center to start a new recording.
When you want to record your screen, open the Control Center menu (for iPhone X and later) or swipe up from the bottom of the screen (for iPhone 8 and older). Then, look for the screen recorder button. It will appear as a gray dot surrounded by a circle, and when you press it, it will begin a three-second countdown. Once the time is up, the button will turn red to indicate that you’re recording.
3. To stop the recording, either tap the screen recorder button again or tap on the red status bar at the top of the screen.
Once you’re finished recording, you can share your video with friends and family by opening it in the Photos app and tapping the share button.
How to enable screen recording on an iPad
Screen recording is a feature that transforms the iPad from a device for consumption to an engine of creation. From creating tutorial videos to capturing the thrill of gameplay, the ability to record an iPad’s screen has numerous practical applications.
To enable screen recording on an iPad, tap the circular screen recording button (looks like a dot in a circle) located in the Control Center. When you tap the button, a three-second countdown will begin, giving you time to prepare before recording begins. You can also activate the microphone to narrate your recordings or capture background music.
Once a recording is complete, you can share it with friends or colleagues using the Sharing menu from the Photos app or upload it to social media directly from the video timeline. You can also access your recordings from the Messages, Email, and Notes apps as well as in your Camera Roll.
To ensure a smooth recording experience, be sure to have sufficient storage space on your iPad and close any unnecessary apps prior to starting a session. Likewise, make sure the iPad’s brightness is set at an optimal level for best results. In addition, be aware that screen recordings can take up a considerable amount of storage space. If you are running low, you can free up space by deleting old files or moving data to iCloud or an external storage device.
Leave a Reply