How Do I Turn on Screen Recording?
Screen recording is a powerful tool in today’s remote work environment. It allows people to see exactly how to use an app or piece of software without the need for lengthy back-and-forth email chains.
Microsoft’s Windows 11 includes a built-in tool called Game Bar, originally designed to capture PC gaming sessions. However, it can be used to record virtually anything on your computer.
Screen recording is a powerful feature that allows you to capture and share your device’s display, whether you want to create tutorials, showcase gameplay, or troubleshoot technical issues. Enabling screen recording varies across different devices and operating systems. In this comprehensive guide, we’ll walk you through the steps to turn on screen recording on popular platforms, including Windows, macOS, iOS, and Android.
Windows:
Using Xbox Game Bar:
- Press
Win + Gto open the Xbox Game Bar. - If prompted, click on “Yes, this is a game.”
- Click on the camera icon to start screen recording.
- Configure settings like audio recording and capture duration.
- Click the record button to begin recording.
Using OBS Studio:
- Download and install OBS Studio from the official website.
- Launch OBS Studio and go to “Settings.”
- Under the “Output” tab, set the recording path and format.
- Go to the “Video” tab and configure your recording settings.
- Click “OK” to save settings.
- In the main window, click “Start Recording” to begin capturing your screen.
macOS:
Using QuickTime Player:
- Open QuickTime Player (found in the Applications folder).
- Click on “File” in the menu and select “New Screen Recording.”
- Click the red record button and choose to capture the entire screen or a selected portion.
- Click “Start Recording” and then “Stop Recording” when finished.
Using Command Line:
- Open Terminal.
- Enter the command:
xcrun simctl io booted recordVideo output.mov. - Replace
output.movwith your desired file name. - Press
Control + Cto stop recording.
iOS:
Control Center Method (iOS 15 and later):
- Open the Control Center by swiping down from the top-right corner.
- Tap the “Record” button, represented by a circle within a circle.
- Wait for the three-second countdown, and your screen recording will start.
- To stop recording, tap the red status bar or go back to the Control Center and press the record button again.
Settings App Method:
- Open the Settings app.
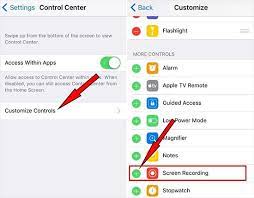
- Go to “Control Center” and then “Customize Controls.”
- Add “Screen Recording” to the Control Center.
- Open the Control Center and tap the screen recording icon to start recording.
Android:
Using Built-in Screen Recorder (Android 11 and later):
- Swipe down from the top of the screen to open the Quick Settings menu.
- Look for the screen recorder icon and tap on it.
- Choose your desired settings, like audio source and video quality.
- Tap “Start” to begin recording and “Stop” to end the recording.
Using Third-Party Apps (e.g., AZ Screen Recorder):
- Download and install a screen recording app like AZ Screen Recorder from the Google Play Store.
- Open the app and configure settings, such as resolution and frame rate.
- Tap the “Record” button to start recording.
- Use the notification shade or the app itself to stop recording.
How to Turn on Screen Recording
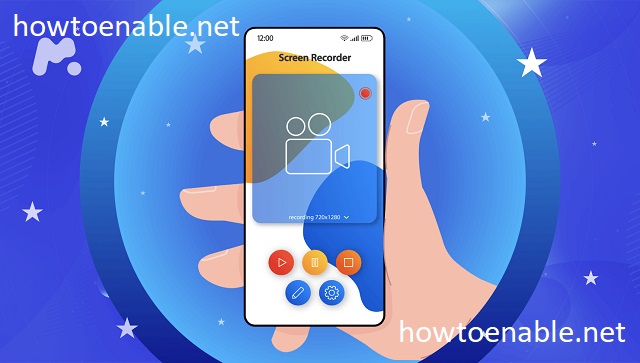
Screen Recording allows you to quickly capture video of your phone or iPad’s display. Whether you need to make a tutorial for your friends or want to capture some gameplay, it’s as easy as a few taps. It’s only available on devices running iOS 14 or later and it can be accessed through the Control Center.
You can also access it by swiping down on the iPhone’s top right corner or with 3D Touch (if you have an iPhone with this feature). Once your recording is done, just tap the red status bar at the top of the screen to stop it.
During recording, clear any notifications or apps that may be distracting to the viewer. It can also help to use an Apple Pencil during a recording as it makes tapping, swiping and long-pressing more precise.
When you’re done, your new video appears in a Gallery window with the name, date and time of the recording displayed. You can view it, share it or save a copy for future reference. The file is automatically saved in the Photos app on your iPhone or iPad.
1. Swipe down from the top right corner of your screen
The iPad has a built-in screen recording feature that lets you create tutorial videos, showcase your favorite apps, or capture gameplay. To use this feature, swipe down from the top right corner of your screen to access Control Center. Once you’ve enabled this feature, the Record button will turn red and start a three-second countdown before your iPad starts recording.
Any notifications that appear during this time will also be recorded. If you don’t want to have these notifications captured, make sure that the Do Not Disturb Focus mode is turned on.
You can find and stop recordings by tapping the Recording button in the Control Center. Once the recording is finished, iOS will save it as an MP4 video file in your Photos app.
This is a great way to share a quick how-to video with friends or family. You can also use this feature to create a video that helps you solve an issue on your device. This can be especially helpful if you’re trying to explain how to fix an error in a program or game.
2. Tap the Screen Recording button in the Control Center
Whether you’re creating a tutorial video, showing someone how to use an app or trying to capture an issue to submit to Apple Support, being able to record your iPhone’s screen is helpful. With iOS 11, Apple added a quick and easy way to do this with the built-in Screen Recording feature.
To enable Screen Recording, open the Settings app and then swipe down from the top of your phone (or from the bottom on older iPhones) to bring up Control Center. Tap the Screen Recording button and a three-second countdown will display before recording begins.
Once recording is complete, tap the red button to stop. The video will then be saved to your Photos app.
You can also access additional options for screen recordings directly from the Control Center using 3D Touch on the screen recorder icon. This includes the option to mute microphone audio, start or stop a recording and toggle the screen recorder’s status.
3. Countdown to recording
Screen recordings make it easier for people to follow along with your tutorials, presentations and demonstration videos. They’re also a powerful tool for remote work, eliminating the need for back-and-forth emails by giving your viewers a more interactive experience.
To enable the feature, head to ‘Settings’ and scroll down to ‘Control Center’. Tap the green ‘+’ button next to Screen Recording. You’ll see a countdown before the recording starts — this helps you prepare to begin the video and confirms that the recorder has started. You can change the countdown duration or disable it completely from the ‘Screen Recording’ menu.
With the Screen Recording feature, you can record your entire screen or just a specific window or browser tab. You can even record audio, narrate your video and add annotations or background music. Then, when you’re done, simply tap the ‘Stop’ button. Your video will be saved to the Photos app automatically. Then, you can share it with a link or download it as a high-resolution video.
4. Tap the Stop button
Whether you’re nearing the rewarding conclusion of your favorite game, or need to walk a colleague through a tricky process on your iPhone or iPad, recording your screen can be incredibly helpful. Unlike screenshots, which only capture the app’s display, screen recordings record both audio and video of your phone’s screen.
Once you have the shortcut added to your Control Center, swipe down and tap the Screen Recording button. After a 3-second countdown, your recording will begin. To stop your recording, simply tap the red clock or bar at the top of the screen.
Your recorded video will be saved to your Photos app. You can then view, edit, and share the file. It is recommended that you regularly backup your iPhone or clear up space on your device before attempting to record.
If you are experiencing an issue where your screen recording keeps cutting off, there are several things that could be causing the problem. For example, your iPhone may have gone to sleep during a recording or there may not be enough storage space on your device.
Summary
Enabling screen recording on different devices involves utilizing built-in features or third-party applications. Whether you’re on Windows, macOS, iOS, or Android, these step-by-step instructions should guide you through the process, empowering you to capture and share your screen effortlessly.
Leave a Reply