How Can I Start Recording My Screen?
Start Recording My Screen are great tools for sharing feedback, offering virtual tours, and delivering presentations. But they can be difficult to set up and use without the right software.
Luckily, there are plenty of ways to start recording your screen – from built-in features on smartphones and laptops to extension-based desktop apps like Vimeo Record.
Recording your screen is a useful skill for creating tutorials, presentations, or sharing your computer activities. In this guide, I’ll provide you with a step-by-step process on how to start recording your screen. Let’s break it down into several sections.
Section 1: Choose a Screen Recording Software
The first step is to select a reliable screen recording software. Popular choices include OBS Studio, Camtasia, and QuickTime Player (for Mac users). Choose one that suits your needs and preferences.
2: Install and Set Up Your Screen Recording Software
- Download and Install:
- Visit the official website of the chosen software.
- Download the installation file and follow the on-screen instructions to install the software.
- Open the Software:
- Launch the installed software on your computer.
- Configure Settings:
- Explore the settings to customize video quality, audio input, and other preferences.
- Adjust recording parameters such as frame rate, resolution, and audio sources according to your requirements.
3: Select the Area to Record
- Full Screen or Custom Region:
- Decide whether you want to record the entire screen or just a specific region.
- Many screen recording tools allow you to select a custom area by dragging a frame around the desired region.
4: Audio Configuration
- Microphone Setup:
- If you plan to include audio commentary, ensure your microphone is connected and selected as the input source in the recording software.
- System Audio:
- Decide whether you want to capture system sounds (e.g., notification sounds, application sounds) during the recording.
5: Record Your Screen
- Start Recording:
- Locate the “Record” or “Start Recording” button within the software.
- Click the button to initiate the recording process.
- During Recording:
- Perform the actions on your screen that you want to capture.
- Speak clearly if you are recording audio commentary.
6: End the Recording
- Stop Recording:
- When you’re finished, locate the “Stop” or “Finish Recording” button in the screen recording software.
- Click the button to stop the recording process.
- Review and Edit:
- Some software may allow you to review and edit your recording immediately. Trim unnecessary parts if needed.
7: Save or Export Your Recording
- Save Location:
- Choose a location on your computer where you want to save the recorded file.
- Export Options:
- Select the appropriate format and settings for exporting your recording.
- Common formats include MP4, AVI, or MOV.
8: Troubleshooting and Additional Tips
- Check Storage Space:
- Ensure you have sufficient disk space for storing the recorded file.
- Test Before Important Recording:
- Conduct a short test recording to check audio and video quality before starting any crucial recording.
- Update Software:
- Periodically check for updates to ensure you are using the latest version of your screen recording software.
- Use Hotkeys:
- Familiarize yourself with hotkeys to simplify the recording process (start, stop, pause).
Windows
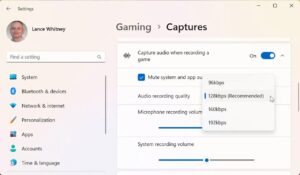
If you’re on a Windows computer, there are a few super simple ways to start recording your screen. One of the most popular is to use Microsoft’s built-in Game Bar tool. While it was designed primarily for gamers wanting to capture their gameplay, it can actually be used to record virtually anything happening on your computer. To begin, simply open the app you want to record and press the Windows key + G at the same time. This will prompt a small recording panel to appear on your screen that includes options for how much audio is captured (including microphone input, which can be helpful if you plan on adding a voice-over narration) and whether or not to display a notification of the recording process.
Another option for capturing your screen on Windows is to use a free screenshot program like Snagit. This program offers a variety of features to make capturing your video fast and easy, including the ability to add text or drawing tools to highlight important areas on your screen. It also has a handy webcam feature to let you record yourself talking, which can be helpful for creating more informal videos or technical tutorials.
Another free way to record your screen on Windows is to use the built-in Xbox Game Bar feature. While this tool was designed primarily for capturing PC and Xbox gaming sessions, it can actually be used to record nearly any type of activity on your computer. To start, simply open an app and click the record button in the Game Bar toolbar. From there, you can choose the desired recording options. Your recordings will be saved to c:users[username]VideosCaptures by default.
Mac
If you’re a Mac user, you have more options than ever to record your screen and add audio. You can use the built-in tools or download a third-party app, like Awesome Screenshot & Recorder. But first, make sure your Mac is healthy so you can record high-quality video.
If your Mac is old or hasn’t been updated recently, the built-in macOS screen recording tools may not work well. To fix this, you can upgrade to macOS Mojave or later.
To start a screen recording on your Mac, press Command + Shift + 5. Then click Record Entire Screen or Record Selected Portion (the fourth and fifth icons). You can also adjust other preferences by clicking the “Options” button, such as choosing a storage location and a timer. You can even enable Show Mouse Clicks to highlight the mouse cursor during your recording.
When you’re done, the resulting QuickTime file will be ready to watch and edit. If you want to save the file as a different format, you can do that in the menu bar by selecting File > Export. Alternatively, you can use any third-party video editing tool to make changes to your screen recordings. You can trim them, add a background music track, apply visual effects, and more. Then, you can share them online or on your mobile device.
Linux
The default screen recording tool in Linux is surprisingly barebones. It doesn’t allow you to record a specific window or desktop, it doesn’t support audio recording and the output is limited to WebMD videos. Thankfully there are many full-featured alternatives that you can use to record your desktop on Linux.
Among the most popular is Simple Screen Recorder. This Qt-based tool has a simple interface and sane default settings that won’t require tweaking to get you started. It can record a fixed rectangle on the screen, it can follow the cursor and it can save your recordings to disk. It’s available for a large number of Linux distributions including Ubuntu, Debian, Red Hat Enterprise Linux and Magee.
Another good option is Konoha, a minimalist screen recording tool with minimal setup hassle. It also supports the Wayland display server and can be downloaded from the snap store or Flat hub. Kazem is another lightweight screen recording tool that can be used to capture a specific window or the entire desktop.
If you are using an Android device you can use scrcpy, a command line tool that mirrors the device’s display to your Linux desktop. You can then use a graphical user interface like guiscrcpy on top of it to create your recordings. However, keep in mind that these tools can produce very large files that may be clunky to send and difficult to store.
Android
Screen recording on Android is a great tool for creating helpful tutorial videos and demonstrating how to use your smartphone. However, it’s important to prepare beforehand and have the right tools to avoid mistakes that may reduce the quality of your video.
First, make sure you have enough storage space to record your video. Depending on your device, you may need to clear unused apps and other files. This will help ensure that you don’t run out of space in the middle of a recording.
Next, set your phone to Do Not Disturb mode while you record. This will prevent incoming notifications from interfering with your video, which can distract viewers. You can also lock your screen orientation to keep the display from rotating during the recording.
Once you’re finished recording, your video will be saved to the Movies folder in the Google Photos app. You can access it by tapping the notification that says “Tap to view”.
In addition, you can edit the video in Google Photos by dragging the bar at the beginning and end of the clip. This will trim away the extra portion of the beginning and end of the video, making it shorter. You can then save the video to your phone or tablet, and share it with others. This is a great way to demonstrate how to use an Android app or show off your gameplay in HD quality!
Conclusion
Recording your screen can be a straightforward process with the right software and setup. Whether you’re creating educational content, tutorials, or sharing your screen for other purposes, following these steps will help you get started on your screen recording journey.
Leave a Reply