
How to Enable Screen Record on Any Apple Device
Enable Screen Record you’re explaining an iPhone feature to your co-workers or a bug to a support team, screen recordings are one of the most powerful tools at your disposal. Learn how to quickly enable this tool on any Apple device in just a few clicks.
Using your screen recording video can save you time by eliminating the back-and-forth email exchanges that typically occur between employees. It also makes content easier to understand.
Enable Screen Record on various devices and operating systems can differ, so I’ll provide instructions for a few popular platforms: Windows, macOS, iOS, and Android. Please note that the steps might vary slightly based on the version of the operating system you are using.
Windows:
Using Xbox Game Bar:
- Press
Win + Gto open the Xbox Game Bar. - Click on the camera icon to open the capture bar.
- Click on the red circle button to start recording.
Using OBS Studio:
- Download and install OBS Studio from the official website.
- Open OBS Studio and go to the “Sources” panel.
- Click the “+” button and select “Display Capture” or “Window Capture.”
- Adjust settings and click “Start Recording.”
macOS:
Using QuickTime Player:
- Open QuickTime Player.
- Click on “File” in the menu and select “New Screen Recording.”
- Click the red record button and select the area to record.
Using OBS Studio:
- Download and install OBS Studio from the official website.
- Open OBS Studio and add a source (Display Capture or Window Capture).
- Adjust settings and click “Start Recording.”
iOS:
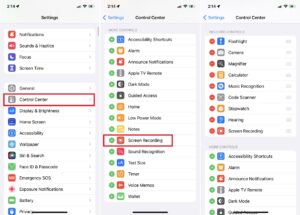
Using Control Center:
- Open the Control Center by swiping down (or up, depending on your device model).
- Tap on the screen recording icon (a circle with a dot inside).
- A countdown will appear, and the recording will start.
Using Third-Party Apps (like TechSmith Capture):
- Download a screen recording app from the App Store.
- Follow the app’s instructions to set up and start recording.
Android:
Using Built-in Screen Recorder (if available):
- Swipe down to open the notification shade and look for the screen recorder icon.
- Tap on it and follow on-screen instructions.
Using Third-Party Apps (like AZ Screen Recorder):
- Download and install a screen recording app from the Google Play Store.
- Open the app, configure settings, and start recording.
General Tips:
- Check System Settings: Ensure that your device or operating system supports screen recording. Some older devices or software versions may lack this feature.
- Storage Space: Make sure you have enough storage space to save the recorded videos.
- Permissions: Grant necessary permissions to the screen recording application.
- Quality Settings: Adjust recording quality settings according to your preferences and available storage.
- Audio Capture: If you want to record audio, check and configure audio input settings in your recording application.
By following these general guidelines, you should be able to enable screen recording on your device, whether it’s a computer or a mobile device, using built-in features or third-party applications.
Getting Started
Whether you’re trying to show a colleague how to do something on an iPhone or a computer, screen record is a handy tool to have. But first, you need to enable it. Here’s how.
To enable the feature, swipe down on your phone’s screen or tap the Control Center icon. Then, tap the screen recording button (looks like a red circle with a white “R”). You’ll be given three seconds before the recording starts. Once it does, a red recording bar will appear at the top of your screen. You can also click that button to stop the recording.
You can also use the same technique on a Mac. There are plenty of options for recording your screen on a PC, from the built-in Xbox Game Bar to third-party tools such as Camtasia and Snagit. But before you start recording, be sure to clear any personal information from your computer’s screen. It would be embarrassing to make a video showing your address, photos of your children or any other sensitive information.
It’s also a good idea to turn off notifications while recording. It’s no good if your Mom calls during the middle of a demonstration, and it will only distract you and potentially ruin the quality of your video. Also, if you plan on using an Apple Pencil for your recordings, it will help to have it charged and ready to go.
Recording
Whether you’re an instructor creating a video lesson for asynchronous learners or a content creator making commentaries and reaction videos, screen recorders offer the power to make your work better. Capturing your computer or mobile device’s screen gives viewers a glimpse into what you are seeing, helping them understand and follow along.
Enable Screen Record tools come with a variety of features that can help you create and edit your recordings. For example, some have the ability to choose which portion of your screen to capture (like your entire monitor or just a specific window). Some also allow you to control audio input so that you can record with your microphone or system sound, or both.
Another common feature is annotation, which allows you to draw or highlight important parts of the video with text, shapes, or arrows. This helps to reinforce and emphasize important information in the video, which makes it easier for your audience to understand.
Many online screen recording tools include a built-in video editor to further enhance your videos with the click of a button. The editor can be used to trim, cut, add background music, and annotate your video. This makes it easy for you to produce professional quality screencasts, tutorial videos, product demos, and instructional guides.
Stopping
A lot of screen recording tools do not make it clear how to stop the recordings once you start. This is frustrating, especially when you want to finish the recording and share it on a platform. Movavi Screen Recorder is a reliable screen recording tool that makes this easy to do. It also makes it simple to edit and share your recordings.
You can also use QuickTime to record your screen on a Mac. Open QuickTime Player, click File in the menu bar or use the keyboard shortcut Command + Control + N to create a new screen recording. You can choose to record your entire screen or a specific portion of it. Options are also available to enable or disable the microphone, show mouse clicks during the recording (useful while making tutorial videos) and more.
Once the recording is done, a preview window will appear to let you see what you’ve recorded. You can then save it to your computer or delete it. Enable Screen Record
If something goes wrong during a screen recording, you can try using the Force Quit function on your Mac. This can be accessed from the Apple menu at the top left corner of your screen or the Ctrl+Alt+Esc shortcut. This will close the program and hopefully stop the recording. If this does not work, you may need to restart your Mac or contact Apple support.
Exporting
When you complete a screen recording, you can export it to use on another device. From the recording playback window, click the export icon. The Select a folder for exported recordings dialog appears. Enter a file name and select a destination folder, then click Save.
You can also export the source video for a step-by-step screencast from the fine-tuning editor. Right-click any slide that’s part of a step-by-step screencast and select Action Fine Tuning from the context menu that appears. To export the video, select Export Frame at Project Size or Export at Original Size and choose a folder location.
If you need to adjust your video, you can drag the starting and ending markers in the timeline. You can also use the previous and next frames buttons to move a specific frame along the timeline one at a time. You can also create a zoom using the timeline controls or by clicking the zoom timeline area.
If your video is too large for its intended display size, scaling may degrade the quality of the video. To avoid this, make sure that the canvas dimensions are the same as your recording dimensions. You can set the canvas dimensions, editing frame rate and audio levels in the project settings. You can also set a custom width and height for your recording using the Magnification dropdown. You can also customize your cursor settings. For example, you can disable mouse hover to prevent the cursor from disappearing when you click.
Leave a Reply