
How to Enable Screen Record on an iPad
Enable Screen Record iPad is an incredibly powerful feature for content creation. Whether it’s creating a tutorial video for a new app or capturing your latest gaming session to share with friends, there are many uses for this handy tool.
To use this feature, add the screen recording button to your Control Center. When activated, the icon will turn red and trigger a three-second countdown before the recording begins.
Enable Screen Record iPad is a straightforward process that allows you to capture and share activities on your device. Follow these steps to enable screen recording on your iPad.
Following These Steps
1: Ensure iPad Compatibility
Before proceeding, make sure your iPad is running iOS 11 or later. Screen recording is a feature introduced in iOS 11 and is available on compatible devices.
2: Access Control Center
Swipe down from the top-right corner of the iPad’s screen to open the Control Center. On iPads with Face ID, swipe down from the upper-right corner. For iPads with a Home button, swipe up from the bottom of the screen.
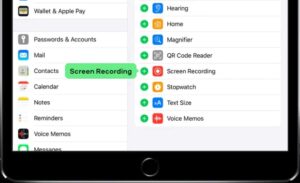
3: Locate Screen Recording Icon
In the Control Center, look for the Screen Recording icon. It looks like a solid circle inside another circle. If you don’t see this icon, you may need to add it to the Control Center by going to Settings > Control Center > Customize Controls, then tapping the “+” next to “Screen Recording.”
4: Tap the Screen Recording Icon
Once you’ve located the Screen Recording icon, tap it. A countdown (usually three seconds) will begin, indicating that the screen recording is about to start.
5: Confirm Microphone Settings (Optional)
After tapping the Screen Recording icon, a small menu will appear. If you want to include audio in your screen recording, long-press or 3D Touch the Screen Recording icon to open a menu. Here, you can toggle on or off the microphone audio. If you’re recording a tutorial or commentary, enabling the microphone is recommended.
6: Begin Screen Recording
Once you’ve configured the microphone settings (if needed), tap “Start Recording.” The status bar at the top of your iPad’s screen will turn red, indicating that the recording is in progress.
7: Perform the Actions to Be Recorded
After starting the recording, navigate to the app or screen you want to capture. Perform the actions you want to include in your recording.
8: Stop the Screen Recording
To stop the recording, tap the red status bar at the top of the screen. Alternatively, open the Control Center again and tap the Screen Recording icon (it will be pulsating). Confirm that you want to stop the recording.
9: Access the Recorded Video
Once you stop the recording, the iPad will automatically save the video to the Photos app. Open the Photos app, and you’ll find your screen recording in the Camera Roll or the “Screenshots” album.
10: Edit and Share (Optional)
If you want to trim or edit your screen recording, open the Photos app, select the video, and tap “Edit.” Make any necessary adjustments, and then tap “Done.” You can now share the video through various platforms or save it to cloud storage.
1. Go to Settings
Screen recording on an iPad is a powerful tool that transforms the tablet from a simple device for content consumption to one of creation. It opens up a wide range of possibilities in terms of how the tablet can be utilized for content creation across various domains, such as tutorial videos, product demonstrations, gaming streams, and even narrating processes.
To start a screen recording, swipe down from the top of the iPad to open Control Center and then locate the circular button for screen recording. A countdown of three seconds will begin, after which your iPad will begin to record whatever is displayed on the screen. To stop a recording, tap the red status bar in Control Center or use 3D Touch on the screen recording button. Screen recordings are saved as video files in the Photos app.
The built-in iPad camera is capable of recording audio alongside a captured video, but for better sound quality, it’s recommended to connect a Bluetooth headset or other external microphone before starting a screen recording. Likewise, the brightness of your iPad’s display should be adjusted for best results. Recordings with a low resolution or low frame rate may result in video distortion, which can spoil the overall experience for your viewers. Moreover, closing unnecessary apps and clearing the RAM can improve the performance of your tablet when recording.
2. Tap General
Enable Screen Record iPad lets you capture what happens on your tablet and record the audio from the speaker or mic. To turn on this feature, add the “Screen Recording” button to Control Center, and then swipe up from the bottom of your screen. Tap the button, and a three-second countdown begins before the recording starts. To stop the recording, either swipe up from the bottom of your screen or tap the red “Screen Recording” icon in the Control Center.
If you have vision loss or other impairment, you can use the accessibility settings to adjust the screen brightness and color. For example, you can choose to invert the colors on your screen for better contrast. Or you can choose to reduce the white point, which helps with visibility on an LCD screen. You can also set your preferred font size, zoom level, and keyboard layout.
You can also enable additional gestures, such as a four-finger pinch to open the multitasking bar or a five-finger swipe to go back to the home screen. And you can set how long the AssistiveTouch pointer remains active on a screen element or an area of the screen. You can even configure mouse keys and pointer style, and turn on drag lock. You can also enable Dwell Control, which allows you to perform a gesture by pressing and holding a finger on the screen for a certain amount of time.
3. Tap Device Management
Screen recording is a powerful tool that transforms an iPad from a mere device for consumption into a versatile tool of creation. It allows you to easily record the movement of your screen and speaker output, and you can share it for diverse purposes. In addition, it helps you transcribe, summarize and take notes of your videos and audio recordings, making it easier for you to communicate with your team, clients, and customers.
You can enable this feature on your iOS device with a simple swipe and tap. It’s a handy way to capture gameplay, show someone how to use an app, or record a bug that you want to report to Apple. It’s also a great way to create tutorials and presentations. The screen recording shortcut is located in Control Center, which you can open by swiping down from the top right corner of your iPhone or iPad. The icon looks like two nested circles. Once you tap it, a three-second countdown will begin. To stop the recording, you can either press deeply on the button or tap the red status bar at the top of the screen.
The default destination for your recorded video is the Photos app. If you’re using an iPad that’s connected to a business network, you may encounter MDM (Mobile Device Management). MDM is typically activated on work devices and prevents users from disabling the feature. To bypass MDM, you can connect your iPad to a personal Wi-Fi network or use a USB-Lightning cable.
4. Tap Screen Recording
You can enable screen recording on your iPad by using a built-in feature. To do so, swipe down from the top right corner of your device to open Control Center. Tap the gray Record button and wait for a three-second countdown before recording begins. The button will turn red when your recording is active. You can stop the recording at any time by pressing the red button or tapping the red status bar at the top of your screen.
Screen recording is a handy tool for creating tutorials, demonstration videos, and more. It can also capture in-app sound, which is useful for creating a more immersive experience when playing games or making video calls. To create the best possible quality, you should ensure that your device is charged and in a quiet environment free from distracting noises. You should also adjust the brightness of your screen for a more vivid image.
Depending on the purpose of your recording, you may want to add narration or background music to the video. This can help your viewers understand what you are saying and improve their learning experience. For optimal audio performance, you should use a microphone that is designed for mobile devices.
To view your recorded videos, go to the Photos app and select Screen Recordings under Media Types in the sidebar. You can also play the video directly from the app by selecting it and tapping the Play button.
Conclusion:
Enabling screen recording on your iPad is a useful feature for creating tutorials, sharing gameplay, or capturing any on-screen activity. By following these steps, you can quickly start and stop screen recordings and customize the audio settings to suit your needs. Remember that the ability to screen record may vary slightly depending on your iPad model and the version of iOS it is running.
Leave a Reply