How to Enable Screen Recorder on Your iPhone
Enable Screen Recorder are a powerful tool for strengthening communication, especially in remote settings. If you find yourself stuck in back-and-forth email chains or having trouble understanding coworkers, try using a screen recorder.
Screen recording is available on all iOS 11 devices with a built-in feature that you can access from Control Center. To start a video recording, swipe down from the top right corner and tap the screen record button.
Enabling the screen recorder on various devices and operating systems involves different steps. In this comprehensive guide, we’ll cover the process for Windows, macOS, iOS, and Android. Each platform has its own built-in screen recording capabilities, and we’ll walk through the steps for each one.
Windows:
- Using Xbox Game Bar:
- Press
Win + Gto open the Xbox Game Bar. - If prompted, click “Yes, this is a game” to enable Game Bar features.
- Click on the camera icon to start recording.
- Press
- Using Windows 10 Settings:
- Open Settings (
Win + I) and go to “Gaming.” - Select “Captures” from the left sidebar.
- Toggle on “Record in the background while I’m playing a game” and set your desired settings.
- Open Settings (
- Using OBS Studio (Optional):
- Download and install OBS Studio.
- Configure the settings, select your sources, and hit the “Start Recording” button.
macOS:
- Using QuickTime:
- Open QuickTime Player (
Cmd + Space, type QuickTime, and pressEnter). - Click on “File” and select “New Screen Recording.”
- Adjust settings and click the red record button.
- Open QuickTime Player (
- Using Shift + Command + 5:
- Press
Shift + Cmd + 5to open the screenshot toolbar. - Choose “Record Entire Screen” or “Record Selected Portion.”
- Click on the record button.
- Press
iOS (iPhone/iPad):
- Using Control Center:
- Open Control Center by swiping down from the top-right corner (iPhone X and later) or swiping up from the bottom (iPhone 8 and earlier).
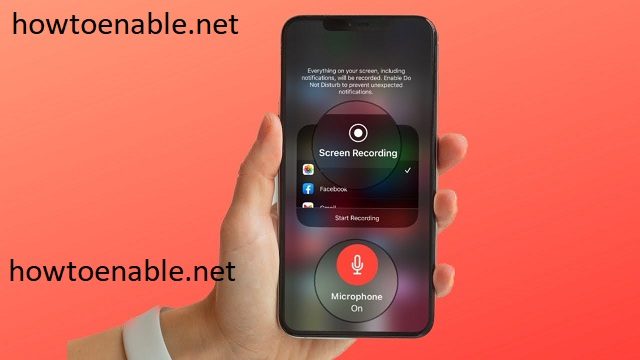
- Press and hold the Screen Recording button.
- Tap the microphone if you want to record audio.
- Using Screen Time:
- Open Settings and go to “Screen Time.”
- Tap “Content & Privacy Restrictions” > “Allowed Apps.”
- Enable “Screen Recording” under Allowed Apps.
- Using Third-Party Apps (Optional):
- Download a screen recording app from the App Store for additional features.
Android:
- Using Quick Settings:
- Swipe down from the top of the screen to open Quick Settings.
- Look for the Screen Recorder icon (if not present, tap “Edit” to add it).
- Tap the Screen Recorder icon to start recording.
- Using Google Play Games (Optional):
- Open the app and select a game.
- Tap the recording icon on the toolbar.
- Using Third-Party Apps (Optional):
- Explore screen recording apps on the Google Play Store for additional features.
Common Tips:
- Audio Settings:
- Ensure that your audio settings are configured correctly if you want to record system sounds or microphone input.
- Storage Space:
- Monitor your device’s storage space, as screen recordings can consume a significant amount of storage.
- Editing Tools:
- Use video editing software to refine your recordings if needed. Many platforms provide built-in editing tools.
- Privacy Considerations:
- Respect privacy laws and guidelines when recording screens, especially when capturing sensitive information.
By following these detailed steps, you should be able to enable the screen recorder on various devices and operating systems. Whether you’re on Windows, macOS, iOS, or Android, the built-in features or optional third-party apps provide flexibility for your screen recording needs.
1. Go to Settings
Enable Screen Recorder is a great way to record video content for training, customer support, marketing, or product demonstrations. These videos can also be repurposed for follow-up meetings, webinars, and social media posts. They provide full transparency and help employees and teams work asynchronously without having to meet face-to-face.
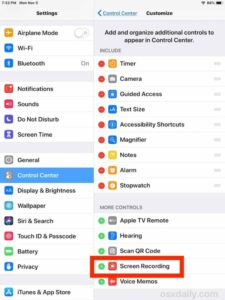
With the addition of a screen recording feature to iOS 11 and later, you can easily record every swipe, tap, and sound on your device. To enable the new feature, first open your Settings and swipe down to the Control Center. Then, scroll down to MORE CONTROLS and tap the green plus button next to Screen Recording.
After you’ve added the shortcut to your Control Center, swipe down (iPhone X or later) or up (iPhone 8 or earlier) and tap the Screen Recording button to start recording. A three-second countdown will start and the status bar at the top of your display will turn red when the recording is active. Once the recording is finished, you can view it in your Photos, Files, or other media viewing app.
If you’re using macOS Monterey/Catalina or 12, it’s a little more complicated to enable screen recording. If you can’t find the option in System Preferences, there may be an app that’s blocking it. Check the app’s permission settings and unlock it if necessary.
2. Go to System Preferences
One of the ways you can record your screen is to use QuickTime Player. This is a pre-installed program on all Mac computers and works well for recording both full and partial videos of your screen. The only downside to this method is that it doesn’t allow you to schedule a recording in advance.
You can enable the Screen Recording feature in MacOS by visiting System Preferences. Then, navigate to Security & Privacy and select the “Allow apps to access the camera and microphone” option. Once you do, you’ll see a list of all the apps on your computer that have been granted permission to record your screen. Toggle the switch next to each app to turn it on.
Once you’ve enabled the screen recording feature in System Preferences, you should see a small icon in your Control Center that looks like a red circle with a recording symbol on it. You can also add this button to your Control Center by opening the Settings app, swiping down on your phone (iPhone X and later) or up on your iPhone 8 or older and scrolling down to MORE CONTROLS. Then, tap the green + button next to Screen Recording.
When you click on the Screen Recording icon in your Control Center, you’ll be prompted to choose whether you want to record your whole screen or just a selected portion of it. You can also choose to include your computer’s microphone in the recording or mute it. When you’re done, press the Stop button in your menu bar or use the keyboard shortcut Command + Control + Escape to stop the recording.
3. Go to Security & Privacy
The screen recording feature on your iPhone allows you to capture what’s on your device’s display and share it with others. It’s especially useful when you need to show someone how to use a program, such as an email app or a website. To enable this feature, open Settings and then tap Control Center. Scroll down to MORE CONTROLS and then tap the green plus icon next to Screen Recording. You’ll be able to see who is currently using your device, as well as start and stop a recording.
You can also access the screen recording option from the QuickTime Player application on your Mac. This pre-installed tool will work with older versions of Mac OS, but it has limited functionality. You can also record your screen with a third-party tool, such as OBS Studio or Snagit. However, these tools can cause performance issues and pose security and privacy risks, so it’s important to choose a reliable tool that has good customer support.
Screen recording offers many benefits, but it’s important to understand how it works so you can protect your privacy. When you record your screen, everything visible on your screen is captured, including your email if it’s open and any notifications that pop up during your recording session. This information can be shared with anyone, and it’s important to know how to prevent unauthorized screen recording.
4. Go to Screen Recording
Just like cleaning the house before guests arrive, your computer should be free of any unnecessary items before recording. That will make your video look clean and professional, and it will keep viewers focused on your content rather than a messy desktop. You can also use a stylus or Apple Pencil to make your touch inputs (tapping, swiping, and long pressing) more precise.
All iPhones with iOS 11 or later have a built-in screen recorder. To enable it, open the Settings app and tap Control Center. Tap the green plus button next to “Screen Recording” to add it to the list of Included Controls. Then, open the Control Center by swiping down from the top-right corner (iPhone X or later) or swiping up (iPhone 8 or earlier). Tap on the red Recording button or the three-second countdown to start recording. When you’re done, tap on the red Recording button or the red status bar at the top of the screen to stop recording. Your video will then appear in the Photos app.
You can also enable the screen recorder on Mac by opening System Preferences, tapping the Build Number seven times, and turning on Feature Flags for “settings_screenrecord_long_press.” This is a security measure that’s enabled to protect your privacy and prevent third-party apps from gaining access to your microphone or camera.
Leave a Reply