
How to Enable Screen Record on Mac
Enable Screen Record On Mac a video tutorial for your coworkers or need to capture a software bug, the built-in tools on your Mac can help. However, Apple’s native tools can have problems.
Starting with macOS Catalina, Apple introduced new security measures to screen recording on Mac. You now need to grant permission for apps or browsers to record your screen.
Screen recording on a Mac can be a valuable tool for creating tutorials, capturing gameplay, or documenting software issues. Fortunately, macOS comes with a built-in screen recording feature called QuickTime Player, which is easy to use. In this guide, I’ll walk you through the steps to enable screen recording on your Mac.
Using QuickTime Player:
- Open QuickTime Player:
- Launch QuickTime Player from your Applications folder. You can also use Spotlight Search (Cmd + Space) to find and open it.
- Access the Screen Recording Feature:
- In the menu bar, click on “File,” and then select “New Screen Recording.”
- Configure Settings:
- A small screen recording window will appear. Before you start recording, you can adjust settings by clicking the arrow next to the record button.
- Choose your microphone source if you want to record audio. You can also select whether to show mouse clicks in the recording.
- Start Recording:
- Click the red record button in the center of the window to begin recording. You may choose to record the entire screen or drag to select a specific portion.
- Stop Recording:
- After recording, click the stop button in the menu bar, or simply press “Cmd + Control + Esc.”
- Save Your Recording:
- QuickTime Player will open the recorded video in a new window. To save it, go to “File” and choose “Save.” Pick a destination and a file name for your recording.
Using the Screenshot Toolbar (macOS Mojave and later):
- Access the Screenshot Toolbar:
- If you are using macOS Mojave or later, press “Cmd + Shift + 5” to open the Screenshot Toolbar.
- Choose Screen Recording:
- In the toolbar, you’ll see options for capturing the screen or a selected portion. To enable screen recording, click on the “Record Entire Screen” or “Record Selected Portion” button.
- Configure Settings:
- Similar to QuickTime Player, you can configure settings such as microphone input and whether to show mouse clicks before starting the recording.
- Start Recording:
- Click the record button to start recording your screen.
- Stop Recording:
- Once you finish recording, click the stop button in the menu bar, or press “Cmd + Control + Esc.”
- Save Your Recording:
- After stopping the recording, you’ll be prompted to save the video. Choose a location and file name for your recording.
Tips and Additional Information:
- Useful Shortcuts:
- Start recording directly with “Cmd + Shift + 5” (macOS Mojave and later).
- Quickly stop recording with “Cmd + Control + Esc.”
- Audio Settings:
- If you need to record system audio, you may need to install additional software or use a third-party application.
- Editing Recordings:
- After recording, you can edit your video using video editing software like iMovie or Final Cut Pro, both available on the Mac App Store.
- Storage Considerations:
- Keep in mind that screen recordings can consume a significant amount of storage space. Regularly manage and clean up your recorded files.
- External Applications:
- If you require advanced features, consider third-party applications like Camtasia or ScreenFlow, which offer additional functionalities and editing capabilities.
By following these steps, you can easily enable screen recording on your Mac using the built-in tools, capturing and sharing your screen content effortlessly. Whether it’s for work, education, or entertainment, screen recording on a Mac is a versatile feature that can enhance your digital experience. Enable Screen Record On Mac
1. Turn on Screen Recording
Screen recording on macOS is available for both native and third-party apps. It can be enabled using QuickTime Player’s built-in hotkey features, or with a dedicated screen recording app like Movavi Screen Recorder.
To use the built-in macOS Screen Recording feature, open QuickTime Player and select File New Screen Recording. This opens a toolbar with a variety of options. Choose whether you want to record the entire screen or a specific portion of your screen. You can also choose to include audio, show mouse clicks, and more.
The default storage location for your screen recordings is the desktop, but you can change this in the Screen Recording toolbar’s settings. You can also stop your recording at any time by clicking the stop button in the menu bar. I can also press (Command) + Control + Escape to cancel a screen recording before it starts.
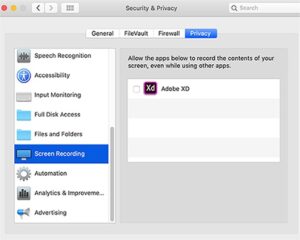
You can control which apps can record your screen or system audio. This can be done in the System Preferences app, under Security & Privacy. Select the “Privacy” tab and then click the “Screen Recording” option on the right side of the window. This will display a list of apps that can record your screen or system audio, and you can enable or disable them as desired. Keep in mind that any information recorded by third-party apps is governed by their own terms and privacy policies.
2. Go to System Preferences
If you have a recent Mac, you can natively record your screen without needing any third-party software. All you need to do is open the QuickTime Player app (which should already be installed on your computer), then click ‘File’ and ‘New Screen Recording.’ A dark gray recording window will appear – it can be configured to either record your entire screen or to just capture a specific window or area. You can even drag to adjust the size of the recorded area. Other options include choosing a storage location, setting a timer for the recording to start, and whether or not to show mouse clicks in the video. Enable Screen Record On Mac
While QuickTime does not have robust editing tools, you can still trim and save recordings through the menu bar. If you’re using an external microphone, make sure that it is disconnected from your computer before starting the recording. This will prevent accidental noise from your headphones or other external devices from being recorded into the video.
You may experience some issues with your recording, such as frame rate lag or audio distortion. This can be due to a number of reasons, such as overheating, having too many applications or windows open, or animations and effects that are active in the app being recorded. You can try closing all other applications and tabs, or reducing the resolution of your display in System Preferences to help improve recording quality.
3. Select Security & Privacy
When you click the Security & Privacy tab, a new pane opens that lets you configure your preferences for how secure your computer is. You can choose from options like requiring a password to log on or to change any system preference, locking your screen after a specified period of inactivity, or setting a lock message.
The Camera and Microphone settings here determine which apps are allowed to use your Mac’s camera, microphone, and whether or not to record audio with video. You’ll also want to match the bitrate to your video recording resolution. For example, 480p videos should be recorded at 500 Kbps and 720p at 1 Mbps. Using third-party tools, such as the free Mac app Handbrake can help reduce video file size without losing quality.
You’ll want to monitor this area closely and regularly. Look at the list of apps and ask yourself if they truly need full access to your camera, microphone, or the contents of your hard drive. You can check or uncheck each option as needed.
You can also use this pane to limit the amount of personal data that Apple shares with developers to improve security. I can even disable the sharing of crash and diagnostic information. You’ll need to have your Apple ID password handy to make changes here.
4. Select Screen Recording
Using the native screen recorder on your mac can save you time and hassle. It’s simple and easy to use, but it doesn’t offer the advanced features that many third-party tools do.
To launch the built-in screen recording tool, click on File in the QuickTime Player app or press Command + Shift + 5. The screen recording window will open. Select ‘Record Entire Screen’ or ‘Record Selected Portion’. If you want to include mouse clicks in your video, check ‘Show Mouse Clicks in Recording’. ‘Device audio’ will be recorded, and if you also want to record your voice, click on the microphone icon next to the red Record button to select a mic.
Your screen recording will now begin, and your entire Mac screen (or the selected portion of the screen) and any sound playing from apps or browsers on your mac will be captured in a video file. You can stop the recording at any time by clicking the red button in the window or by pressing Command + Control + Escape.
Screen recording is a useful feature to enable on your mac, especially if you create content for others. It’s perfect for teaching, explaining complicated ideas, giving tutorials and presentations, or collaborating with team members who are not in the same location or time zone. To get started, you can follow the steps above or try out an all-in-one screen recorder for mac like Awesome Screenshot & Recorder from Set app.
Leave a Reply