How to Enable Screen Record on iPhone 12
Enable Screen Record On iPhone 12 is a handy tool for content creators. Whether you’re making tutorial videos or commentary on video games, a screen recorder can make the process much easier.
To enable the feature, go to Settings and scroll down to “More Controls.” Tap the green plus button next to Screen Recording to add it to your Control Center.
Enable Screen Record On iPhone 12 is a straightforward process that can be completed in a few simple steps. Screen recording is a useful feature that allows you to capture and share what’s happening on your device’s screen, whether it’s for demonstrating a process, troubleshooting, or creating content. Here’s a detailed guide on how to enable screen recording on your iPhone 12.
Step 1: Access Control Center
Swipe down from the upper-right corner of the iPhone 12 screen to access the Control Center. The Control Center is a convenient hub for accessing various settings and features.
2: Locate Screen Recording Icon
In the Control Center, look for the Screen Recording icon. It looks like a small circle inside another circle. If you can’t find it, you may need to customize the Control Center to include the Screen Recording option.
3: Customize Control Center (Optional)
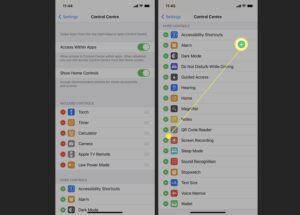
If the Screen Recording icon is not visible in the Control Center, you can add it by customizing the settings:
a. Go to “Settings” on your iPhone.
b. Scroll down and select “Control Center.”
c. Tap “Customize Controls.”
d. Find “Screen Recording” in the list of available controls and tap the green plus icon next to it to add it to the Control Center.
4: Start Screen Recording
Once the Screen Recording icon is in the Control Center, you can start recording your iPhone 12 screen:
a. Open the app or screen you want to record.
b. Access the Control Center by swiping down from the upper-right corner.
c. Press and hold the Screen Recording icon.
d. A menu will appear with options, including turning on the microphone for recording audio. Adjust your preferences and tap “Start Recording.”
5: Record Your Screen
Your iPhone 12 is now recording the screen. The status bar at the top of the screen will turn red, indicating that the recording is in progress. You can navigate through the device and interact with apps or features as needed.
Step 6: Stop Screen Recording
To stop recording, access the Control Center again by swiping down from the upper-right corner. You’ll see the red recording icon in the status bar. Tap on it, and a prompt will appear asking if you want to stop the recording. Confirm by tapping “Stop.”
7: Access Recorded Videos
Once you stop the recording, the video will be saved to your Photos app. You can find it in the “Recents” album. From there, you can edit, share, or delete the recording as needed.
Additional Tips:
- If you want to include audio in your screen recording, make sure to enable the microphone before starting the recording. This is done by pressing and holding the Screen Recording icon in the Control Center and toggling on the microphone.
- Screen recordings capture everything on your screen, including notifications. Be mindful of any sensitive information that might be displayed during the recording.
- You can edit the recorded video using the built-in editing tools in the Photos app or use third-party video editing apps for more advanced editing options.
By following these steps, you can easily enable and use the screen recording feature on your iPhone 12 to capture and share activities on your device. Whether you’re creating tutorials, showcasing features, or troubleshooting, screen recording is a versatile tool for various purposes.
How to enable screen record
There are times when you may need to record a video on your iPhone screen. Whether you’re creating a tutorial for others or simply need to save a funny moment, the iPhone’s in-built screen recording feature can be a lifesaver. The best part is that you don’t need to download an additional app to enable the feature. All you need to do is enable it in the Control Center.
To do this, open the Settings app and then tap “Control Center”. From there, select the plus sign next to “Screen Recording.” The button will then appear in the More Controls section of the Control Center. You can also tap the red icon to start a recording. The video is saved to the Photos app by default.
Unlike many Android devices, the iPhone’s screen recorder can be used without a microphone. However, if you want to record audio along with the video, there is a simple setting that needs to be changed.
To do this, slide down (or swipe up depending on your device) from the top-right corner of your iPhone’s screen and then tap the screen recorder icon. A three-second countdown will occur before your iPhone starts recording. If you want to stop recording, simply tap the red status bar or swipe down from the Control Center.
How to stop screen record
If you’ve accidentally activated your iPhone’s screen recording, there are a few ways to stop it. You can either swipe down on your iPhone’s screen and tap the screen record button in Control Center to turn it off, or you can use the three-second countdown inside of the screen record icon in Control Center to pause the video. If you want to record audio along with your screen recording, just tap the microphone button in Control Center.
You can also press the side button of your iPhone (the Sleep/Wake button on older models) to stop recording. Your recorded video will be automatically saved to Photos. If you want to save your video for later, you can find it in an album titled “Screen Recordings” in the Photos app.
Enable Screen Record On iPhone 12 is a powerful feature on the iPhone that allows you to create walkthroughs and tutorials for friends and family members. It’s also a great tool for mobile gamers to record gameplay footage from their favorite games. However, it can be easy to forget to turn off the recording feature or accidentally trigger it by swiping down on your phone’s screen. If you’re having trouble using your iPhone’s screen recording feature, check out the tips in this article to get it working correctly. If you still have trouble, you may need to free up some space on your iPhone or make sure that the Screen Recording feature is enabled in Settings > Screen Time > Content & Privacy Restrictions.
How to record audio
Whether you want to record a video tutorial or simply capture audio from your favorite app, screen recording is an easy and handy feature that’s built into iOS. You can enable this feature by adding it to your Control Center (a pull-down menu on the iPhone X and later, or a slide-up menu on older iPhone models).
To enable screen recording, swipe down from the top of your iPhone’s screen (or slide up from the bottom of the screen on older models). You’ll see a small circle with an “R” inside — that’s the screen recorder button. Tap it to start a three-second countdown, then tap again to stop the recording. The recording will be saved to your Camera Roll.
If you’d like to include sound while recording your screen, tap the microphone icon next to the “Screen Recording” button in Control Center. The microphone will be enabled automatically and the recorded audio will also include any sounds that are playing on your iPhone.
Once you’ve completed your screen recording, you can share it through Messages, AirDrop, or via any other method available on your iPhone. Your recordings are also saved to your Photos app in an album called “Screen Recordings.” Keep in mind that screen recording can quickly fill up your iPhone’s storage, so you might want to consider backing up your iPhone or clearing its storage regularly.
How to stop recording audio
There are many apps on the App Store that provide users with customizable screen recording tools, but Apple’s built-in feature is a much simpler option. In fact, you can enable it in just a few steps. First, make sure your iPhone is updated to the latest version of iOS. Once you’ve done that, swipe down from the top of your device’s screen (or swipe up from the bottom on older iPhone models) to open Control Center.
Tap the Screen Recording button in the Included Controls list. A green plus icon will appear beside the option; tap this to add it to your Control Center. Once you’ve added the option, you can start recording your screen by swiping down from the top of your device’s display. The screen will turn red when recording begins, and the clock in your Control Center will also turn red to indicate that sound is being recorded.
You can stop recording your iPhone’s screen by tapping the red status bar in Control Center or pressing firmly on the Screen Recording button. Keep in mind that recordings will take up space on your iPhone, so it’s important to back up or clear your iPhone storage if you frequently use this feature. Also, be aware that any notifications or phone calls you receive while recording will be heard by the person on the other end of the line.
Leave a Reply