How to Enable Screen Record on iPhone 13
Enable Screen Record On iPhone 13 are a powerful tool for content creators. You can use them to create how-to videos and infographics.
Using the built-in screen recording feature on your iPhone is easy. Simply swipe down from the top of your device and tap that circle button to start a recording. Once you’re done, you can stop the recording by tapping the red clock or bar again.
Enabling screen recording on the iPhone 13 is a straightforward process that allows you to capture and share what’s happening on your device. Follow these steps to enable screen recording on your iPhone 13.
Follow These Steps
- Access Control Center: Start by accessing the Control Center, which is a menu that provides quick access to various settings and features. Swipe down from the top right corner of the screen on iPhone models with Face ID or swipe up from the bottom of the screen on iPhone models with a Home button.
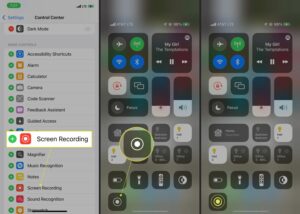
- Locate Screen Recording Icon: In the Control Center, look for the screen recording icon. It resembles a small circle with a white dot inside. If you don’t see it, you may need to customize the Control Center to include the screen recording feature.
- Customize Control Center: If the screen recording icon is not visible, you can add it by going to Settings > Control Center > Customize Controls. Find “Screen Recording” in the list of available controls and tap the green “+” button next to it to add it to the Control Center.
- Start Screen Recording: Once the screen recording icon is in the Control Center, tap on it. A countdown of three seconds will begin, giving you a moment to prepare. After the countdown, your iPhone will start recording the screen.
- Control Center Indicators: While recording, the status bar at the top of the screen will turn red, indicating that the screen recording is in progress. You’ll also see a timer showing the duration of the recording.
Following These Steps
- Pause or Stop Recording: To pause the recording, open the Control Center again and tap on the red recording indicator. A menu will appear, allowing you to pause or stop the recording. Tap “Stop” to end the recording.
- Save the Recording: Once you stop the recording, a notification will appear, and the recorded video will be saved to your Photos app. You can find it in the “Recents” album.
- Access Recordings in Photos: Open the Photos app and navigate to the “Recents” album to find your screen recordings. From there, you can edit, share, or delete the recordings as needed.
- Record Audio: If you want to record audio along with the screen recording, long-press or 3D Touch the screen recording icon in the Control Center. This will open a menu that allows you to turn on or off the microphone audio.
- Set Microphone Preferences: If you enable microphone audio, your iPhone will record both system sounds and your voice through the microphone. You can change the audio source by tapping the microphone icon in the screen recording controls.
- Edit Recordings: If you need to make edits to your screen recordings, you can use the built-in editing tools in the Photos app. Trim the video, add annotations, or make other adjustments as needed.
- Share Screen Recordings: Once you’re satisfied with your screen recording, you can share it with others. Open the recording in the Photos app, tap the share icon, and choose the platform or app through which you want to share the video.
How to enable screen record on iPhone 13?
Screen recording is a very useful feature on an iPhone, whether it’s to capture critical moments in games, demonstrate actions on your phone, or debug software and websites. To enable screen recording on your iPhone 13, you can use the built-in video recorder or third-party apps. If your screen recording isn’t working, try restarting your phone or updating the operating system.
The iPhone 13 has a built-in video recorder that lets you capture videos and audio from your device’s screen. To enable it, you can add the feature to your Control Center by going to Settings and tapping “Control Center.” Once you’ve added the function, you can open your Control Center, tap the circular ‘Screen Recording’ button, and start recording. When you’re done, you can exit your Control Center and find the file in your Camera Roll. If you need to edit your recordings, you can do so with powerful video editing software.
Step 1: Go to Settings
Enable Screen Record On iPhone 13 is a great way to capture critical moments in games or demonstrate how to use apps and software. Screen recordings also come in handy when debugging websites or programs. To enable screen record on your iPhone, go to Settings. Then, select Control Center and tap Screen Recording. You’ll see a red status bar that indicates when the recorder is in use. After the timer runs out, the screen recording is saved to your photos and videos app.
Swipe down from the top right of your iPhone 13 to access a menu of shortcuts to everything from the phone’s flashlight to nearby AirPlay devices. You can vet these shortcuts and configure how they’re accessed from the Control Center in your iOS Settings.
One feature that you might want to adjust is the True Tone display on your iPhone 13. This setting matches the brightness of the display to the ambient light, so your screen looks more natural in any environment.
You can add more shortcuts to the Control Center by visiting your Settings, selecting General, and then tapping Customize Controls. Then, you can add more icons or reorder the ones you have. You can also change other settings in this panel, such as turning cellular data on or off and seeing cellular data usage. You can even set which apps and services use cellular data, and you can turn on a feature that alerts you when you’re about to exceed your cellular plan limit.
Step 2: Tap Control Center
If you’re looking for a simple and effective way to record what happens on your iPhone 13’s screen, you don’t have to look far. The device has a built-in screen recording function that lets you make videos of every swipe, tap and sound you’re making. To enable the function, head to Settings, then look for Screen Recording in the list. If the feature isn’t already available, click the green plus icon to add it.
When you’re ready to start recording, simply open Control Center by swiping down (iPhone X and later) or up (iPhone 8 and earlier). You should see a grid of icons. Tap the one that resembles a circle inside another circle, and iOS will start a three-second countdown. To stop the countdown, tap the screen recording button again or directly tap the red clock or bar at the top of the screen.
Whether you want to record a video of your gameplay or use the feature as a tutorial tool, this handy iPhone hack is sure to come in handy. You can find the feature by swiping down from the Home screen or lock screen, and you can also customize the Control Center to include your preferred options. If you’re having trouble enabling this feature, try following the tips in the article above or contact Apple Support for more help.
Step 3: Tap Screen Recording
Screen recording allows you to capture what happens on your iPhone’s screen, including audio. To start a screen recording, swipe down (iPhone X and later) or up (iPhone 8 and earlier). You’ll see a red clock or bar at the top of your screen, which will stay on for three seconds until you stop the recording. You can also tap the red button in Control Center to stop a recorded video.
You can use screen recordings to demonstrate something on your iPhone or to capture video for a tutorial. The resulting video will appear in your Camera Roll and can be edited using your iPhone’s video editing tools. The length of a video you can record depends on your iPhone’s storage availability.
If you’re having trouble with your screen recording, try restarting your phone. If the problem persists, you can also try updating your iOS software.
You’re looking for a more flexible solution, there are several third-party apps that offer multiple functions for your screen recorder. Wonder share Demo Creator, for example, offers diversity with efficiency and is available for both Mac and Windows. It supports a wide range of video formats and frame rates. Its advanced editing features allow you to trim and crop videos, add music, insert text, and more. You can even use your videos to create GIFs, which are perfect for sharing on social media.
Summary
Enabling screen recording on the iPhone 13 is a simple process that involves accessing the Control Center, adding the screen recording icon if necessary, starting the recording, and managing settings such as audio preferences. The recorded videos are then easily accessible in the Photos app for further editing or sharing.
Leave a Reply