
How to Enable Screen Record on iPhone 8
Enable Screen Record On iPhone 8 Recording a video on your iPhone can be super useful. Maybe you want to show your non-tech-savvy family member how to use a feature or capture your best mobile gaming moment for your friends to applaud.
Or maybe you need to troubleshoot an issue within an app and documenting the process is easier with a screen recording. Here’s how to enable the screen record feature on your iPhone.
Enable Screen Record On iPhone 8 is a straightforward process, and it can be a useful feature for capturing your device’s display for various purposes. Here’s a comprehensive guide with step-by-step instructions.
Step 1: Access Control Center
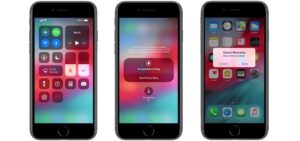
Swipe up from the bottom edge of your iPhone 8 screen to open the Control Center. If you’re using an iPhone with Face ID, swipe down from the top-right corner of the screen.
2: Locate Screen Recording Icon In the Control Center, look for the screen recording icon. It resembles a small circle surrounded by another circle. If you don’t see it immediately, you might need to swipe left or right to access additional Control Center panels.
3: Customize Screen Recording Settings (Optional) Before initiating the screen recording, you can customize some settings. Press and hold the screen recording icon until a menu appears. Here, you can enable or disable the microphone for recording audio, toggle on or off the inclusion of your FaceTime camera, and set the recording quality.
- To enable or disable the microphone: Tap on the microphone icon to toggle it on or off. When the microphone is on, it will turn red.
- To include or exclude your FaceTime camera: Tap on the camera icon to switch between including or excluding the front camera. If the camera icon is highlighted, it means the front camera is included.
- To set the recording quality: Tap on the “Start Recording” option. A menu will appear where you can choose the desired recording quality (720p or 1080p at 30 fps). Select your preferred option.
4: Start Screen Recording
Once you have configured your settings, tap the “Start Recording” button. A three-second countdown will begin, giving you time to navigate to the screen or app you want to record.
5: Record Your Screen Once the countdown finishes, the screen recording will commence. You’ll see a red status bar at the top of your iPhone, indicating that the screen recording is in progress.
6: Stop Screen Recording To stop the screen recording, open the Control Center again (by swiping up or down, depending on your iPhone model) and tap the red recording indicator at the top of the screen. Alternatively, you can tap the red status bar to stop the recording.
7: Access and Edit the Recording (Optional) After stopping the recording, you will receive a notification that the screen recording was saved to your Photos app. You can access the recording from the Photos app, and if needed, use video editing tools to trim or enhance the recording.
8: Share or Save the Recording From the Photos app, you can share the screen recording via messages, email, or social media. You can also save it to your iCloud Drive or other cloud storage services.
9: Troubleshooting Tips If you encounter issues with screen recording, ensure that the feature is enabled in your iPhone settings. Go to “Settings,” select “Control Center,” and make sure “Screen Recording” is included in the “Included Controls” section.
1. Open Control Center
Enable Screen Record On iPhone 8 the screen of your iPhone is an easy way to create tutorial videos, document bugs in apps and capture game sequences. You can also use the feature to document a FaceTime call with friends or an important meeting.
Depending on your iPhone model, you can open Control Center by swiping up from the bottom of the screen (iPhone X and later) or down from the top of the display (iPhone 8 and earlier). Once it’s open, look for the Screen Recording button in the upper-right corner of the iPhone display; it will have red highlights when it’s active.
When you tap the Screen Recording button, a three-second countdown starts and your iPhone’s microphone activates to capture sound from around the device. You can mute the microphone during a screen recording by tapping the button again, or you can stop your iPhone’s recording at any time by pressing it again.
Once you’re finished with your screen recording, you can share it with anyone who has access to your Photos app. You can also send your recording using Messages or AirDrop. To share your recording, find it in the Photos app and tap the share button. It looks like a box with an upward arrow.
2. Tap the Screen Recording button
Screen recording is a handy feature that can be used in many situations. For example, if your non-tech-savvy family members want you to show them how to use an iPhone feature but you can’t be there to help, you can record yourself on video to send them a tutorial. Or if you’re an aspiring mobile game streamer, you can capture gaming sequences to share with your followers.
To enable the feature, swipe up from the bottom of your iPhone to open Control Center and tap the Screen Recording button. A three-second countdown will display inside the button before it begins recording your iPhone’s screen and any sound that your iPhone’s microphone picks up. Once you’re done, you can either exit Control Center or tap the red status bar at the top of your iPhone to stop recording.
You can also disable the microphone when you’re using a specific app, which is useful for cases where you need to record a video but don’t want to capture any audio. You can find your recorded videos in the Photos app. If you’d like to move the video to another location, tap and hold on the video and select the Share icon, which looks like a box with an arrow going out of it.
3. Wait for three seconds
If you’re teaching your mum how to use her new smartphone, a simple video showing off your latest game or simply want to capture a moment to look back on, iPhone 8 and 8 plus make it super easy.
The only catch is that the red status bar will remain visible wherever it is – a small price to pay for a native screen recording tool that’s quick and easy to access. It will also record anything you hear through the headphones, including notifications and phone calls, so be mindful about what you’re recording.
Before iOS 11, the only official way to record an iPhone’s screen was to hook it up to a Mac or install unofficial apps that were complicated to set up and use. Thankfully, native screen recording has now arrived for all Apple devices.
To enable the feature, open Settings, then tap “Control Center.” Tap Customize Controls and look for Screen Recording in the More Controls section, then tap the green + icon to add it. Once you have it added, swipe down on your device to open Control Center and tap the Screen Recording button to start your recording. You can stop your recording at any time by opening Control Center and tapping the screen recording button or the red status bar at the top of the screen.
4. Tap Stop
If you decide you no longer need to record your screen, simply swipe down from the top of your iPhone (iPhone X and later) or up from the bottom (iPhone 8 and earlier) to open Control Center. Tap the Screen Recording button, hang tight for three seconds, and then tap Stop.
There are a number of reasons why you may want to use your iPhone’s screen recording feature. Perhaps you’re working on a project and want to record your progress, or maybe you have some good news to share with a friend and would like to document their reaction. Screen recording can also be helpful when troubleshooting a problem within an app.
The ability to record your iPhone’s screen is an excellent feature, but it’s not available in every situation. If you need to record an app that doesn’t have a built-in feature, there are a number of applications available on the App Store that can provide this functionality. You can find your video in the Videos folder or in a specific album.
Summary
Enabling screen recording on your iPhone 8 involves accessing the Control Center, customizing settings if necessary, starting and stopping the recording, and managing the recorded content through the Photos app. This feature is versatile and can be valuable for creating tutorials, capturing gameplay, or troubleshooting issues on your device.
Leave a Reply