
How to Enable Another User in Windows 10
If you’re wondering how to enable another user on your Windows 10 computer, you’ve come to the right place. In this article, we’ll go over how to disable the Fast User Switching feature, change the settings of a specific user, hide the username from the lock screen, and add a new user without a Microsoft account. Regardless of the reason for disabling this feature, this article will help you make the most of your new Windows 10 PC.
If you’ve encountered slow computer performance because you frequently switch between multiple accounts, you may wonder how to disable the Fast User Switching feature in Windows 10. To do this, first go to the Control Panel > Administrative Templates > System and double-click the option that says Enable Fast User Switching. Next, save the change and exit the Local Group Policy Editor. After you’ve disabled this feature, you can enable it again Google.
First, you need to open the Registry Editor. To open the Registry Editor, type’regedit’ or copy the string into the address bar. Then, create a new folder named System and name it Hide Fast User Switching. You can also access this registry key by right-clicking on an empty space in the System folder and selecting “Hide Fast User Switching.”
Changing A User’s Account Settings Windows 10
To change the type of a user account, you need to open the Computer Management tool. Navigate to Users and Groups, and then click on the appropriate type of user account. In the drop-down menu, click the appropriate type. Then, select the option you want for the selected user account. For example, if you want to change a user account from Standard to Administrator, you should click on the Type option and then click on the appropriate button to change the type of the account.
Once you have logged in to the computer, select the Accounts tab. You will find the other user accounts under the Family and other users section. From here, you can change the type of the user account. If you want to change the account type, click on “Change account type.” Then, select the appropriate option. If you want to change the account’s permissions, click on the “Settings” button.
Hide The Username On The Lock Screen In Windows 10
There are several ways to hide the username from the lock screen in Windows 10. One of the easiest is to edit the registry. The dword “dontdisplay” is a 32-bit value that is created in the system registry and stored in the Winlogon key. To hide the username, you can change the value data from 0 to 1.
To make the lock screen not show your name and email address, you can change the registry settings. The dword ‘don’t display last username’ controls whether the last user’s name is displayed on the sign-in screen. Change it to 1 or 2 and your Windows 10 system will no longer display the last user’s name.
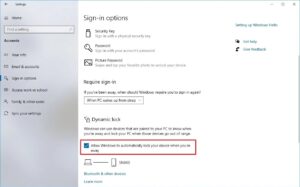
In Windows 10, you can hide the username on the lock screen by changing the “Default” setting to hide the name by default. The same functionality can be found under “Settings”>Accounts>Sign-in options”.
Adding A User Without A Microsoft Account:
If you want to add a user to your computer without using a Microsoft account, follow these steps. First, go to the “Users” section of the Control Panel. Next, click “Add a user.” You will be asked to enter an email address, sign-in information, and a password. Once you enter the required information, you can add the user. The new account will be a standard user by default, but you can upgrade it to an administrator later.
Follow This Steps:
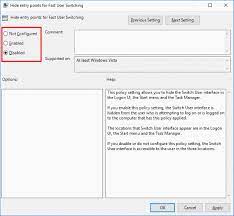
- In Local Group Policy Editor, click on Local Computer Policy, go to
- Computer Configuration > Administrative Templates, and select the System/Logon. *
- Double click on the Entry Points for Fast User Switching, set it to enable, and click OK.
- Then restart the system and check if that restores the “other user” option.
Once you’ve signed in to your computer, you’ll see a window asking you to sign in with your Microsoft account. If you don’t have a Microsoft account, you can skip this step and choose to add the user without a Microsoft account. Next, fill out the User Name and password hint. The password hint will remind you to use a certain character when you sign in.
Leave a Reply