
How to Enable Maintenance Mode in WordPress
When making changes to your enable maintenance mode in WordPress site, you may want to temporarily hide the site in maintenance mode. Using a staging environment allows you to test new plugins or themes without having to deal with downtime. This feature is particularly useful for testing plugins and themes. If you’re working on a complex project, it may take a few weeks to complete all the necessary steps. Activate maintenance mode before making any changes to your WordPress website.
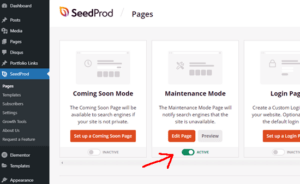
The best way to enable maintenance mode on your WordPress website is to install a maintenance plugin. This plugin will give you complete control over your maintenance page and will allow you to customize it to your preference. You’ll find an example of a maintenance plugin in Under Construction. Once you install the plugin, simply click on the “Activate” button in the corresponding section. Once you’ve activated the plugin, you’ll need to configure your maintenance page Google.
Activating maintenance mode in WordPress is easy and straightforward. After installing a plugin, you’ll need to select it in the Plugins tab. You’ll need to have the same permissions as you would in any other plugin. After installation, you should click “Save Changes” to save your changes. Once you’ve completed the maintenance page, you can then edit content and the CSS style sheet. You can also edit the meta title and description and add a favicon.
How Do I Setup A WordPress Maintenance Page:
Activating maintenance mode in WordPress isn’t very technical. Anyone can do it. However, you should know that manual changes to your WordPress site can break the website, so it’s important to create a backup before proceeding with the maintenance process. In addition to the plugin, you can create a backup using Blog Vault to prevent your site from being damaged. After you’ve made a backup, activate maintenance mode in WordPress by following the instructions on your dashboard.
Activate maintenance mode in WordPress in the plugins section. You’ll see the maintenance page in the admin panel after clicking on the “maintenance” tab. During the maintenance process, the changes will be visible to visitors logged in. Once the changes have been made, the maintenance page will be published. You’ll be notified by email and will be able to access the live site. After the installation, you’ll be prompted to enter the maintenance page in your browser.
How Do I Get My Website Out Of Maintenance Mode:
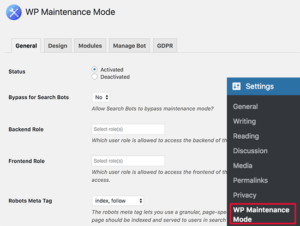
By enabling WP maintenance mode, you can give your users full access to your site during the maintenance process. You can set user roles by clicking the “Admin” tab in your dashboard. This will enable admins to access the dashboard and edit the content of the website. You can also add opting pop ups and opting boxes on the maintenance mode page. This feature makes it possible to create landing pages on your website without any interruption in the workflow of your business.
Once you’ve enabled maintenance mode, you can customize it to meet your unique needs. You can choose a custom design for the maintenance mode page. You can also customize the message text by adding an opting box or a widget. I can also customize the background color and image of the maintenance mode page. Once the maintenance period is over, you can switch the site back to normal. Then, you’re ready to start implementing your new changes!
How Do I Activate My WordPress Website:
Once you’ve enabled maintenance mode, you can set up your website to automatically update your content every day. This will keep your site up to date and make it easier for your visitors to navigate. You can also customize the look of the maintenance mode page to match your branding. A good way to do this is by adding a custom opting form to the page. It will automatically appear in the maintenance mode page when it is ready.
Activate Maintenance Mode:
- Log in to the WordPress administration panel.
- Browse to the “Settings -> WP Save Mode” page.
- In the “General Settings” section, change “Status” to “Default”.
- Click the “Save Settings” button.
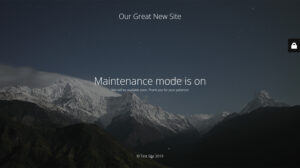
Once you’ve enabled maintenance mode, you’ll need to use the customizer plugin to create the splash page. This plugin allows you to create a unique splash page, which looks like a basic web page. It’s not the same as a custom theme, so you’ll need to add your own content if you want to make a splash. A page that’s in maintenance mode will appear as a simple blank screen.
Leave a Reply