How to Enable HTTPS on WordPress
There are two basic methods of forcing HTTPS on a WordPress website. The first method requires you to install an SSL plugin on your site. This will force HTTPS on your site. Alternatively, you can use the plugin’s manual HTTPS settings to force HTTPS. If you don’t want to download an SSL plugin, the easiest way to enable HTTPS is to download the free version of WordPress. This will automatically set the SSL on your site.
In order to make your WordPress site HTTPS-secured, you will need an SSL certificate. You can also download a free SSL plugin and install it on your site. Once the plugin is installed, you can start implementing HTTPS on your WordPress site. This method is the most comprehensive and most convenient, but it doesn’t cover every little detail. While it is the most complicated method, it will result in a faster loading website with fewer errors Google.
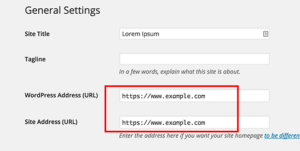
After you have installed an SSL certificate, your WordPress website should be encrypted with the proper security protocol. If your website does not have a SSL certificate, you should first change your site’s address. You should change the URL address to something like https://www.wp-com/. You can also update your Google Analytics and check whether your site is secure. When you have finished this step, your WordPress website will be ready for visitors.
WordPress HTTP To HTTPS Redirect Access:
Once your website is secure, you should use a SSL certificate for it. If your WordPress site already has an SSL certificate, you should install it on your domain. After the SSL certificate has been installed, you can then enable HTTPS on WordPress and force HTTPS on your website. Once your website is secured, your users will be able to make secure online transactions. However, you must ensure that you have a valid SSL certificate for your WordPress site.
Once you have enabled HTTPS on your WordPress site, you should make sure that your visitors will automatically land on the HTTPS version. Otherwise, it will cause duplicate content issues, which are bad for SEO. Additionally, you should test the SSL implementation by using a tool such as SSL Test. This tool will give you a general score and details of any problems you might have encountered. If you encounter any, you can make them known in advance.
Free SSL Certificate WordPress:
Once you’ve installed the SSL plugin, you’re ready to install the HTTPS plugin on your WordPress site. It will then redirect all of your WordPress pages to HTTPS. If you’ve installed the plugin, it will automatically enable HTTPS everywhere on your website. Alternatively, you can opt for Always-On SSL on your WordPress site, which will allow HTTPS on your entire website. This requires you to install a 301 redirection to your WordPress installation.
WordPress Force HTTPS Without Plugin:
Alternatively, you can enable HTTPS on WordPress for all of your website’s pages. Once you’ve enabled HTTPS, you’ll need to delete any caches you’ve installed on your site. You’ll also need to disable a caching plugin on your WordPress site. In addition to deleting cached pages, you can also change the default setting for all WordPress themes. You’ll need to do this as part of the plugin’s instructions.
WordPress Using A Plugin:
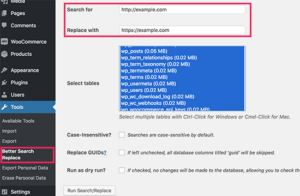
The plugin will take care of everything including mixed content errors. Here is what the plugin does behind the scenes:
- Check the SSL certificate
- Set up WordPress to use https URLs
- Set redirect from HTTP to HTTPs
- Check the URLs of your content that we are uploading from unprotected HTTP sources
- and try to correct it.
Depending on which caching plugin you use, you’ll need to install the HTTPS plugin. If you don’t want to install a plugin, you can also manually enable HTTPS in WordPress. If you choose to install a plugin, you’ll need to enable it in your WordPress admin panel. This will automatically force HTTPS on your website’s pages.
Leave a Reply