
How to Disable Driver Digital Signature Enforcement in Windows 11
Driver signature verification requires every driver to be digitally signed by Microsoft before installing on your computer. You can enable driver signature enforcement windows 11 by following these steps. First, restart your computer and change the startup settings to disallow driver digital signature verification. Once done, the drivers in your computer will no longer require digital signature verification. Then, you can reinstall them. But you should make sure to backup your drivers before you do so!
If you’re having trouble booting your PC, one possible fix is to disable driver signature enforcement in Windows 11. Press the F7 key on your keyboard and choose Advanced options from the list. Press Disable driver signature enforcement in the Startup settings section. Click Restart. Now your PC should boot normally. When the next time you reboot, the driver signature enforcement will be enabled again. After this, you can install unsigned drivers without any problems Google.
Open the CMD or Advanced Boot Options and find the ‘Disable Driver Signature Enforcement’ option. Press F7 on your keyboard to disable Driver Signature Enforcement. Your computer will restart with the new setting in effect. To enable driver signature enforcement once again, simply run the following command in the CMD window:
How To Enable Driver Signature Enforcement:
In order to enable driver signature enforcement in Windows 11, you must first ensure that your drivers are signed. Signed drivers contain the publisher and all the relevant information that Windows needs to run properly. A digital signature enables Windows to detect changes to the package by comparing the original with the new version. All system files must be digitally signed by Microsoft. Windows will not run unsigned drivers on both 32-bit and 64-bit systems.
If you’re facing this problem, there’s a way to disable this feature. To enable driver signature enforcement windows 11, you can use the Advanced Boot Options in the Windows Settings app. The Advanced Boot Options window will show a “Test Mode” watermark when you’re in the Windows startup process. To activate the Test Mode, you need to open the Administrator Command Prompt. This can be opened by right-clicking the Start button and choosing “Administrator Command Prompt.” If you’d like to use PowerShell, you can open the same window and enter the command.
How To Disable Driver Digital Signature Verification:
How to disable driver digital signature verification in Windows 11. Basically, if you’re using a driver that’s signed by a third party, your PC will prevent you from installing it until it’s signed by an official certificate. You can disable this feature by pressing the “F7” key when starting your PC. You’ll be prompted with a warning message about unsigned driver software. Rather than clicking “OK,” ignore the message and select “Install this driver software anyway.” Once you’ve successfully disabled driver signature enforcement, your PC will restart automatically.
However, this process is not permanent. If you don’t need this feature in Windows, you can disable it temporarily or permanently from the Advanced Startup Options in Windows 11. This method works for all types of drivers. The first one is the easiest to do, while the second one is more difficult. The first method is a temporary one, but you’ll need to be patient if you don’t want it to remain permanently.
How To Disable Driver Signature Enforcement On Windows 10:
If you’re experiencing problems booting up your computer, one of the best ways to fix this problem is to disable driver signature enforcement on Windows 10. To do this, you’ll need to open the Advanced options menu on the Control Panel and then select Startup. From there, choose Disable driver signature enforcement and then click OK. If you’re having problems, you can also try pressing the F7 key to bypass the driver signature integrity check. Your computer will then boot normally, and driver signature enforcement will be enabled after you restart.
The reason for this is that many software and hardware programs don’t have digital signature authentication. Even if they do, drivers that have not been signed will be inaccessible. You can disable driver signature enforcement temporarily or permanently in Windows 10 by running the following command. You can also try this method to install unsigned drivers. If you don’t have a reliable driver, you can always try installing an unsigned driver.
How To Disable Driver Signature Enforcement On Windows 7:
There are two ways to turn off driver signature enforcement on Windows 7. One is to restart your computer and press the “F7” key. The other is to use the command line options. Both work in the same way. The first method disables driver signature enforcement while the other enables it on startup. However, it does not permanently disable driver signature enforcement. Once enabled, driver signature enforcement will prevent your PC from installing unsigned drivers.
You can also disable driver signature enforcement on Windows 7 by enabling the Secure Boot feature in the BIOS. You need to disable it from the BIOS. Alternatively, you can use a tool like Ready Driver, which is enhanced. This tool will automatically select Disable Driver Signature Enforcement. The bcdedit command will also work. You can disable driver signature enforcement on Windows 7 by following these simple steps.
How To Disable Driver Signature Enforcement On Windows 8:
If you have a device that requires drivers to be signed, you may want to know how to disable driver signature enforcement on Windows 8. This feature is enabled by default, but you can turn it off manually. First, disable the Secure Boot policy.
Select The Start Button:
- Click the Start button on the taskbar, hold down the Shift key and then click the Power button on the start menu. Next, click the Restart option.
- Your computer will restart as “Advanced Options.”
- In the list of options, select Troubleshoot tiles.
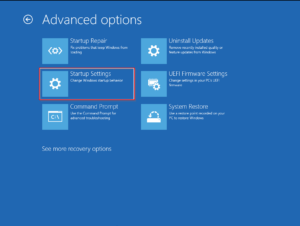
- Then click Advanced Options.
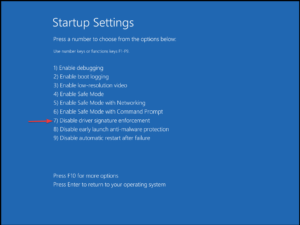
- Under “Advanced Options,” select Startup Settings.
- Then click the Restart button to restart your PC on the “Start Settings” screen.
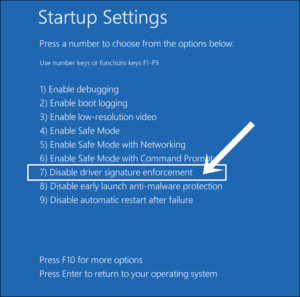
- After that, you will see “Startup Settings” in your monitor.
- Press the “7” key from the keyboard to turn on the “Disable driver signature” option.
To disable driver signature enforcement on Windows 8, you need to right-click the Microsoft Windows Start button and select “Search”. Next, choose Advanced Startup and click the Restart Now button. Then, click the Disable Driver Signature Enforcement option from the menu. Click OK to confirm the change. Now, you can install the USB driver from it. If you did not install it manually, you can use a dedicated driver installation software that will help you install all drivers.
Leave a Reply