
How to Disable Secure Boot on UEFI Mode
Are you wondering how to disable secure boot on UEFI mode? In this article, we’ll look at how to get to the BIOS settings and disable the feature. Once there, follow the steps to disable the UEFI mode. After that, it’s simple to disable Secure Boot mode on your PC. Here are some tips to help you. – Identify the BIOS tabs to locate the Secure Boot option.
If you want to disable UEFI Secure Boot, you will need to uninstall any compatible hardware first. Then, restart the computer. While booting, hold down the Shift key and click on the Restart button. Now, go to the BIOS and find the Security, Boot, and Authentication tabs. From there, click on the Secure Boot option, and click Disable. Then, reboot the computer Google.
The process of booting your computer is protected with Secure Boot, and it prevents the booting of unsigned operating systems and drivers. By limiting the access of malware to the bootloader, Secure Boot provides extra security. The bootloader is vulnerable to ransomware and rootkit attacks, and Secure Boot prevents them from entering the system. But, you can disable Secure Boot and still use your PC normally.
Should I Disable Secure Boot For UEFI:
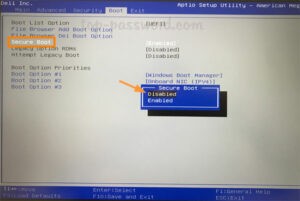
If you’ve installed UEFI on your PC, the first step to enable it is to access the BIOS setup. Press F2 to access the BIOS setup, then press F12 to view the boot selection menu. The next step is to change the Secure Boot setting to Disable. To do this, press F10 to exit the BIOS setup. To enable Secure Boot, click on the Advanced startup option and choose “Enable Secure Boot”.

If you’re using Secure Boot, make sure the kernel is signed with a valid UEFI Secure Boot key. Otherwise, your hardware might brick. In some cases, you may be unable to replace the platform key. Fortunately, there are workarounds that can help you disable Secure Boot. You can also use the EFI system console to Secure Boot. You can read more about enabling and disabling Secure Boot below.
How To Disable Secure Boot Windows 11:
Disabling the Secure Boot feature in the BIOS menu may prevent your PC from booting up. Then, to fix this problem, you have to remove any incompatible items from your PC and reset it. The resetting will delete all of your files and custom settings. If you need to keep these files, back them up on an external drive or the cloud. If you cannot boot your PC after disabling Secure Boot, contact your PC manufacturer for help.
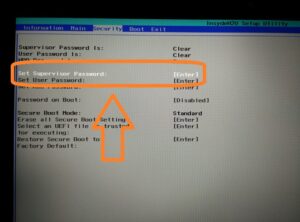
To disable Secure Boot, open your BIOS and navigate to the Security, Authentication, and Boot tab. Locate the Secure Boot option and press the arrow key to go to the Secure Boot section. Click Disable to disable this feature. If you wish to enable it again, you will have to restore your PC to the factory state. Then, restart the computer. The Secure Boot feature will no longer work unless you manually enable it.
How To Disable Secure Boot Windows 10:
Getting to the BIOS to disable secure boots is relatively easy. First, you must enter the password. After entering this, you can access various BIOS tabs and choose the Security tab. You can also find the option to Secure Boot under the Boot tab. After ensuring that the password is correct, press the Enter key. Alternatively, you can press F10 to continue. You may need to restore your PC to a factory state before attempting this process again.
Once you have entered the password, you can move on to the next step. You can disable Secure Boot by enabling the Secure Boot control option. Then, restart your computer and go to the BIOS. Select the System Configuration tab. From there, click Boot Options. You will see a Secure Boot option. Click on the Secure Boot control option. If you see an option that says “Active”, disable it.
How To Disable Secure Boot Ubuntu:
If you’re wondering whether or not using NNM mode after disabling Secure Boot is safe, then read on. Secure Boot is a security feature that prevents programs from loading kernel modules on the boot sector. Some versions of Linux (like Red Hat Enterprise Linux 8), however, prevent programs from loading at all, even in NNM mode. To enable NNM mode on Linux, you must disable Secure Boot first. However, if you Secure Boot, NNM modules will still be compatible with SELinux, as they comply with the rules of SELinux. Note that this method will require you to login as the root user and access the console.
Click The Start Button Click Settings:
- Open and press [F2] to enter the BIOS.
- Go to the [Security] tab> [Automatic Security Startup on] and set it as [Disabled].
- Go to [Save and Exit] tab> [Save Changes] and select [Yes].
- The [Security] tab and enter [Remove All Safe Unlock Flexibility] and select [Yes] to continue.
- Then, select [OK] to restart.
To use NNM mode after disabling Secure Boot, your PC must have the proper hardware and operating system. To do this, simply hold the F1 or F12 key during boot-up, or hold Shift while selecting Restart to enter the BIOS menu. The Secure Boot option is usually located in the Boot, Security, or Authentication tabs. You can also load the Secure Boot keys via the BIOS or Custom settings.
Leave a Reply