
How to Allow 3rd Party Cookies on Mac
Allow 3rd Party Cookies On Mac are created by domains other than the site you’re currently visiting. They’re often used for retargeting and to track cross-site browsing data.
They’re also considered an invasion of privacy and many users prefer to disable them. However, there are cases where it’s useful to enable them.
Enabling third-party cookies on a Mac involves adjusting settings in the Safari browser. While Safari prioritizes user privacy and security, allowing third-party cookies can be necessary for some websites and services to function correctly. Below is a step-by-step guide with detailed explanations.
Understanding Cookies:
Before delving into enabling third-party cookies, it’s essential to understand what cookies are. Cookies are small pieces of data that websites store on your computer. They serve various purposes, such as remembering your preferences, tracking your activity, and enabling certain website features. Cookies can be classified as first-party or third-party based on the domain they originate from.
- First-party cookies: These are set by the website you are currently visiting and are primarily used to enhance user experience.
- Third-party cookies: These are set by domains other than the one you are currently visiting. Advertisers and other third-party entities often use them for tracking and analytics.
Why Enable Third-Party Cookies: While blocking third-party cookies can enhance privacy and security, some websites rely on them for essential functionalities. Disabling third-party cookies might result in login issues, broken features, or disruptive experiences on certain sites. If you encounter such problems, enabling third-party cookies selectively can be a viable solution.
Enabling Third-Party Cookies in Safari:
Note: As of my knowledge cutoff in January 2022, these instructions are based on Safari version 14.0.2. Subsequent Safari updates might have introduced changes. Please refer to the latest Safari documentation for the most accurate information.
- Open Safari:
- Launch the Safari browser on your Mac. You can find it in the Applications folder or use Spotlight (Command + Space, then type “Safari”).
- Access Preferences:
- Click on “Safari” in the top menu bar.
- Select “Preferences” from the drop-down menu.
- Navigate to Privacy Settings:
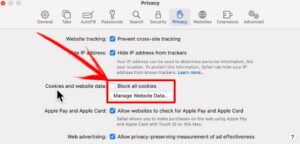
- In the Preferences window, click on the “Privacy” tab.
- Adjust Cookie Settings:
- Find the “Cookies and website data” section.
- From the “Block cookies” dropdown menu, select “Never” to allow all cookies.
- Manage Website Data:
- Click on the “Manage Website Data” button.
- This will open a new window showing a list of stored website data, including cookies.
- Enable Third-Party Cookies for Specific Sites:
- In the Website Data window, you can search for and selectively enable third-party cookies for specific websites.
- Type the website’s name in the search bar.
- When the site appears in the list, select it and click the “Remove” button. This will clear any existing data for that site.
- Now, revisit the website, and Safari will prompt you to allow or block cookies for that specific site. Choose to allow.
- Manage Website Data Globally:
- If you prefer enabling third-party cookies for all websites, you can do so by clicking “Remove All” in the Manage Website Data window. This action will clear all stored website data, and upon revisiting websites, Safari will prompt you to allow or block cookies.
- Restart Safari:
- After making changes, close and reopen Safari to ensure the new settings take effect.
Additional Tips:
- Keep Safari Updated:
- Regularly check for updates to Safari and macOS. Browser updates often include improvements to privacy features and security.
- Consider Alternative Browsers:
- If you encounter persistent issues or have specific privacy concerns, consider using alternative browsers like Google Chrome or Mozilla Firefox. Each browser has its cookie settings, and you can choose the one that aligns with your preferences.
- Use Private Browsing Mode:
- Safari offers a Private Browsing mode that automatically prevents websites from tracking your activity. You can activate it by selecting “File” > “New Private Window.”
By following these steps and understanding the implications of enabling third-party cookies, you can customize your Safari settings to balance privacy and functionality according to your preferences.
1. Safari
Cookies have gotten quite the bad rap in the media, but they are actually useful to many people. They allow websites to store your browsing patterns and make things like logging in, adding items to an online shopping cart, or remembering your location easier for you. They’ve also allowed for personalized data, such as adverts that match your interests, which can be helpful. However, the privacy concerns around them have earned them a bad reputation, and most web browsers, including Safari, block third-party cookies by default. This wikiHow will show you how to enable cookies on Safari for Mac, as well as on iPhones and iPads, using a simple process.
Open Safari on your Apple device and click the Safari menu, which is usually located in the top left corner of the screen. This will expand to reveal a number of Safari-specific options. Click Preferences on the list to bring up a window with a variety of options. Click the Cookie tab, then select Accept all cookies and website data or Choose a custom option. Make sure that the Prevent cross-site tracking checkbox is unchecked as well, if you want to prevent Safari from storing and using any third-party data on your computer.
With these tips, you can start surfing the web worry-free. If you’re looking for more tools to help you keep your Mac clean and safe, check out CleanMyMac X, AdLock, or Secrets (available in Setapp). With these apps, you can delete your browser history, passwords, and other sensitive information easily and quickly.
2. Chrome
Allow 3rd Party Cookies On Mac are a great way to make your online experience better. They let you sign in to sites without having to type your password every time, remember web preferences, and give you locally relevant information.
However, if you don’t want websites to be able to collect your data, then you can disable cookies. This can stop ads from appearing, but it could also prevent some websites from working properly. To avoid that, you can enable third-party cookies on mac.
Allow 3rd Party Cookies On Mac are a type of cookie that is set by domains other than the website you’re visiting. They can track your behavior across multiple sites in order to use that information for retargeting and ad serving.
To allow third-party cookies on Chrome, go to the Settings menu and select “Cookies and Site Data”. Uncheck the box next to ‘Block all cookies’ and check the one for ‘Cookies and other site data’.
Click ‘OK’ to save the changes. If you want to be more selective about the cookies that are enabled, you can go back to the settings menu and choose a custom option. You can also change the default setting to ‘Strict’ which will block all cookies except essential ones. This can make it difficult to log in to websites or to use some website features. This setting is recommended if you are concerned about the privacy of your data.
3. Firefox
Websites store a lot of your browsing information on your computer, known as cookies. They can be used to remember your web preferences, and even keep you logged into websites or services for longer periods of time. However, they have received such a bad reputation that many people want to disable them, or at least limit their use.
Firefox offers a few different ways to control cookies, but the most effective is by using its Privacy & Security panel. Open the menu by clicking the icon in the top right corner ( – Mac, – Windows) and select Settings. Then click the Privacy & Security tab and choose the Custom option from the Tracking Protection section.
The options are as follows: Standard — allows all cookies except for those from trackers; Strict — blocks all cookies, including those from third parties; and Custom — lets you pick the specific types of cookies you’d like to allow. You can also enable heuristics, which are rules that allow certain types of cookies when they’re needed for website functionality.
As you can see, it’s not difficult to control the cookies that are stored in your browser. However, it’s still a good idea to review and clear all this data on a regular basis. CleanMyMac X is a great tool for doing this, as it can scan all the web browsers installed on your computer and delete any unused or unnecessary files.
4. Edge
There are few topics that have caused as much discussion about internet browsing privacy as cookies. These reusable files are useful because they allow web browsers to remember your details and preferences, meaning that you don’t need to log in every time or enter your location each time you visit a new website. The downside, however, is that they also provide web and app owners with lots of reusable personal information about your surfing habits. And some of that data is shared with third parties in order to deliver more targeted adverts, which can feel intrusive at times.
Whether you want to see more targeted ads or not, there is a good chance that your Mac browser has cookies enabled. However, enabling them could result in you losing control of your browsing privacy, so it is important to understand how to manage and clear them. This is especially true of third-party cookies, which have earned a bad reputation thanks to their laissez-faire attitude towards letting through invasive trackers.
To avoid these problems, you need a reliable tool that can help you keep your browsers clean. The solution is to use Clean My Mac X, which can scan and delete all the cookies on your Mac, as well as all the other information that web browsers store. This includes browsing, search and download history, information about open tabs, cache files, autofill information, and passwords.
Leave a Reply