
How Do I Enable Virtualization on My PC?
To enable virtualization on your PC, you need to make sure that your BIOS allows virtualization. The BIOS allows you to enable and disable virtualization. To enable it, open the BIOS setup and look for the virtualization extensions. If they are disabled, you can enable them by following the steps listed below.
To enable virtualization on Windows 11, you must first enable the Hyper-V feature. This feature is located in the BIOS and is available for Windows 11 Home users. Once enabled, you can use the Hyper-V manager to run Virtual Machines. Once enabled, you must restart your computer to activate the feature Google.
You can disable Hyper-V by using the Control Panel or PowerShell. If you do not have access to this option, you can use the Windows Sandbox to remove the software. You can also use the system info utility to check for the presence of Hyper-V. Depending on the motherboard model, this process may be different.
How To Disable Hyper-V To Enable Virtualization:
After you’ve completed these steps, you can run a system scan to make sure all virtualization components are functional. If you do not, you can run a Windows PowerShell command to test if your system is ready to enable virtualization. The registry operation can be lengthy, so you should have a backup before starting it.
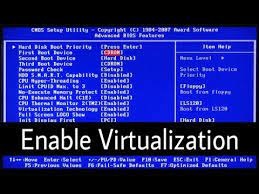
In order to enable virtualization on your motherboard, first go into your BIOS setup. You can typically find the virtualization option in the Chipset or Processor menu, but your BIOS may also have other names, such as Security Settings. Once you find it, save any changes before exiting.
How To Enter The BIOS Setup:
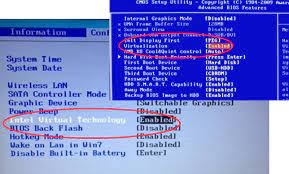
You may also see an option that says Enable Intel(R) Virtualization Technology (VT-X). If your computer is Windows-based, you must install and enable Microsoft Hyper-V using the Windows 10 operating system. This may be located under the “Advanced” processor configuration/security menu.
If you are unsure which BIOS version your motherboard is running, try searching on your computer’s manufacturer’s website for the latest BIOS version. The manufacturer’s website will have instructions on how to install the latest version. Once you’ve downloaded the new BIOS, you need to find an entry for “virtualization” and enable it. If your BIOS doesn’t have this option, your PC won’t be able to support virtualization.
How To Verify That Virtualization Extensions Are Enabled:
Once you have enabled virtualization, you can check it in Task Manager or the UEFI settings. However, the BIOS screen is different for each PC, and the steps for enabling virtualization will vary slightly from system to system. You can also use the ESC or Delete key to enter the BIOS setup.
The first step in enabling virtualization extensions on your PC is to find out whether your system has virtualization support. You can do this by going into your BIOS settings and looking for “virtualization extensions”. You’ll likely notice “VT” or “AMD-V” flags. These flags indicate whether your system supports hardware virtualization.
How Can I Enable Virtualization On My PC:
If you don’t see virtualization enabled in your BIOS, you should check the manufacturer’s website for updated BIOS versions. Follow the instructions provided there to update your BIOS. Look for ‘virtualization’ in the right-hand column. If you don’t see virtualization in your BIOS, your PC is not compatible with virtualization. However, there are a few simple steps to enable virtualization on your PC.
To enable virtualization in your computer, you need to make sure that your CPU has the necessary hardware acceleration settings for virtualization. For example, if you have an Intel processor, you can enable virtualization using the BIOS. AMD processors have a similar process.
How To View the Status Of Virtualization:
You can view the status of virtualization in Windows by going to the task manager and looking at the performance tab. By default, the virtualization section will show that virtualization is enabled. If it is not, you should check the BIOS for settings. It may vary from computer to computer, depending on your motherboard, chipset, and CPU configuration.
You can also use the Windows PowerShell command to view the status of virtualization. To run the command, press Windows Key + R. Then type the “system info” or “get-Computer Info” to get the system information. The Virtualization status will be displayed in the CPU category. If it is off, virtualization is disabled.
Click Start Settings:
- Go to the Security tab and press Enter in CPU settings.
- Select Intel(R) Virtualization Technology and press Enter.
- Select Enable and press Enter.
- Press F10.
- Press Enter to select Yes to save the settings and start Windows.
Alternatively, you can run the AMD-V detection utility or the Intel Processor Identification Utility to verify if your processor supports virtualization. The AMD-V detection tool will not work on Windows 8 or Windows 10.
Leave a Reply