
Enable Virtualization Without BIOS
To enable virtualization, you need to access the BIOS, which is the software that controls the hardware in your computer. You can enter the BIOS using the Command Prompt, which you can find in the Start menu. Then, type “system info” to get your computer’s system information. Make sure that the Virtualization Enabled in Firmware field is present, and then press Enter. Now you can enable virtualization and use it to your advantage.
If your PC does not have a virtualization feature, you can enable it manually. To do so, go into the BIOS settings and tap the ESC or Delete key two times within the first second of the screen. However, this method may not work for every model of PC. To enable virtualization without BIOS, you must install the latest Windows update on your PC. To enable virtualization, you should also install Windows 10’s Virtualization feature.
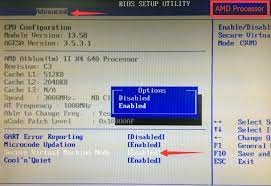
The steps for enabling virtualization depend on the version of your BIOS, and may differ a bit depending on your PC. In some cases, you can find the feature under the CPU Configurations or the System Configurations tab. You should find the Virtualization Technology option in the processor, Northbridge, or CPU overclocking section. To disable virtualization, you must restart your computer and install the latest drivers for your processor.
How Enable does Hardware Virtualization Work:
To enable virtualization without BIOS, you need to enter the BIOS settings. It can be found in various places on your PC, and enabling it will require you to have a bios key for your system. The key you use will differ from manufacturer to manufacturer, but you should know how to select the right one for your system. If you can’t find the right keys, you can use the F2 and Delete keys to do the task.

To enable virtualization, you need to open your BIOS. You need to access the processor tab, which can be located under the CPU or the motherboard. To do this, you need to go to the Performance tab of the Task Manager and locate the virtualization option. Once you’ve found this, you need to click on it to enable it. After that, you need to reload the BIOS.
Advantages of Hardware Enable Virtualization:
You can enable virtualization by going to the BIOS. You should be able to see the instructions if you have a BIOS key that allows virtualization. In order to enable virtualization, you have to enter the BIOS and UEFI settings for the hardware to support it. This is the easiest way to enable virtualization. But if you can’t find the appropriate keys, you can disable it in the BIOS.
To enable virtualization on your PC, you need to enable this option in the BIOS. The BIOS settings are found in the settings of your system, and you must know the exact version number of your system to enable it. To disable virtualization, you must disable the BIOS to run the program. If you don’t see the virtualization option, you need to remove the VM before installing it. Once you’ve enabled virtualization, it will be displayed in the task manager.
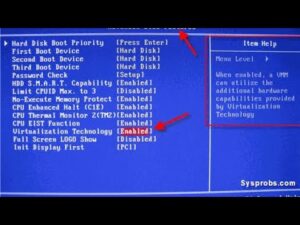
Find the Settings for Virtualization:
In order to enable virtualization, you must enable this feature in your BIOS. It is possible to do this by using the F10 key. To disable this feature, hold down the F1 key. Once you have done this, you will be able to run programs on your PC. But before enabling the virtualization option in the BIOS, you must be sure that your PC supports it. This is an important step that you must complete if you want to use this option.
Tool to Enable Option:
- Check if your system supports hardware virtualization.
- Reboot your Computer and Press the BIOS Key.
- Locate the section for CPU configuration.
- Find the Settings for Virtualization.
- Select the Option for Enabling Virtualization.
- Save the Changes You Have Made.
- Exit Your BIOS and Reboot Your Computer.
To enable virtualization on your PC, you need to first enable it in the BIOS. To do this, go to the “processor” or “chipset” menu and click the Virtualization option. Once you have enabled this, press the F4 or Alt key to open the BIOS. After that, you will need to install the virtualization software in your PC. You can then use your PC with the virtualization function.
Leave a Reply