
Should I Enable XMP on My PC?
Enable XMP On My PC is technically considered overclocking and can damage your RAM or system if done incorrectly. It can also increase power consumption and temperature, so it’s important to have adequate system cooling.
To enable XMP, you’ll need to enter your motherboard’s BIOS or UEFI settings (usually by pressing a specific key during startup). Once inside, navigate to the memory setting and look for ‘XMP’ or ‘A-XMP’.
Enable XMP On My PC can be a beneficial decision for users seeking better performance from their RAM modules. In this detailed discussion, I’ll cover what XMP is, its advantages, potential risks, and how to enable it, helping you make an informed decision.
What is XMP?
XMP is a technology developed by Intel that allows compatible memory modules to run at higher speeds than their default specifications. This is achieved by loading pre-configured profiles into the system’s BIOS (Basic Input/Output System) or UEFI (Unified Extensible Firmware Interface). These profiles contain optimized settings for the memory modules, such as frequency, timings, and voltage.
Advantages of Enabling XMP:
- Increased Memory Performance:
- The primary benefit of enabling XMP is the potential for increased memory performance. This can lead to faster data access and improved overall system responsiveness.
- Easy Performance Boost:
- XMP simplifies the process of overclocking memory. Instead of manually tweaking settings, users can apply a pre-configured profile with optimized parameters for their RAM modules.
- Compatibility:
- XMP is widely supported by many motherboard manufacturers and RAM vendors. It provides a standardized way to ensure compatibility between memory modules and motherboards.
- Gaming and Content Creation:
- Users engaged in gaming, video editing, 3D rendering, and other resource-intensive tasks can benefit from the improved memory performance provided by XMP.
Potential Risks and Considerations:
- System Stability:
- While XMP is designed to enhance performance, it may lead to system instability if not implemented correctly. Overclocking can cause crashes, system freezes, or even hardware damage if the settings are too aggressive.
- Warranty Concerns:
- Overclocking, including enabling XMP, may void the warranty of your RAM modules. Before enabling XMP, check the warranty terms and conditions from the manufacturer.
- Heat Generation:
- Overclocking often generates more heat. Ensure your system has adequate cooling to handle the increased thermal load that may result from enabling XMP.
- Data Integrity:
- Overclocking can sometimes lead to data corruption, especially if the system is unstable. Regularly back up important data to minimize the risk of data loss.
How to Enable XMP:
- Accessing BIOS/UEFI:
- Restart your computer and enter the BIOS/UEFI settings by pressing the designated key during the boot process (commonly Del, F2, or F10).
- Locate XMP Option:
- Navigate to the section related to memory settings. Look for an option named “XMP,” “DOCP” (Direct Over Clock Profile), or something similar, depending on your motherboard manufacturer.
- Select XMP Profile:
- Once you find the XMP option, select the appropriate profile that matches the specifications of your RAM modules. Profiles are usually labeled with the intended frequency, such as 3200MHz or 3600MHz.
- Save and Exit:
- After selecting the XMP profile, save the changes and exit the BIOS/UEFI. Your system will reboot with the new memory settings.
- Stability Testing:
- It’s advisable to run stability tests, such as memtest86 or other benchmarking tools, to ensure that the system remains stable under the new memory configuration.
What is XMP?
The short answer is that it’s a way to enable the highest clock speeds possible for your RAM. XMP is an extension of the standard JEDEC SPD specifications for memory that allows you to change multiple settings with the click of a button or menu item, rather than fiddling around with frequencies, voltages, and timings manually (which would be considered overclocking).
All high-performance RAM will come with a pre-configured XMP profile that lets them run above standard DDR industry specs without needing to fiddle with BIOS settings or use complicated software. Typically, the speed will be quoted on the packaging and/or sticker on the RAM itself. By default, however, the memory will run at the standard spec based on your CPU.
To use the XMP profile, access your motherboard’s UEFI/BIOS. This may require pressing a specific key, such as Del or F2, though this varies from motherboard to motherboard. Look for an XMP toggle on the UEFI/BIOS home screen or in the overclocking or advanced settings menu. Once you find it, turn it on.
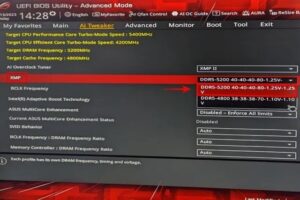
You’ll then see a drop-down menu that says XMP (as shown below in the Asus BIOS), or something similar. Choose the profile that matches your kit’s speeds. Some kits offer more than one XMP profile, so choose the right one. Once you’re done, save your UEFI/BIOS settings and reboot.
How do I enable XMP on my PC?
Enabling XMP in your PC will help you to unlock the full potential of your RAM. With newer PC programs and AAA games becoming more demanding, you will need to utilize your computer’s hardware to its maximum capability. Thankfully, enabling XMP is safe and fairly simple.
First, you will need to access your computer’s BIOS/UEFI. Depending on your motherboard manufacturer, this may be done by pressing the delete key, escape key, or one of the function keys (often F2, F10, or F12). Once you have access to the BIOS, navigate to the “Memory” or “Overclocking” section.
Once you have found the correct menu, find the option to enable XMP. You should have a choice of XMP profiles, with the fastest being Profile 1. Select this, and save the changes. Afterward, reboot your computer.
It is important to note that enabling XMP is considered overclocking, and doing so can cause damage to the memory modules and CPU (unless you have an overclocked motherboard with proper cooling). It is also not covered by any warranty. Therefore, only enable XMP on systems that are capable of handling the additional clock speed and voltages without issue. If you are unsure whether your system can handle it, consider using a program such as CPU-Z to compare the current RAM timings with their advertised settings.
What are the benefits of XMP?
Enabling XMP is a safe and easy way to get the most out of your high-speed memory. It’s important to note that overclocking (which is what enabling XMP does) can increase CPU and system temperatures, so you should always monitor your PC’s stability after enabling XMP. You should also make sure your PC has adequate system cooling to avoid any potential damage.
In order to enable XMP, you’ll need to access your computer’s BIOS settings. The exact key to do this will vary by motherboard manufacturer, but it’s generally either Del, F2, F10, or F12. Once you’ve accessed the BIOS, navigate to the “memory” or “DRAM configuration” settings. On most systems, you’ll find an option labelled ‘XMP’ or’memory profiles’, which should offer a number of preset configurations for your RAM modules. Select the one that matches your RAM’s speed and performance requirements.
Once you’ve selected an XMP profile, save and exit the BIOS settings. Your computer should restart with the XMP profile enabled, allowing your RAM to run at its advertised speed. You can test the new speed by launching a program like CPU-Z, which will display your RAM’s timings and compare them to the stock setting. If you see that the new profile offers better timings, then you’ve successfully enabled XMP. It’s important to note that manually tweaking the XMP settings may cause instability, so it’s recommended to leave the defaults alone if possible.
What are the disadvantages of XMP?
XMP overclocks the memory to run at speeds faster than the processor is officially rated to support. This can lead to quicker data transfer rates, which could result in games and programs loading more quickly and the system operating more smoothly overall.
Overclocking can place additional strain on your computer’s components and can cause instability or damage if not done correctly. This is why it’s important to monitor your PC for signs of instability or issues after enabling XMP, such as crashes or freezes. Depending on your system and power supply, overclocking can also cause increased power consumption and heat which could shorten the lifespan of your hardware.
As the name suggests, XMP is a pre-configured profile for your RAM that provides optimal performance based on the specific capabilities of the module and your motherboard. It is very easy to use and doesn’t require advanced technical knowledge, making it an ideal option for novices or casual users who want a quick and easy way to increase the performance of their RAM.
To enable XMP, start by accessing your computer’s UEFI/BIOS settings. The key to do this will vary between motherboards, but typically the access keys are Del or F2, though you can check your motherboard manual for more details. Once in the UEFI/BIOS, navigate to the “Memory” or “Overclocking” section and look for the XMP profile toggle. Once you find it, switch it to On. Save your changes and exit the BIOS/UEFI, and your PC should restart with the XMP profile enabled.
Conclusion:
Enable XMP On My PC can be a worthwhile decision if you seek improved memory performance. However, it’s essential to weigh the potential benefits against the risks and take necessary precautions. Ensure that your system is adequately cooled, monitor temperatures, and be aware of warranty implications. If done responsibly, enabling XMP can be a relatively straightforward way to boost your system’s overall performance.
Leave a Reply