
How to Enable TPM 2.0 in Bios 2021
In order to Enable TPM 2.0 in Bios 2021, you need to go into your BIOS and make changes to the security settings. Fortunately, this process is easy, even for those of us who aren’t computer experts. While this step is not required, it is highly recommended. You will want to make sure that you don’t mess up anything else, as this may result in a broken TPM. The best way to do this is to look up the appropriate option in your BIOS interface.

In the Advanced PCH-FW configuration, look for the PTT option. Next, click on the AMD CPU FTPM option. You can also find this option on the AMD PCH-FW configuration. Select Enable TPM 2.0 and toggle the setting to “Enable TPM”. To save the change, press F7. Then, select Enable TPM 2.0. After you’ve done this, exit the BIOS and apply all changes Google.
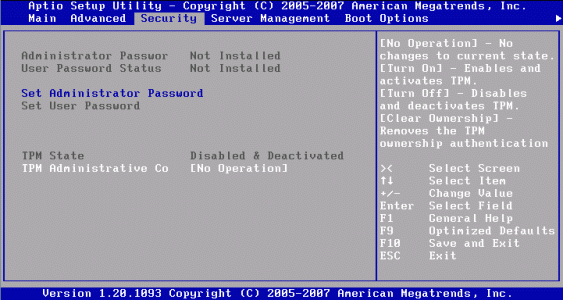
Now, you should be able to enter the BIOS. After entering the BIOS, you should find the TPM option in the security tab. If you’re using an AMD or Intel motherboard, you’ll need to toggle it to “Firmware TPM” and “Enable” to turn on TPM. If you’ve made any changes, save and exit the BIOS. Then, you’re all set!
How To TPM settings:
In Windows, you’ll find the TPM settings under the Security Settings section. Double-click on Secure Boot. It will now appear as enabled. After saving the setup, you can go back to the Power menu to reboot the system. Now, you’ll be prompted to enter your password. If you’re not prompted to login to Windows, you’re all set! You should now be able to boot your system with TPM enabled.
In Windows, TPM is a security feature that allows you to identify the identity of a person and disable spyware. TPM is a must-have for Windows 11 compatibility and security. Many people are worried that TPM is not compatible with older devices. In order to avoid such a situation, you can enable TPM 2.0 in your BIOS. Your motherboard will no longer need to be unable to perform this operation.
The TPM chip will tell you which type of processor you have. If it isn’t, the chip isn’t compatible with your system. In order to enable TPM 2.0, you need to enable it in Windows 10. However, if you don’t have a TPM enabled motherboard, you can easily enable it manually in the BIOS.
Have Enabled TPM 2.0 :
After you have enabled TPM 2.0, your motherboard will display a small icon with the information on it. This will let you know which version your motherboard uses. Once TPM 2.0 is enabled, you will be prompted with a message asking you to restart your computer. Once you’re done, click on the button to reboot the computer. After enabling TPM, you’ll be prompted to reboot.
If you’re using a TPM 2.0 motherboard, it’s essential to enable this security feature. To enable TPM, you’ll need to go into the BIOS settings menu. Ensure that you haven’t accidentally changed anything, as this could break your system. If you don’t, you should delete the setting. Then, reboot the computer and make sure it is running properly.
You Can Follow These Steps:
The BIOS is a vital part of your computer. You can disable or enable TPM with it. It’s also important to keep your PC running as secure as possible. This is why it’s so critical to keep the BIOS updated. It’s an essential security feature that protects your system and your data.
- In the Advanced PCH-FW configuration, look for the PTT option.
- Next, click on the AMD CPU fTPM option.
- You can also find this option on the AMD PCH-FW configuration.
- Select Enable TPM 2.0 and toggle the setting to “Enable TPM”.
- To save the change, press F7.
- Then, select Enable TPM 2.0. After you’ve done this, exit the BIOS and apply all changes.
- you should be able to enter the BIOS.
- After entering the BIOS, you should find the TPM option in the security tab.
- If you’re using an AMD or Intel motherboard, you’ll need to toggle it to “Firmware TPM” and “Enable” to turn on TPM. If you’ve made any changes, save and exit the BIOS. Then, you’re all set!
- In Windows, you’ll find the TPM settings under the Security Settings section. Double-click on Secure Boot.
- It will now appear as enabled. After saving the setup, you can go back to the Power menu to reboot the system.
- Now, you’ll be prompted to enter your password.
- If you’re not prompted to login to Windows, you’re all set! You should now be able to boot your system with TPM enabled.
Leave a Reply