
How to Enable Swift Pair Bluetooth on Windows 10
If you are Enable Swift Pair Bluetooth On Windows 10 computer, you must have experienced situations where the pairing process takes time to complete. Microsoft has come up with a neat feature called Swift Pair which makes the process much faster.
Swift Pair is a new Bluetooth pairing experience in Windows 10. It’s available since version 1803, or the April 2018 Update.
Enabling Swift Pair Bluetooth on Windows 10 is a straightforward process that allows you to quickly connect supported Bluetooth devices to your computer. Swift Pair simplifies the pairing process by providing a seamless and efficient way to connect devices without the need for navigating through various settings. Follow these steps to enable Swift Pair Bluetooth on Windows 10.
-
Ensure Bluetooth is Enabled:
- Before you begin, make sure that your computer’s Bluetooth functionality is enabled. You can do this by navigating to the “Settings” menu and selecting “Devices.” In the “Bluetooth & other devices” section, ensure that Bluetooth is turned on.
- Check Swift Pair Compatibility:
- Confirm that your Bluetooth device supports Swift Pair. Not all Bluetooth devices have Swift Pair capabilities. If your device supports Swift Pair, it should be mentioned in the product documentation or on the manufacturer’s website.
- Update Windows 10:
- Ensure that your Windows 10 operating system is up-to-date. Microsoft regularly releases updates that may include improvements and new features. To check for updates, go to “Settings,” select “Update & Security,” and click on “Windows Update.” Install any available updates.
- Enable Swift Pair:
- To enable Swift Pair, open the “Settings” menu and select “Devices.”
- Click on “Bluetooth & other devices” in the left-hand menu.
- Scroll down to the “Related settings” section and locate the “More Bluetooth options” link. Click on it to open the Bluetooth settings.
-
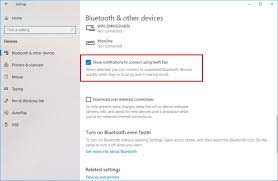
Configure Bluetooth Settings:
- In the Bluetooth settings window, you’ll find an option labeled “Allow Bluetooth devices to find this PC.” Ensure that this option is selected. This setting allows your computer to be discoverable by other Bluetooth devices.
- Activate Swift Pair Notifications:
- Scroll down in the Bluetooth settings window until you find the “Notifications” section.
- Check the box next to “Show notifications to connect using Swift Pair.” This ensures that you receive notifications when a compatible Bluetooth device is in proximity and ready to pair.
- Ensure Bluetooth Device is Discoverable:
- Activate the Bluetooth pairing mode on your compatible device. Refer to the device’s user manual for instructions on how to make it discoverable or initiate the pairing process.
- Swift Pair Notification:
- Once your Bluetooth device is discoverable and within range of your Windows 10 computer, a Swift Pair notification will appear in the bottom-right corner of your screen.
-
Click “Connect”:
- Click on the Swift Pair notification. A pop-up will appear displaying the name and image of the Bluetooth device. Click “Connect” to initiate the pairing process.
- Verification Code (if applicable):
- Some devices may require a verification code for added security. If prompted, verify the code on both your computer and the Bluetooth device to complete the pairing process.
- Confirmation:
- After successful pairing, a confirmation message will appear, indicating that the Bluetooth device is now connected to your Windows 10 PC using Swift Pair.
- Check Device Connection:
- Verify the connection by checking the “Bluetooth & other devices” section in the Settings menu. Your paired device should be listed under “Devices.”
- Troubleshooting:
- If you encounter any issues during the Swift Pair process, ensure that your Bluetooth drivers are up-to-date. You can update drivers through the “Device Manager” by right-clicking on the Bluetooth device and selecting “Update driver.”
By following these steps, you can easily enable Swift Pair Bluetooth on Windows 10 and streamline the process of connecting supported Bluetooth devices to your computer. Keep in mind that not all Bluetooth devices support Swift Pair, so it’s essential to check compatibility before attempting to use this feature.
1. Go to Settings
Introduced in Windows 10, version 1803, Swift Pair is the newest way to make Bluetooth device pairing easier and faster. This blog discusses what hardware is needed to support this feature, frequently asked questions about it, and how to configure your device to enable it.
To enable Swift Pair, you will need to have a Bluetooth capable device that supports the Bluetooth LE standard. It is also recommended that you enable Bluetooth LE Privacy on your device (see Testing Considerations for more information). When the peripheral begins beaconing for Swift Pair, Windows detects it by matching the pattern in its vendor section. This is done without waking the system or active scanning, so it does not drain battery.
When the device is detected, it will send a notification to the PC that it is ready to be connected. Windows will then show a notification in the Action Center that you can select to connect the device. If you choose to connect, the device will begin pairing and will become available in your system within a few seconds.
The process of enabling Swift Pair can be done by going to the Settings app on your computer and clicking on “Devices”. Check the “Show notifications to connect using Swift Pair” checkbox. Then, when you have a compatible Bluetooth device near the computer, it will automatically trigger the Swift Pair setup and notify you to connect.
2. Go to Bluetooth & Other Devices
To use Bluetooth Swift Pair, first make sure your Bluetooth is enabled. You can do this by clicking on the Bluetooth button in the Action Center (it looks like a speech bubble) or by going to the Devices menu in Settings.
Once you’ve done this, turn on the Bluetooth switch. Then, you’ll need to put your Bluetooth device into pairing mode. This will vary per device, but generally there’s a button you need to press for about 10 seconds until the connect light starts flashing. Refer to your device’s manual for more details.
When you enable Swift Pair, the Bluetooth button in the Action Center will automatically show up if there’s a device nearby that wants to connect. This will save you time and effort, since it would otherwise require a manual Bluetooth scan or a PIN entry.
To work with Swift Pair, peripherals must be advertised as Bluetooth LE capable and have one of the Microsoft defined vendor advertisement sections shown in Fig 2-4. They also need to be beaconing for Swift Pair with a higher than normal cadence, so Windows can identify the device shortly after it enters pairing mode. Windows also parses the display name from the 3 byte major/minor values to show in the notification. This information can be overwritten for customized notifications by enterprises that wish to use Swift Pair in their environments.
3. Check the Show notifications to connect using Swift Pair checkbox
Swift Pair is the newest way to connect Bluetooth devices to Windows. It reduces the time needed to pair Bluetooth devices by displaying a notification when a supported device is nearby and ready to be connected. This feature is available on any Windows 10 version starting with 1803.
To enable Swift Pair, go to the ‘Bluetooth & other devices’ settings page and check the Show notifications to connect using Swift Pair checkbox. After that, Bluetooth devices can be paired by simply bringing them near your computer. The Swift Pair feature only works with compatible Bluetooth devices, such as keyboards, mice, and headphones.
Peripherals must support the Swift Pair service and must be advertising a friendly name in a Microsoft defined vendor section in their Bluetooth Low Energy (LE) advertisement when they are in pairing mode. The peripherals must also beacon at a slightly faster cadence for quick discovery by Windows. This cadence must then be reduced to a normal advertisement rate after a short period of time.
Then, when the Bluetooth device is in proximity pair mode, it will send an onboarding experience toast to the user letting them know the device can be connected and offering the option to keep the feature on or turn it off. This is a great feature that makes Bluetooth device pairing and connecting much quicker. It’s important to note, however, that some Bluetooth devices will still require PIN or Pairing codes to be connected.
4. Click OK
Earlier, if a Bluetooth headset or other peripheral was close to your PC, you would have to go to Settings and manually enter the pair code. This process was often a bit lengthy and not very convenient, so Microsoft introduced Swift Pair in Windows 10 1803. This feature minimizes the steps required to connect devices by prompting the user when a compatible device is near the PC and then simply asking them to click ‘connect’.
Now with the latest Windows 10 preview build, the company has further improved Swift Pair so that it can connect a Bluetooth headset to your PC without needing to go into Settings and manually entering the pair code. The feature is called Enhanced Swift Pair and is available to Insiders in the Fast Ring with version 1803.
If you enable this, when you have a compatible Bluetooth headset or other peripheral close to your PC, you will get a notification saying that it’s ready to be connected. Then all you have to do is click the ’connect’ button in the notification. The Bluetooth peripheral will automatically be put into pairing mode and the connection will happen right away.
This is a neat feature but there’s one drawback: it’s limited by the device and only works with some specific hardware. This means that if your device isn’t a Microsoft product or a particularly popular gadget, you won’t be able to use it with the new Swift Pair experience.
Leave a Reply