How to Enable Screen Recording in Windows 11
Enable Screen Recording In Windows 11 is an increasingly popular way to create game video clips, product demos, tutorials, training video guides and other presentations. It’s also a great tool for live streaming.
Fortunately, Windows 11 has easy-to-use built-in tools to record your computer’s screen. In this article, we’ll show you how to enable screen recording in windows 11. We’ll also talk about a few third-party options.
Enabling screen recording in Windows 11 is a straightforward process that allows users to capture their screen activities for various purposes such as creating tutorials, recording gameplay, or troubleshooting. Follow the steps below to enable screen recording on Windows 11.
Follow The Steps
- Check System Requirements: Before proceeding, ensure that your system meets the requirements for screen recording. Ensure your computer has sufficient processing power and memory to handle the recording process smoothly.
- Use Built-in Xbox Game Bar: Windows 11 comes with the Xbox Game Bar, a built-in feature designed for gamers that also supports screen recording. To enable it:a. Press
Win + Gto open the Xbox Game Bar.b. If prompted, click on “Yes, this is a game” to continue.
c. Click on the “Capture” icon, which looks like a camera, to open the capture menu.
d. Toggle the “Record” button to start recording.
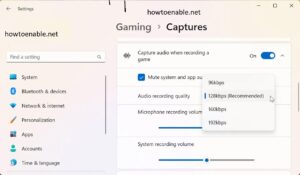
e. You can also configure settings like audio, video quality, and shortcuts within the Xbox Game Bar settings.
- Use the Windows + Alt + R Shortcut: Windows 11 provides a quick shortcut to start and stop screen recording. Press
Win + Alt + Rto initiate recording. This shortcut is especially handy for quick and spontaneous screen captures. - Adjust Game Bar Settings: Fine-tune your recording preferences by adjusting the Game Bar settings:a. Open the Xbox app by searching for it in the Start menu.
b. Click on the settings icon (gear-shaped) on the bottom left.
c. Navigate to the “Game DVR” tab.
d. Customize settings such as audio recording, video quality, and storage location.
- Use the Snip & Sketch Tool: Windows 11 includes the Snip & Sketch tool that can capture screenshots and record screens. To use it:a. Press
Win + Shift + Sto open the Snip & Sketch tool.b. Select the “Rectangular Snip” option.
c. Drag to select the area you want to record.
d. Click on the “Record” button in the toolbar.
Following The Steps
- Explore Third-Party Applications: While Windows 11 offers built-in tools, you can also explore third-party applications for more advanced features and customization. Applications like OBS Studio, Camtasia, and ShareX provide extensive options for screen recording.
- Update Graphics Drivers: Ensure your graphics drivers are up to date. Screen recording performance may be impacted by outdated or incompatible graphics drivers. Visit the website of your graphics card manufacturer to download and install the latest drivers.
- Check Storage Space: Screen recordings can consume a significant amount of storage space, especially if recorded at high quality. Make sure you have sufficient free space on your storage drive to accommodate your recordings.
- Consider Using the Photos App: Windows 11’s Photos app has basic video editing capabilities and can be used to trim and cut your recorded screen captures. Simply locate your recording in the Photos app, click “Edit & Create,” and then “Trim.”
- Troubleshoot Common Issues: If you encounter issues during screen recording, such as black screens or audio problems, troubleshoot by checking system resources, updating drivers, and adjusting recording settings.
- Use Game Mode for Enhanced Performance: Enable Game Mode in Windows 11 to optimize your system for gaming and screen recording. Open Settings, navigate to “Gaming,” and toggle on the “Game Mode” switch.
- Explore Advanced Settings in Xbox Game Bar: Xbox Game Bar offers additional settings for advanced users. Explore options such as background recording, microphone and system audio settings, and more to customize your recording experience.
Xbox Game Bar
If you’re looking for a quick and easy way to record your screen, the Xbox Game Bar is an excellent option. The Game Bar is designed to help you capture and edit gameplay videos, but it can also be used to record other applications and programs. You can use the Windows logo key + G to quickly start or stop recording. You can also control the video quality and frame rate, and select whether you want to record the mouse pointer and system sound.
To enable screen recording in the Xbox Game Bar, open an application or window that you want to record. Then, press the Windows logo key + G to launch the Xbox Game Bar. You can then click the record button to start recording. The video will be saved in the Captures folder.
There are several ways to record your screen in Windows 11. The Snipping Tool and the Xbox Game Bar are both built-in options, while you can also use a third-party program like OBS Studio. Each of these tools has its own advantages and disadvantages.
The Snipping Tool has the advantage of being free and offering a wide range of features. However, it can only record one app at a time and doesn’t support audio. You can use the Xbox Game Bar to capture multiple apps at once, but it will not show your desktop or File Explorer.
PowerPoint
If you’re using PowerPoint, you can use the built-in screen recording function to create a video. The feature is available as part of the Insert menu.
Once you click it, the screen dims, and a toolbar appears with a Record button. You click that, a three-count countdown begins, during which you can start the onscreen activity you want to record. Once the countdown ends, a video is recorded in an MP4 file that’s automatically inserted into your PowerPoint presentation.
You can choose whether to include audio and the mouse pointer in your recording, and you can use the onscreen buttons in the video capture dock to pause and resume the recording. You can also select options to stop or hide the cursor. The recording is saved as an MP4 file in your Videos folder on the PC.
If you’re looking for a more advanced way to record the screen, there are many third-party tools that can help. For example, OBS Studio is a popular choice among gamers. This free software is available in the Windows Store and can be used to record game footage or other content on a computer. It can also be used to record a PowerPoint slideshow with voice-over or add a webcam to the screen. The software can also be used to edit and optimize videos.
Third-party tools
There are a variety of ways to record your computer screen in Windows 11, some of which require no additional software. For example, the Snipping Tool (which is also available for Mac) can be used to capture an area of your screen and save it as a video. There are also a number of third-party tools that provide more comprehensive and flexible screen recording features, such as QuickTime and Snagit.
One of the easiest ways to enable screen recording in Windows 11 is through the Xbox Game Bar, which comes installed on all PCs with a Microsoft 365 subscription. When you launch the Game Bar, click on the ‘Record’ button to start a recording session. The game will dim and a toolbar will appear on the top of the window, allowing you to select which part of the screen to record. You can adjust the dimensions of the recordable region by clicking and dragging on its edges.
When you’re done with your recording, the file will be saved as an MP4 file in the Videos folder on your desktop. To keep track of your files, it’s a good idea to create a dedicated folder and use consistent naming conventions for each recording. Then, you can easily locate your recordings and organize them into subfolders based on topic or date.
Final Words
Screen recording is a popular way to make tutorial videos, product demos, and instructional guides. It also allows gamers to record their gameplay and share it with the world.
There are a number of ways to capture your computer’s screen, but the easiest is to use the built-in shortcuts. You can find the keyboard shortcuts for screen recording in the Microsoft Windows support article. You can also use third-party software, such as Descript, which has an in-app help center and a live chat team that is available Monday through Friday from 8 AM to 5 PM Pacific Time.
Windows users have long struggled with finding easy-to-use built-in tools for screen recording. However, with the introduction of Windows 11, 2023, Microsoft added a screen recording feature to its Snipping Tool. The feature is simple to use, and it makes Snipping Tool even more useful. It’s important to note, though, that the Snipping Tool’s screen recording feature doesn’t capture sound. Therefore, it is best used in conjunction with a microphone or speaker to create audio recordings.
If you want to capture audio with your screen recording, consider using a third-party tool. This will allow you to add voice-overs and edit your video later. To begin a screen recording on an iPad or iPhone, swipe down from the top of your device’s home screen to open Control Center. Tap the “Record” icon, then choose your settings and wait for a three-second countdown to start your recording. Once you’re finished, tap the red recording status bar to stop your video.
Conclusion
Windows 11 provides multiple options for screen recording, ranging from the built-in Xbox Game Bar to third-party applications for advanced users. Whether you’re capturing gameplay, creating tutorials, or documenting software issues, these steps should guide you in enabling and optimizing screen recording on your Windows 11 system.
Leave a Reply