How to Enable Sound in iPhone Screen Recording
Enable Sound In Screen Recording make great content for teaching online courses and creating tutorials, but they aren’t complete without audio. To capture sound with iPhone screen recordings, double-check that no other apps are using the device’s audio source.
Some Windows system settings may interfere with capturing computer audio. To avoid this, disable sound enhancements in your audio device.
Enabling sound in screen recording adds an essential audio dimension to your captures, enhancing the overall viewer experience. Whether you’re creating tutorials, gameplay videos, or presentations, incorporating sound can significantly enrich your content. The process may vary slightly depending on the device and software you’re using.
Enabling Sound in Screen Recording: A Comprehensive Guide
Introduction
Screen recording has become an indispensable tool for creating engaging and informative content. While capturing visuals is crucial, integrating sound can take your recordings to the next level. Whether you’re a content creator, educator, or gamer, the ability to record system audio or external sources can significantly enhance the impact of your videos.
1. Understanding Audio Sources
Before diving into the technical aspects, it’s crucial to understand the various audio sources you might want to record:
- System Audio: Capturing the sounds produced by your computer, including software alerts, music, and other system sounds.
- Microphone Audio: Recording external sounds using your device’s built-in or external microphone.
2. Selecting the Right Software
Choosing the right screen recording software is the first step in enabling sound. Some popular options include:
- OBS Studio: A free, open-source software widely used for live streaming and screen recording.
- Camtasia: A comprehensive, user-friendly tool known for its robust screen recording and video editing capabilities.
- QuickTime (Mac): A built-in application for Mac users that allows screen recording with audio.
3. Configuring System Audio Settings
Windows
- Sound Settings:
- Right-click on the speaker icon in the system tray and select “Open Sound settings.”
- Under the “Output” section, choose your desired audio output device.
- Ensure that the output volume is not muted.
- Recording Devices:
- Right-click on the speaker icon and select “Open Sound settings” again.
- Click on “Sound Control Panel.”
- Navigate to the “Recording” tab and set your preferred microphone as the default recording device.
Mac
- System Preferences:
- Go to “System Preferences” and click on “Sound.”
- Choose the correct output device under the “Output” tab.
- Input Device:
- In the “Sound” preferences, switch to the “Input” tab and select your preferred microphone.
4. Configuring Software Settings
OBS Studio
- Audio Sources:
- Open OBS Studio and go to “Settings.”
- Under the “Audio” tab, configure the audio settings.
- Set the “Desktop Audio” to your preferred system audio source.
- Assign the appropriate microphone to “Mic/Auxiliary Audio.”
- Output Settings:
- Go to the “Output” tab in settings.
- Choose your preferred audio bitrate for recording.
Camtasia
- Audio Settings:
- Open Camtasia and go to “Edit” -> “Preferences” -> “Audio.”
- Ensure that the correct audio devices are selected for recording.
- Recording Options:
- Before starting a recording, select the desired audio sources in the recording options.
- Check both system audio and microphone options if needed.
QuickTime (Mac)
- Selecting Audio Sources:
- Open QuickTime and go to “File” -> “New Screen Recording.”
- Click on the arrow next to the record button to choose audio sources.
- Select the appropriate microphone for narration.
5. Testing and Adjusting Levels
After configuring your settings, it’s crucial to test your audio levels to ensure a balanced and clear recording.
- Test Recording:
- Record a short test video to check both system audio and microphone levels.
- Play the recording to ensure that both audio sources are captured.
- Adjusting Levels:
- In your recording software, you’ll typically find audio level meters.
- Adjust the levels to avoid distortion or low volume issues.
6. Troubleshooting Common Issues
If you encounter any issues with sound in your screen recordings, consider the following troubleshooting steps:
- Check Cables and Connections:
- Ensure that all cables and connections for external microphones are secure.
- Update Drivers:
- Update your audio drivers to the latest version to resolve compatibility issues.
- Software Updates:
- Keep your screen recording software up to date to benefit from bug fixes and improvements.
What is a screen recorder?
Enable Sound In Screen Recording allows you to capture what’s on your phone, tablet, or computer screen and turn it into a shareable video. Often, these recordings include audio from your device’s microphone and system audio to create more comprehensive videos. Screen recordings are useful for many reasons, from creating tutorials to documenting technical problems and providing step-by-step solutions.
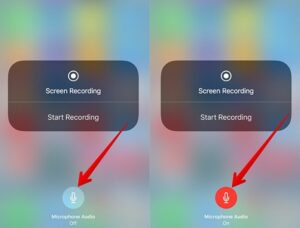
Sometimes, simple glitches can disrupt the functionality of screen recording, resulting in no sound in your recordings. Restarting your device or updating your software may help resolve the issue. You should also check your recording settings. If you’re aiming to record app sounds or gameplay, select the Device audio option; if you want to include narrations or external commentary in your recordings, choose Microphone.
If you’re looking for an easy-to-use, high-quality screen recorder, consider using a free program like the built-in Game Bar in Windows or the free Movavi Screen Recorder for PC or Mac. These programs provide high-quality recording and editing options without the extra features that come with paid versions. The interface of these programs is also straightforward to navigate, making it simple for anyone to use. These programs also offer a free trial so you can try them out before deciding whether or not to purchase. For more advanced screen recording tools with a variety of features, you can consider paying for an app like Microsoft Stream.
Why do I need a screen recorder?
Whether you’re creating software tutorials, onboarding new employees, or giving a video presentation to clients, screen recording is a powerful tool that can help you streamline your workflow. And while there are plenty of tools available, the best screen recorder for you depends on your specific needs.
Fortunately, there are many different screen recording options for both desktop and mobile devices. Some are built into your operating system, like the Xbox Game Bar in Windows or QuickTime Player on Mac. Others are stand-alone applications, like TechSmith Capture (which is made by the creators of Snagit). The choice ultimately comes down to your budget and needs.
With a wide range of features, these apps can make the process of recording your computer or mobile device screen effortless. They’re ideal for capturing gameplay, app audio, or adding a narrator’s voice to your videos. Some also offer advanced video editing capabilities that allow you to crop, trim, or edit your footage.
While there are a number of great screen recording apps on the market, some have a tendency to lose sound during recordings. To avoid this problem, make sure your screen recording app is configured to capture system and microphone audio. If you’re using an app that doesn’t include these settings, be sure to check your device’s settings or contact the developer for instructions on how to fix it.
How do I record audio with a screen recorder?
Whether you need to record a video to explain a technical process or create a video to convey a message to an audience, screen recording can be a valuable tool for any project. However, it can be difficult to get your recordings to work correctly – especially if you are experiencing issues with audio. In this blog post, we will take a look at some of the most common problems and offer tips on how to fix them.
If you are having problems with audio in a screen recording, there may be a few different reasons for it. One possibility is that the software you are using does not have access to your microphone. To resolve this issue, make sure that the program you are using has access to your microphone and is enabled in your system settings. Another possibility is that your computer has audio enhancements turned on, which can interfere with the recording process. To resolve this problem, open your sound settings and ensure that the “Enhance audio” option is disabled.
Finally, it is important to use a quality screen recording app. By using a quality app, you will be able to ensure that your recordings are clear and have no audio distortion. A good screen recording app will also allow you to easily edit and trim your recordings, as well as add annotations and links to external websites.
Conclusion
Enable Sound In Screen Recording is a multi-step process that involves configuring both system and software settings. Understanding the various audio sources and choosing the right recording software are crucial initial steps. Once configured, testing and adjusting audio levels ensure a high-quality recording. Troubleshooting common issues can help resolve any unexpected problems, ensuring a smooth and professional recording experience. With the right setup, you can create compelling content that captivates your audience with both visual and auditory elements.
Leave a Reply