How to Enable Audio for Screen Recording
Enable Audio For Screen Recording are a great tool for creating product demos, tutorial videos, and instructional guides. They can also be used to monitor and support remote work tasks.
With Animator’s easy-to-use video maker, you can add a voiceover to your video project so that you can verbally walk viewers through the process. To get started, follow these steps.
Enabling audio for screen recording is a valuable feature that enhances the overall quality of your recordings. Whether you are creating tutorials, capturing gameplay, or producing software demonstrations, incorporating audio can significantly improve the viewer’s experience. In this comprehensive guide, we’ll explore how to enable audio for screen recording on various platforms, including Windows, macOS, and third-party applications. Follow these steps to ensure a seamless audio recording experience.
1. Understanding Audio Sources: Before diving into the specifics of enabling audio, it’s crucial to understand the available audio sources. Typically, you can record system audio, microphone input, or a combination of both. System audio captures the sound produced by your computer, while microphone input records your voice or external audio sources.
2. Windows:
- Built-in Tools:
- Game Bar: Windows 10 includes a built-in Game Bar with screen recording capabilities. To enable audio, press Win + G to open the Game Bar, click on the settings (gear) icon, and ensure that the “Record audio” option is enabled.
- Steps Recorder: For older Windows versions, the Steps Recorder tool can capture screenshots along with audio narration. However, it doesn’t produce video files.
- Third-Party Software:
- OBS Studio: Open Broadcaster Software (OBS Studio) is a powerful and free tool for screen recording. After installing OBS Studio, configure audio settings in the ‘Settings’ menu. Under the ‘Audio’ tab, select the appropriate devices for Desktop Audio (system sound) and Mic/Auxiliary Audio (microphone).
3. macOS:
- Built-in Tools:
- QuickTime Player: Open QuickTime Player, go to ‘File,’ and select ‘New Screen Recording.’ Click on the arrow next to the record button to choose audio sources. Ensure the correct microphone and system audio options are selected.
- Third-Party Software:
- ScreenFlow: This popular macOS screen recording application allows you to capture audio from multiple sources. Open ScreenFlow, go to ‘File’ > ‘New Recording,’ and configure audio settings in the recording window.
4. Common Tips:
- Check Permissions: Ensure that the screen recording application has the necessary permissions to access your microphone and system audio. In both Windows and macOS, you can adjust these settings in the system preferences or settings.
- Audio Levels: Test audio levels before recording to prevent issues like distortion or inaudible narration. Adjust microphone and system audio levels to achieve a balanced mix.
- External Microphones: If you’re using an external microphone, make sure it’s properly connected and selected as the recording input device. Adjust microphone settings in your operating system’s audio settings.
- Advanced Settings: Some screen recording applications, especially third-party ones, offer advanced settings for audio processing. Explore these settings to customize audio quality, noise reduction, and other parameters.
- Post-Processing: After recording, consider using video editing software to fine-tune audio levels, remove background noise, and enhance overall audio quality.
5. Troubleshooting:
- No Audio: If you encounter issues with audio not being recorded, double-check your settings, restart the recording application, and ensure that your audio devices are functioning correctly.
- Sync Issues: In some cases, audio and video may be out of sync. This can often be addressed during the post-processing stage by adjusting the timing of audio tracks.
Windows
Whether you’re trying to record a tutorial video or just want to capture audio from your computer while playing games, Windows offers several options for screen recording with sound. These include the built-in Xbox Game Bar and third-party software that offers more versatile recording and editing tools.
If your enable screen recording has no sound, the problem may lie in the recording settings or your device’s microphone. To fix this, start by opening the Windows Settings app and selecting “Update and security.” Here, you can check your sound card’s driver version. If it’s outdated, you can download the latest update from the manufacturer’s website. If you still have no luck, try restarting your computer.
Another option for enabling audio for screen recording on Windows is to use a third-party software program such as Movavi Screen Recorder. This tool is designed to record your computer’s screen, and it can also capture the sounds from your microphone. It’s easy to use and can be used for any type of screen recording project.
You can also try using a browser extension to enable audio for screen recording on Windows. Vidyard, for example, is a popular choice for business professionals. This tool can be used to create webinars and livestreams, as well as to record videos in multiple formats. It can even be used to create and edit interactive video content.
Mac
Whether you’re recording jaw-dropping presentations or step-by-step masterpieces, screen recordings have entered a new age in the world of business. They’ve also become invaluable tools for empowering educators and enlightening students like never before. Thankfully, there are lots of options for screen recording on Mac. One of the best is Movavi Screen Recorder, which allows you to easily capture both screen and microphone audio on your Mac.
If you’re using a recent version of Mac OS, you can use the built-in QuickTime Player to record your screen with sound. To do this, open the QuickTime Player and click the red circled button at the bottom of the window. Then, select Microphone from the drop-down menu. Finally, choose the internal MacBook microphone or another external one from the list.
However, this method has its limitations. For example, it doesn’t work with system sounds, and you’ll have to go back to the System Preferences menu and change the sound output device to the default again.
Another option is to use a third-party program for recording your screen. There are many programs available, but some of them can be expensive. The good news is that there are a few free alternatives that can give you all the features you need to make great recordings. You can even use a free program to record your screen with audio and then convert the file to MP3 or other formats for easier sharing.
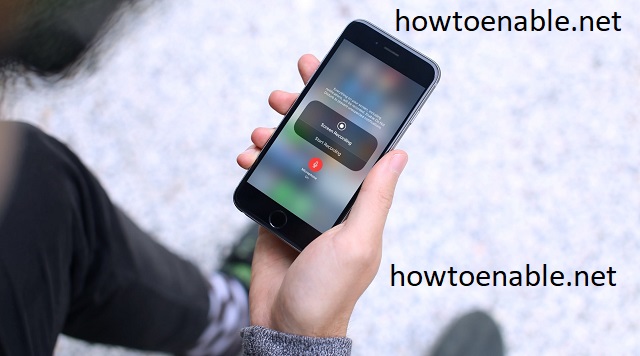
iOS
In today’s hybrid work era, screen recordings are an essential tool for streamlining communications. Whether you’re creating tutorials, walking someone through a process or simply explaining something that’s confusing, screen recordings can make your messages clearer and more effective. But oftentimes, it can be difficult to include sound when recording on an iPhone or iPad.
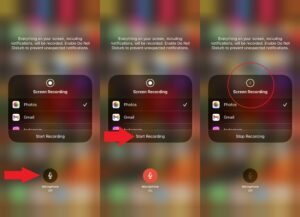
The good news is that iOS offers a native feature to enable audio for screen recording. To do so, open Control Center by swiping down (iPhone X and later) or up (iPhone 8 and earlier). Then, find the circular Screen Recording button and tap it to begin a three-second countdown. Once it’s finished, a red recording bar will appear on the screen.
Once the recording is complete, you’ll be able to choose where the video will be saved. By default, it’s saved to your Photos app. You can also share the video to other apps that support it, such as YouTube and Vimeo.
It’s worth noting that if you’re using a music app, the audio from that app will be muted as soon as screen recording starts. This is because Apple Music and Spotify use copy-protected content, which means they don’t allow screen recording to capture audio. Additionally, if you’re trying to record a voice or video call through WhatsApp, FaceTime or Messenger, the audio will be muted as well for privacy reasons.
Android
Screen recording is a great way to show someone how to do something on your Android phone or tablet. However, many people have trouble with the audio in their recordings. The problem may be caused by a few different things.
First, make sure that your device is set to record audio. You can do this by opening the Settings app and tapping on Sound. Then, ensure that the device is set to record both device and microphone audio. Then, you can start your screen recording.
Alternatively, you can use a third-party screen recorder. AZ Screen Recorder is an easy-to-use screen recording app that allows you to capture video and audio on your Android device. It also offers a livestreaming feature and is free to download.
Finally, you can try turning off your Android’s notifications during your recording. This will help to reduce the noise that is captured in your audio.
If you have tried all of these solutions and are still having problems with your audio in screen recordings, then it is possible that your audio recording software is defective. In this case, it is best to find a new program that can offer better performance. Try searching for a screen recording program with high ratings and reviews. These programs are often more reliable and come with advanced features.
Conclusion:
Enabling audio for screen recording adds a dynamic element to your content, making it more engaging and informative. Whether you’re using built-in tools or third-party applications, understanding the audio sources, adjusting settings, and troubleshooting any issues will help you create high-quality screen recordings with clear and synchronized audio. Experiment with different configurations to find the setup that best suits your recording needs.
Leave a Reply