
How to Enable Mic on Screen Record
Enable Mic On Screen Record are a great way to communicate and collaborate with coworkers in today’s hybrid work era. They provide full transparency in meetings, webinars and product demonstrations that can then be repurposed for share-worthy promotional videos.
If you are experiencing audio issues while recording your screen on a Windows computer, make sure that the app you are using has permission to use your microphone. You can check this in System Preferences.
Enabling the microphone during screen recording is a crucial step if you want to capture not only the visuals but also the accompanying audio. Whether you are creating tutorials, recording gameplay, or conducting presentations, having clear audio enhances the overall quality of your content. Here’s a comprehensive guide on how to enable the microphone during screen recording, covering various platforms and devices.
Windows:
Windows 10
- Check Microphone Settings:
- Right-click on the speaker icon in the taskbar and select “Open Sound settings.”
- Ensure that your microphone is listed and set as the default recording device.
- Recording Settings:
- Go to the Control Panel and select “Hardware and Sound.”
- Click on “Manage audio devices” under the Sound section.
- Navigate to the Recording tab and set your microphone as the default device.
- Screen Recording Software:
- Use built-in tools like Xbox Game Bar for gaming-related content.
- Alternatively, third-party applications like OBS Studio or Camtasia allow more advanced customization.
- Configure Recording Settings:
- Open your chosen recording software and access settings.
- Look for audio settings and ensure the correct microphone is selected.
- Start Recording:
- Begin your screen recording, and your microphone should capture audio by default.
Mac:
QuickTime Player (Built-in)
- Open QuickTime Player:
- Launch QuickTime Player from the Applications folder.
- Start New Screen Recording:
- Click on “File” and select “New Screen Recording.”
- Enable Microphone:
- Click the small arrow next to the record button.
- Choose your microphone from the dropdown menu.
- Start Recording:
- Click the red record button, and your screen recording with microphone audio will begin.
Linux:
Simple Screen Recorder
- Install Simple Screen Recorder:
- Use your package manager to install Simple Screen Recorder.
- Configure Audio:
- Open Simple Screen Recorder and go to the “Audio” tab.
- Choose your microphone under the “Select audio profile” dropdown.
- Start Recording:
- Click on the “Record” button, and your screen recording with microphone audio will initiate.
iOS:
Built-in Screen Recording
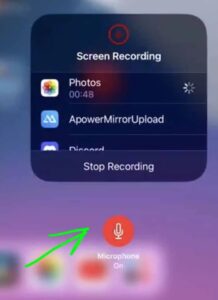
- Enable Microphone:
- Open the Control Center by swiping down (or up, depending on the device).
- Long-press or force-touch the screen recording button.
- Toggle on the microphone icon to enable audio recording.
- Start Recording:
- Tap the record button, and your iPhone or iPad will start capturing the screen along with microphone audio.
Android:
Google Play Games
- Install Google Play Games:
- Download and install the Google Play Games app from the Play Store.
- Enable Microphone:
- Open the app and navigate to your profile.
- Tap on the gear icon to access settings.
- Enable the microphone toggle.
- Start Recording:
- Launch the game you want to record, press the record button, and your screen recording with microphone audio will begin.
Web-based Screen Recorders:
Apowersoft Online Screen Recorder
- Visit the Website:
- Go to the Apowersoft Online Screen Recorder website.
- Configure Settings:
- Click on the microphone icon to enable audio recording.
- Start Recording:
- Click “Start Recording,” and your screen recording with microphone audio will commence.
Windows
Enable Mic On Screen Record is a handy tool for various purposes. It allows you to record whatever is displayed on the computer screen and also capture sound from microphone or system audio. Whether you want to create a video tutorial, an online gaming commentary, or any other kind of real-time guidance for your audience, it is better to do the job in real time rather than dubbing later.
There are many free and paid software tools for recording the screen on Windows, and it is up to you to decide which one suits your needs. However, the best option is a commercial program that has all the essential features you need. One of the most convenient to use is RecMaster, which comes with five recording modes and a number of advanced settings.
To enable mic on screen record on Windows, you can either launch Xbox Game Bar or a dedicated video-capturing program such as EaseUS Recorder. Both of them offer a variety of features for recording the computer’s screen with audio and can be used on all versions of Windows computers. To launch Game Bar, press the Windows logo key + G on your keyboard. It will open a control panel right under the screen and allow you to start recording your gameplay. You can choose to turn on the mic and add a live commentary while recording, or just mute the microphone for a silent recording.
Mac
If you’re on a Mac and looking for a way to record screen and internal audio at the same time, you have several options. While most Mac users are familiar with QuickTime Player, there are a few other tools that you can use to accomplish this task. These include Screenflick, iMovie and EaseUS RecExperts.
To begin recording, open the app or window you want to record and press Command + Shift + 5. A screen capture toolbar will appear on your Mac. From there, you can select the icon on the left to record your entire screen or the one on the right to record a specific portion of your screen.
Once the recording is complete, you can view it in QuickTime Player or export it as a.mov file. If you need to edit the video, iMovie offers a variety of editing features, including trimming, adding effects, and adding narration.
While QuickTime Player is a good choice for recording screen and audio, it’s not without its drawbacks. One major issue is that it often confuses noise with voice, which can lead to a loss of quality. However, if you’re using the latest version of macOS, there is an option to disable ambient noise reduction. This will prevent the software from mistakenly blocking your voice. This will improve the sound quality of your recordings.
iOS
There are many reasons you might want to record your iPhone screen, from nearing the rewarding conclusion of a hard Apple Arcade game to walking a loved one through setting up their new phone. While it’s possible to take a screenshot, there are times when recording a video is a better option, especially when you need to include audio.
The good news is that iOS includes a built-in tool that makes it easy to make videos with sound. You just need to know how to use it.
First, you’ll need to add the screen recording shortcut to Control Center. To do this, swipe down from the top right corner of your device. This will open the Control Center menu. Tap on the icon that looks like a clock with a red bar. If your iPhone is equipped with 3D Touch, you can press hard on the icon to activate the shortcut immediately. Otherwise, a long-press will work as well.
Activating the screen recording shortcut in Control Center will start a three-second countdown. It will also enable your ringer and mic. If you’d rather record without external audio, you can silence both with a quick tap on the microphone button.
The resulting video will be saved to your Photos app. From there, you can edit it, crop it, and share it through Messages or on your favorite social media platforms.
Android
The built-in screen recorder on Android phones is a convenient way to capture video, but it has some limitations. For example, it doesn’t capture audio from the speakers, so your video may not have any sound. You can fix this by using a third-party screen recording software. This will enable you to capture audio from your speakers as well as the display, which will result in a higher-quality video.
To activate the screen recording feature, open the Quick Settings panel and tap the screen recorder icon (may also be referred to as “screen capture” or “recording”). Then, you will see a three-second countdown to prepare for the recording process. Once the recording is complete, tap the “Stop” icon to finish the process and your recorded video could be found in the output folder.
Before you start recording, it’s important to save storage space on your device. This will prevent you from running out of space in the middle of a recording session. To free up space, delete photos and videos that you no longer need. You can also clear the cache on your device to help it run more efficiently.
If you’re using an older version of Android, or you want more advanced screen recording features, you can download a third-party app from the Google Play store. Some popular screen recording apps, such as AZ Screen Recorder, offer customizable video resolutions, bitrates, and frame rates.
Conclusion
Enabling the microphone during screen recording varies across different platforms and devices. Familiarizing yourself with the settings of your chosen recording method is essential for capturing high-quality content. Whether you’re on Windows, Mac, Linux, iOS, Android, or using a web-based recorder, following these steps should help you seamlessly integrate microphone audio into your screen recordings.
Leave a Reply