
How to Enable Remote Access on Mac
Enable Remote Access On Mac is essential in some situations, whether you are a businessman working from home or an IT specialist fixing a computer for a client. It’s important to know how to enable it properly so that only those with your password can gain access.
Luckily, the process is pretty easy. We will cover three possible ways to remote access a mac: Screen Sharing, Remote Management and SSH.
Enabling remote access on a Mac allows you to control your computer from another device, providing flexibility and convenience. There are various methods to achieve this, but I’ll guide you through using the built-in macOS feature called “Screen Sharing” and the “Back to My Mac” service.
1. Set Up iCloud:
Ensure your Mac is signed in to iCloud. Go to “System Preferences” > “Apple ID,” and sign in or create an Apple ID if needed. Enable iCloud Drive and ensure that the “Back to My Mac” option is checked.
2. Enable Screen Sharing:
a. Open “System Preferences” on your Mac.
b. Click on “Sharing.”
c. Check the box next to “Screen Sharing” on the left-hand side.
d. Click the “Computer Settings” button, then check “VNC viewers may control screen with password.”
e. Set a secure password for remote access.
3. Configure Firewall:
a. In “System Preferences,” go to “Security & Privacy.”
b. Click the “Firewall” tab.
c. Click the lock icon at the bottom left to make changes, then click “Firewall Options.”
d. Ensure “Screen Sharing” is allowed. If not, click the “+” icon and add it.
4. Note Your Computer’s IP Address:
a. Open “System Preferences” > “Network.”
b. Note the IP address listed under “Connected” or “Status.”
5. Access Your Mac Remotely:
a. On another Mac: Open Finder, click “Go” in the menu bar, and select “Connect to Server.” Enter vnc://[Your_Mac_IP_Address] and click “Connect.” Enter the username and password of your Mac.
b. On Windows or Linux: Use a VNC client (like RealVNC or TightVNC) to connect to your Mac using its IP address.
6. Troubleshooting:
If you encounter issues, check:
- Your Mac and remote device are on the same network.
- The firewall settings allow Screen Sharing.
- You are using the correct IP address.
7. Advanced: Use Dynamic DNS (Optional):
If your Mac’s IP address changes frequently, consider using Dynamic DNS (DDNS) to assign a domain name to your Mac. Services like No-IP or DynDNS offer free options.
8. Secure Your Connection:
For added security, consider using a Virtual Private Network (VPN) to encrypt the connection between your devices.
In summary, Enable Remote Access On Mac involves configuring iCloud, enabling Screen Sharing, adjusting firewall settings, and accessing your Mac using its IP address. Additional steps such as using DDNS and a VPN can enhance security and accessibility.
Screen Sharing
Screen sharing on mac allows users to view and control another Mac computer’s desktop remotely. It allows users to move files, open apps, and restart other Mac computers. This is useful if you need to access a file from a remote Mac but are not in the office or want to help someone else fix their Mac when they cannot be there.
This feature is built into Mac and can be enabled in System Preferences by clicking on the Sharing tab and enabling screen sharing. It is also available in a separate free app called Screen Sharing, which can be found in the /Applications/Utilities folder. Once you have enabled the feature, a new icon will appear on the Mac. To connect to a Mac using screen sharing, click on Finder, select Network in the sidebar, and double-click the Mac that has granted you access.
You will be asked to enter a username and password. You can choose whether anyone with an Apple ID can request a connection or you can block specific users from accessing your Mac. I can also set up your screen to automatically start with a full screen or windowed view and specify other display settings. You can also configure the display of the remote Mac to show your screen and apps, or a list of files and folders.
Remote Management
As many countries are on lockdown due to the COVID-19 pandemic, remote access to a Mac is becoming a necessity. Apple has spent a lot of time ensuring that Macs can be remotely accessed and used as though you were right there in front of them. And with the growing number of third-party apps designed to help, it’s now easier than ever to work from home or from anywhere in the world and still have access to your files and your screen.
To Enable Remote Access On Mac Management feature on a Mac, open System Preferences and click the Sharing icon. Then choose the Lock option and enter the name and password of a user with administrator privileges on that computer to unlock it. You can then choose to allow users of this computer to log in remotely, to create a list of specific users who can do so, or to select the checkbox to automatically grant the permission when the Mac is first connected to the network.
For IT pros who manage their organizations’ devices through an MDM (Mobile Device Management) solution, the MDM system can also enable this feature with a custom PPPC payload. This can include a set of security options that are applied to the end-user device such as requiring an admin password to connect to a Mac, preventing automatic screen recording, and limiting the display quality choices for remote connections.
SSH
As the world gets into a remote-hybrid work model, it’s important for IT teams to have the ability to remotely manage their end users’ Macs. This can save hours of back-and-forth troubleshooting and allow for quick resolution to performance issues, especially if the user isn’t physically sitting in front of the computer.
While many people are accustomed to screen sharing for remote access, it’s also possible to gain remote access to a mac using SSH (Secure Shell) and SFTP (SSH File Transfer Protocol). These tools can be used to download or upload files from a Mac and can even be used to connect directly to a command line and run commands.
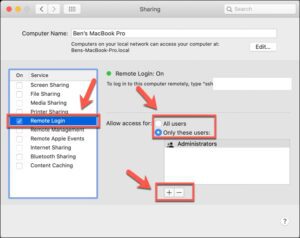
To enable SSH on a mac, simply open System Preferences and navigate to the Sharing options. You should see a checkbox next to “SSH Login” with the command displayed underneath it. If you want to restrict the number of people that can login with SSH, choose the “Only these users” option and customize your list.
Keep in mind that enabling SSH on a mac can make the device less secure. To help reduce this risk, you should configure the firewall to allow SSH communications through port 22. This should be done on the local system as well as the remote one. You should also use a password-protected admin account when connecting to the Mac and avoid leaving it unattended for long periods of time.
Other Sharing Options
Many people need to remotely access their Mac either for work or because they have a family member with a problem. In the past, Apple used to have a simple Back To My Mac tool which has been removed from macOS Mojave. However, there are still a few ways to access a mac from another computer.
One option is to use Screen Sharing. This is a free feature that is built into macOS and it allows you to connect to the other Mac using its IP address. You can also connect to a Mac using its Apple ID if it is listed in your Contacts list. You can control what other users have access to by going into System Preferences and clicking on the Sharing option.
Another option is to use Remote Login, which is a more advanced feature that allows you to connect to a mac from outside of your network by using SSH. This is a more secure option but it does require some technical knowledge to setup. You can enable this by going into System Preferences and checking the Remote Login box. You will then need to specify what users you want to be able to access this computer and also enter the password for this user.
There are a few different options to remotely access a mac and most of them are fairly easy to use. If you need more features then you can always use a professional remote desktop app such as Atera which offers a range of features including file transfer, chat, screen sharing and recording.
Leave a Reply