
How To Enable SSH On MacOS On Login
Modern Macs come with SSH, or Secure Shell, preinstalled, but by default, it’s disabled. Advanced users can enable or disable SSH using the command line. Enabling SSH can make it easy to connect to a remote computer, perform file transfers, or run admin tasks securely. To enable SSH, open a terminal and run the following command. Enable SSH MacOS On Login
In the Terminal window, type “system setup” with sudo privileges. Once you do that, you will be prompted to enter your user password. During this process, you may want to specify the -get more login and -steer mote login flags to ensure the SSH server is running Google.
To enable SSH on MacOS, open the login screen and check the checkbox labeled “Enable SSH.” This will enable the SSH server in the background. You can then restrict SSH access to particular users or groups. Click the “Only these users” or “All users” options to add users or groups to the list. Once you’ve added all the users you want to allow SSH access to, type “logout” to disable SSH.
How To Enable SSH:
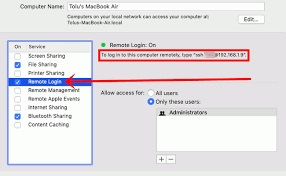
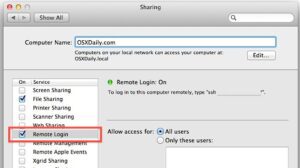
The Mac OS X operating system already includes an SSH server, but the default setting disables it by default. Enabling it is essential if you want to perform remote logins or remote copies. To enable remote login, go to System Preferences and click Remote Login. If you’re not sure whether this is the right setting for your needs, open the Terminal application to find out who’s allowed to log in remotely.
To connect via SSH to a remote Mac, you’ll need an application called Terminal. You can find it in the Applications or Utilities folder on your Mac. There are several ways to open it and start an SSH connection. To use SSH on Mac, you must specify the IP address of the remote server and user.
How To Connect Via SSH:
The first step is to enable Remote Login on your Mac. This option allows your computer to connect to your Mac and carry out tasks on it.
Using the command line, you can limit inbound SSH access to specific users on your Mac. First, you must choose which user or group you want to allow SSH access to. This can be done by clicking the + icon and selecting Users & Groups. By default, SSH is secure. For example, if you use the command “sshd -s” to connect to a remote server, the fingerprint of the SSH connection is b3:42:27:4a.
How To Restrict Inbound SSH Access To Specific Users:
You can also disable password authentication if you want more security. This setting will prevent unauthorized users from connecting. It can also prevent lost keys from connecting to your server. However, disabling password authentication is generally not recommended unless you have a special reason for doing so.
To add multiple keys to ssh-agent for SSH macOS on login, you must first make a symlink to your private key file in /.ssh/login-keys.d. You should replace id_rsa with the name of your key file. Once you’ve done this, open /etc/pam.d/login and include the highlighted text. Remember to check the order of lines as it may affect how the login agent behaves.
Go To Settings:
- To find the SSH command you want to use to log in to your Mac from another computer, choose Apple menu > System Preferences,
- Click Sharing, then choose Remote Login.
- The SSH command is displayed under the “Remote Login:
- Enabled” indicator.
- Enabling remote login to your Mac can make it less secure.
- See Mac security settings.
The next step is to add a custom key. When you create a key pair, you can specify the full path of your user’s.ssh directory. Once you’ve done that, ssh-agent will ask you to enter a passphrase to protect the private key. Once this step is complete, the agent will connect to the server with the correct key.
Leave a Reply