How to Enable Remote Access on Windows 10
Enable Remote Access On Windows 10 For example, if Carol on the IT support team is attending a conference out of town, she can remotely access a computer at the office or home to fix any IT issues. This is a useful way to save time and increase productivity.
For a secure connection, select the option to require network-level authentication to connect. This will thwart any malicious attempts to gain unauthorized access to the device or server.
Enabling remote access on Windows 10 allows you to connect to your computer from another device, providing flexibility and convenience. The process involves configuring settings and ensuring security measures are in place.
1. Check Windows 10 Edition:
- Ensure you have a Windows 10 Pro, Enterprise, or Education edition, as the Home edition doesn’t include the necessary features for remote access.
2. Check Network Connection:
- Confirm that both devices are connected to the same network. Remote access typically works better within a local network.
3. Verify Firewall Settings:
- Open the Windows Defender Firewall settings.
- Click on “Allow an app or feature through Windows Defender Firewall.”
- Make sure “Remote Desktop” is enabled for both private and public networks.
4. Enable Remote Desktop:
- Press
Win + Sto open the search bar, type “Remote Desktop settings,” and select it. - Toggle the switch to enable Remote Desktop.
5. Configure Remote Desktop Settings:
- Click on “Advanced settings” to configure more options.
- Enable “Network Level Authentication” for added security.
- Note the PC name under “How to connect to this PC.” You’ll use this later.
6. Set Up Dynamic DNS (Optional):
- If your home network has a dynamic IP address, consider using Dynamic DNS (DDNS) to access your PC with a consistent hostname.
7. Configure Router for Port Forwarding:
- Access your router settings through a web browser (typically by entering 192.168.1.1 or a similar address).
- Locate the port forwarding section and forward port 3389 to the local IP address of your Windows 10 PC.
8. Find External IP Address:
- Search “What is my IP” on Google to find your external IP address. This is the address you’ll use to connect remotely.
9. Secure Remote Desktop Connection:
- Use a strong, unique password for your Windows account.
- Consider using a Virtual Private Network (VPN) for an added layer of security.
10. Set Up a Microsoft Account:
- Link your Windows 10 user account with a Microsoft account for more straightforward remote connections. Go to Settings > Accounts > Your info to link or create an account.
11. Install Remote Desktop App (Client):
- On the device you’ll use to connect remotely, install the Microsoft Remote Desktop app from the Microsoft Store or relevant app store.
12. Connect Remotely:
- Open the Remote Desktop app.
- Click on the “+” button to add a new connection.
- Enter the PC name or external IP address.
- Click on the connection and enter your credentials when prompted.
13. Troubleshooting:
- If the connection fails, double-check firewall settings, port forwarding, and credentials.
- Ensure Remote Desktop is allowed through any third-party security software.
- Restart both the local and remote computers.
14. Enhance Security Further:
- Regularly update your Windows 10 system for the latest security patches.
- Consider using multi-factor authentication for an additional layer of protection.
15. Optimize Remote Desktop Experience:
- Adjust display settings in the Remote Desktop app for optimal performance.
- Experiment with different connection speeds to find the right balance between performance and quality.
16. Monitor Remote Sessions:
- If multiple users access the PC remotely, monitor sessions using the Task Manager. Right-click the taskbar, select Task Manager, go to the Users tab, and manage sessions accordingly.
17. Log Out or Disconnect Remotely:
- When done, log out or disconnect properly to prevent unauthorized access. Simply closing the remote desktop window leaves your session active.
18. Regularly Review Remote Desktop Logs:
- Periodically review the Windows event logs for any suspicious remote desktop activity. Look for logon/off events and any anomalies.
19. Update Remote Desktop App:
- Keep the Remote Desktop app on your client device up to date to benefit from the latest features and security improvements.
20. Consider Third-Party Solutions:
- Explore third-party remote access solutions for advanced features and functionalities, especially if your needs go beyond basic remote desktop capabilities.
By following these steps, you should be able to enable remote access on your Windows 10 system securely and efficiently. Always prioritize security and keep your system and applications up to date for a robust remote access experience
1. Open the Settings app
You can enable remote access on windows 10 by using the Settings app. This feature is only available if your PC is on the same network. You can also set a gateway server or group connections to make it easier to manage your remote connections. You can also choose to allow or disallow remote desktop through the built-in firewall.
If you’re having trouble connecting to a remote computer, it could be because the necessary services aren’t running. You can check this by searching for “Services.” Click the top result and ensure that Remote Desktop is listed as active. You can also verify that the service is running by checking its status under the Status tab.
You can also use the Run command to open the Settings app immediately. This command is especially useful if you have trouble opening the app using any other method. This article from MiniTool Software lists all the methods you can use to open the Windows Settings app. It’s worth mentioning that some of these methods aren’t always secure, so be sure to use the safest option possible.
2. Click on System
If you want to enable remote access on windows 10, it is important to keep in mind that you should be on a private network when doing so. This is because it will allow others to connect to your computer and view your documents, files, and more. It is also recommended that you enable network-level authentication so that connections are secure. You can do this by clicking the Advanced options at the bottom of the page.
You can now access your windows 10 computer remotely by using the remote desktop app on any device that has a web browser and an internet connection. The app will prompt you to grant access and will require you to enter the IP address or computer name of the computer you want to connect to.
Once you have entered the computer name, you will need to click “Connect”. Then, you will need to wait for a few seconds until you see the blue screen of the remote PC. After that, you can start using the remote PC as if you were sitting right in front of it.
3. Click on Remote Desktop
You can remotely access a computer running Windows 10 or Windows 11 Pro from another Windows device, a Mac, or a mobile device. This allows you to perform administrative tasks on the host PC, such as diagnosing and fixing a computer problem, printing documents from a remote location, or demonstrating a software application.
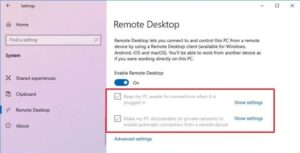
On the Windows device that you want to connect to, open the Settings app and select System. Move the Remote Desktop slider to On to enable remote access. You can also specify how you’ll connect to this PC by clicking the Add a user account button and adding your login details for connecting to the PC remotely. You can even set the option to keep the PC awake and discoverable to facilitate connections.
On the client computer, install Microsoft’s free Remote Desktop app from the Microsoft Store, Google Play, or Apple App Store. Launch the app and click ’Add PC’ to connect to your Windows device using the app. If prompted, grant the app any access it may need to the host PC’s camera and microphone to continue.
4. Click on Allow
Once the Remote Desktop feature is enabled, it will appear under the “System” category in the left sidebar. Click on it and you will see a prompt that reminds you that doing so will allow users to connect to your computer from other networks and over the internet.
This can be useful for businesses and individuals that need to access their devices remotely. You will also want to make sure that the Windows Firewall is configured to allow Remote Desktop to pass through. This can be done by clicking on the “Change settings” button in the Windows Firewall window and ensuring that the checkbox next to “Remote Desktop” is checked for both the Private and Public networks.
Once you have enabled Remote Desktop on your Windows 10 device, you will be able to connect to it from any other device (including Macs) using the Remote Desktop Protocol. This will enable you to offer assistance and control a computer or server without being physically present at the location. The ability to enable Remote Desktop on a device has been around for years, but it was usually a task that required the use of the traditional Control Panel. Now, however, it can be easily done from the new Windows Settings app.
5. Click on OK
Having remote access to your Windows computer allows you to work from anywhere in the world and connect as if you are in front of it. This makes it easy to troubleshoot, collaborate, and stay connected to your team from any device. But, before you can use this feature, it’s important to enable remote desktop on windows 10.
This option is available in the Settings app or Control Panel. When enabled, this setting will add the necessary rules to the built-in Windows firewall and allow Remote Desktop connections to be established from private and public networks.
In the advanced settings, users will also be able to configure extra features such as requiring computers to use network-level authentication for connecting remotely. This will help to make sure that only people with the correct credentials can access the device. Additionally, the advanced settings page will show information about the current Remote Desktop port number.
For more remote access features, check out our solution ITarian, an advanced remote desktop software that enables you to work from anywhere in the world with complete security and convenience.
Leave a Reply