
How to Enable Remote Desktop Protocol on Windows 10
Enable RDP On Windows 10 is a Windows protocol that allows users to access the graphical interface of a computer from another location. It’s used by individuals who work from home or on the road and by IT professionals who troubleshoot a computer remotely.
Enabling remote desktop on Windows 10 is a simple process that can be completed in minutes. The process is easy and quick to follow, and can be done from the Control Panel or the network administrator’s console.
Enabling Remote Desktop Protocol (RDP) on Windows 10 allows you to connect to your computer remotely, providing convenient access to your system from another location. The process involves configuring system settings and ensuring that your computer is secure.
Step 1: Check System Edition
Ensure that your version of Windows 10 supports Remote Desktop. Only Windows 10 Pro, Enterprise, or Education editions include the necessary features. To check your edition, right-click on the Start button, select “System,” and look under the “Windows specifications” section.
2: Verify Network Connectivity
Make sure your computer is connected to a network, either through Ethernet or Wi-Fi. Remote Desktop requires network connectivity to function.
3: Open System Properties
- Press
Win + Xto open the Power User menu and select “System.” - In the System window, click on “Remote settings” on the left sidebar.
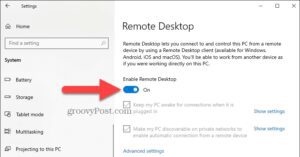
4: Enable Remote Desktop
- In the System Properties window, go to the “Remote” tab.
- Under the “Remote Desktop” section, check the box next to “Allow Remote Assistance connections to this computer.”
- Optionally, you can check “Allow connections only from computers running Remote Desktop with Network Level Authentication” for enhanced security.
- Click “Apply” and then “OK” to save the changes.
5: Configure Firewall Settings
To allow Remote Desktop connections, ensure that your Windows Firewall allows the necessary traffic.
- Press
Win + S, type “Windows Defender Firewall,” and select the corresponding result. - In the left pane, click on “Allow an app or feature through Windows Defender Firewall.”
- Scroll down and find “Remote Desktop” in the list. Ensure that both “Private” and “Public” boxes are checked.
- If “Remote Desktop” is not listed, click on “Change settings,” then “Allow another app…” and add “Remote Desktop” to the list.
6: Set Up Dynamic DNS (Optional)
If your computer’s IP address changes frequently, consider using Dynamic DNS to assign a domain name to your system. This step is optional but can be helpful for connecting to your computer over the internet.
- Sign up for a Dynamic DNS service and follow their instructions to set up an account.
- Install a Dynamic DNS client on your computer and configure it with your account details.
- Now, you can use the provided domain name to connect to your computer remotely.
7: Find Your IP Address
Identify your computer’s local IP address, especially if you are connecting within the same local network.
- Press
Win + Xand select “Command Prompt” or “PowerShell.” - Type
ipconfigand press Enter. - Look for the “IPv4 Address” under the active network connection – it will be something like “192.168.x.x.”
8: Configure Router (Port Forwarding)
If you are connecting to your computer over the internet, configure your router to forward the Remote Desktop Protocol (RDP) port (default is 3389) to your computer’s local IP address.
- Access your router’s settings by typing its IP address in a web browser.
- Find the “Port Forwarding” or “Virtual Server” section.
- Create a new port forwarding rule for port 3389, forwarding it to the local IP address of your computer.
9: Obtain External IP Address (Optional)
If you’re connecting over the internet, find your external IP address. You can do this by searching “What is my IP” in a search engine.
10: Connect to Your Computer
Now that you’ve set up your computer for Remote Desktop, connect to it from another device.
- On another Windows computer, open the “Remote Desktop Connection” app. You can find it by searching in the Start menu.
- Enter the IP address or domain name of your computer.
- Click “Connect” and enter your Windows username and password when prompted.
11: Additional Security Measures
For added security, consider implementing the following measures:
- Use strong, unique passwords for your user account.
- Regularly update your system with the latest security patches.
- Enable Network Level Authentication (NLA) for an extra layer of security.
Method 1: Open Control Panel
Using Remote Desktop Protocol (RDP), you can control a computer over the internet from another location. You can do things like access files, run applications, and print documents from the remote computer as if you were physically present at it. This technology can be particularly useful in business settings, where multiple computers may need to be controlled at once.
If you have Windows 10 or 11, you can enable RDP from the System settings menu. You can also configure advanced options, such as enabling Network Level Authentication and changing the port number. Once you’ve enabled RDP, you can connect to your computer from any other device that supports the protocol.
In order to use RDP, you must have administrator privileges on both the host and client computers. In addition, you must have a stable internet connection. If you encounter any problems while attempting to connect, try the following troubleshooting steps:
The easiest way to enable RDP on your Windows 10 computer is to open the Control Panel. To do this, click the Start menu and search for “Control Panel.” You can also launch the Control Panel by clicking the “Run” dialog box and entering “control.” In the System Properties window, select the “Remote” tab. Check the “Allow Remote connections to this computer” option and click Apply and OK.
Method 2: Open Network and Sharing Center
The Network and Sharing Center allows users to set the rules for how their computers connect to other devices. For example, you can set up a rule that prevents RDP connections from entering the computer’s local firewall. This can help protect the system from potential threats and ensure that only reputable connections are allowed through.
The remote desktop protocol (RDP) is a Microsoft-proprietary protocol that can be used to remotely access other devices on the same network. The protocol works by allowing the user on one device to access the graphical interface of another computer or server. It also provides the user with a file transfer capability. It is often used in corporate environments and is a useful tool for managing systems remotely.
To enable rdp on windows 10, you will need to make sure that the server that you want to access is configured to allow connections from other computers and that the client computer has the RDP software installed. You will also need to configure your router to allow connections from outside the network.
If you are using a corporate network, you may need to check with your IT support staff about the policies for enabling rdp on windows 10. Some networks only permit specific groups and users to use RD so you will need to be sure that your user account is included in this list.
Method 3: Open Security Settings
RDP enables users to remotely connect to a computer using an application. This can be useful for IT professionals or people who travel a lot, and it allows them to use their computer as though they were physically present. However, RDP has some security risks that are important to consider.
To ensure that you have the best security possible, it’s recommended to enable Network-Level Authentication on the server. This will ensure that only authorized users can connect to the server, which can protect against attacks like brute force. You can also enable Account Lockout Policies to prevent hackers from exploiting legitimate accounts for unauthorized access. Additionally, you should always install Microsoft updates to keep your server software up to date.
Another way to enable RDP on Windows is to open the Security Settings. This will allow you to control the settings for the PC that you want to access. You can also set up a password and monitor user activity to identify any suspicious activities.
You can also open the Command Prompt to enable RDP in Windows 10. To do so, click the Start button, type cmd, and press Enter. You can then open the Command Prompt and run the “whoami” and ipconfig” commands to find out your IP address or computer name. Once you know your IP address or computer name, you can open the Remote Desktop Connection application on your Windows 10 PC and connect to a remote computer.
Method 4: Open Group Policy
Teams responsible for supporting physically distant computers and users require a tool that enables them to exercise remote access and control over these systems. Microsoft’s Remote Desktop Protocol (RDP) provides a secure method for doing just that.
RDP requires user authentication on the RD Session Host Server before a session can be formed. This technique is called Network Level Authentication, and it’s a great way to enhance server security. To enable this feature, click the Enabled radio button. Enter the users or groups you want to have permissions to offer Remote Assistance, one per line. Click Finish to exit and save the new rule.
To configure the GPO settings, navigate to Computer Configuration > Policies > Administrative Templates > Windows Components > Terminal Services > Remote Desktop Session Host > Connections. Right-click the policy setting “Require user authentication for Remote Desktop connections by using Network Level Authentication” and select Edit. Enable this policy setting by selecting Enabled and clicking Apply.
After applying the Group Policy, reboot the client computer and re-open System Properties to verify that the RDP connection settings are now configured with Network Level Authentication enabled. If not, launch CMD as an administrator and run the command gpupdate to refresh the group policy on the client. Once complete, you should be able to connect to the host computer using RDP and see that it’s now configured with Network Level Authentication.
Conclusion
Enabling Remote Desktop on Windows 10 provides a convenient way to access your computer remotely. By following these steps, you ensure that your system is properly configured and secure, whether you’re connecting within the same network or over the internet. Always prioritize security by using strong passwords, updating your system, and implementing additional security measures.
Leave a Reply