
How to Disable and Reset the Camera on a Windows 10 Laptop
Disabling the webcam on a Windows 10 laptop can be a frustrating experience, but there are ways to resolve the issue. You can disable your webcam in Device Manager, update the webcam driver, block third-party applications from using your webcam, or reset the camera. These solutions are simple and effective. Enable Camera Windows 10 Laptop.
To turn off your webcam in Windows 10 laptop, navigate to the Device Manager. Then, expand the Imaging Devices category. You can also disable the microphone. In this way, you can avoid taking pictures of your laptop when you’re not using it. To do this, right-click on the camera and click “Disable.” You can then confirm your decision by clicking “Yes.” The webcam will no longer function, but the light will still remain on Google.
You can also choose to disable your webcam through Group Policy or Device Manager. However, you must have elevated PowerShell access to do so. Moreover, disabling a camera via Group Policy isn’t possible for all devices. To do this, you should know how to change the properties of the camera.
How To Update Webcam Driver:
If the camera still isn’t showing up in Device Manager, you can go to the Settings tab of your laptop and check for pending updates. If the webcam is still not showing up, you can also try rebooting your computer or running a troubleshooter for your hardware. If these two methods fail, you can try using the camera by pressing the multimedia key.
If you’re having problems using your webcam on Windows 10 laptop, you may want to update the driver on your system. Many problems with webcams are caused by outdated drivers, which can result in problems with your webcam’s performance. To fix these issues, try updating the webcam driver from the manufacturer’s website. You can find the latest drivers for Windows 10 and Windows 8 laptops there.
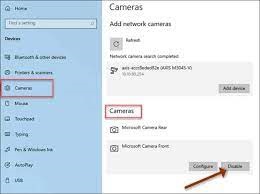
How To Disable Webcam In Device Manager:
To update the webcam driver on your Windows 10 laptop, go to the Device Manager, and expand Imaging devices and Cameras. Next, click Sound, Video, and Game controllers. Locate the webcam in the list and right-click on it. Next, click the Enable Frame Server Mode value, which is a DWORD. Enable Camera Windows 10 Laptop.
If the webcam is not working after updating the driver, you can try uninstalling the new driver by using Device Manager. After uninstalling the old driver, you can install the new one. You should also restart your PC to check if the webcam is working properly.
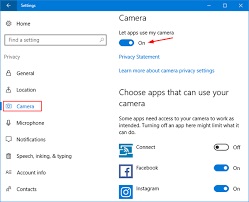
How To Block Third-Party Apps From Using Webcam:
You can easily block third-party apps from using your webcam on Windows 10 laptop by going into the Settings app. Under the Privacy & security tab, you can see which apps have permission to use your webcam. Toggle the camera-access access buttons to deny or allow them to access your webcam. You can also see the last time that your webcam has been used.
Once you’ve selected the settings you want to use, you can enable or disable the webcam on your laptop. First, you need to expand the Imaging Devices category. You can disable the webcam on your Windows 10 laptop by clicking on the checkbox next to the webcam.
How To Enable Camera Reset Webcam:
In case you’re using an external webcam, make sure that it’s not connected to your laptop. Some antivirus applications may be blocking webcam access. If so, temporarily disable or remove your antivirus application. In addition, you should also make sure that your webcam is unplugged from any USB ports.
If your webcam is not working on your Windows 10 laptop, there are a few steps you can take to fix the problem. First, you need to update your webcam driver. Often, the latest version of drivers is required to ensure your webcam will work with Windows 10. To update your webcam driver, open the device manager and right-click on the webcam. Click on Update driver software. Once you have installed the latest version, restart your PC.
How To Enable Camera On Laptop:
If you are unable to fix the problem, you can try to load the default settings for the Windows 10 webcam in the BIOS and UEFI settings. You can also open the Device Manager in the Start menu. From here, you can find and open the Privacy section. Then, choose the Integrated webcam that is not working.
Go To Settings Laptop:
- To open the webcam or camera,
- Select the Start button, select All apps, and
- Then select Camera from the list of applications.
- If you have multiple cameras, you can switch between them by selecting Change Camera at the top right after opening the Camera app.
Once you have done this, you should restart your computer and open the Device Manager to check for any hardware changes. Alternatively, you can disable the antivirus software temporarily, if you have any installed.
Leave a Reply