
How to Enable Camera in Windows 10
If your webcam is not working properly, you may need to update the drivers of your webcam. This can be done through the Control Panel. There are also applications that require a specific driver for your webcam. Some of these applications require updated drivers, while others may only need a basic driver. To change your webcam driver, you must follow these steps Enable Camera Windows 10:
Press the Windows logo key to open the Settings app. From here, click on the Troubleshoot option. The Hardware and Devices section is in the right pane. Click on the Hardware and Devices to run the troubleshooter. If the troubleshooting doesn’t solve the problem, you can try to install the older version of the driver Google.
Alternatively, you can use the Camera program in Windows 10. Go to the Start menu and click on the Camera app. The Camera application contains many settings that you can use to test your webcam. Mac users can also test the webcam by using the Photo booth app. This app is similar to the one you would use to take passport photos. Click on the Camera icon and you’ll see a window where you can click on the camera’s output.
How to turn off a webcam in Windows 10
If you don’t need to use the webcam on your PC, you can turn it off by following a few steps. First, go to Device Manager. Here, you will see a list of cameras and other imaging devices. Click Integrated Webcam and right-click to bring up a context menu. Select the option “Disable camera” and click OK. After that, you will need to restart your PC before the webcam will be disabled.
In some PCs, you may want to enable this hardware feature in the BIOS. This way, the webcam will not be visible in Device Manager. To enable it, simply change its property to Enabled. Alternatively, you can simply cover the webcam and disconnect the cable.
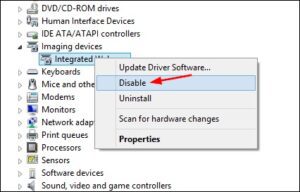
How to disable a webcam in Device Manager
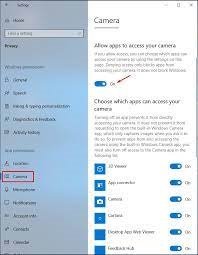
Windows 10 allows you to customize camera settings to control who can view it. You can also disable it for specific applications. Changing these settings is a good way to protect your privacy while using your computer.
The first step in disabling your webcam is to locate it in Device Manager. There, you will see a list of all of the cameras and imaging devices on your computer. To disable your webcam, simply right-click on the Integrated Webcam, VGA WebCam, or USB Camera that you wish to disable. After a few seconds, the LED that appears next to the camera should turn on.
How to check if your webcam is working properly
You should disable your webcam if you are concerned about privacy issues. A webcam is usually built into laptops, so disabling it may prevent anyone from spying on you. In addition, disabling your webcam will prevent other applications from accessing it. Using the Windows keyboard shortcut, open the Settings app. In the left pane, click Bluetooth & devices. On the right, look for Cameras. The Disable button should be located under Connected Cameras. Click Disable when the confirmation window pops up. If you want to enable your webcam, select the Enable option next to the webcam.
If your webcam is not integrated into your computer, you can disable it using the device manager process. This is an especially good solution if you don’t want your children to access child-oriented websites. However, if you don’t want to disable your webcam, you can simply turn it around so that it faces the wall and unplug it. The webcam will then resume normal activity once you plug it back in.
How to turn on a webcam in the Camera app
Windows 10 has built-in cameras that can be used to take pictures or record video, but they might not be enabled or working properly. In such a case, it is important to enable your camera in the Camera app. In addition to that, external webcams may also need software updates.
The camera application will have a slider on the left side that lets you control brightness. If you want to adjust the brightness of your image, simply drag the slider to the left. You can also change the focus by moving the slider from close to infinity.
Go To Settings Camera:
- To open the webcam or camera, select the Start button, select All apps, and then select Camera from the list of applications.
- If you have multiple cameras, you can switch between
- Them by selecting Change Camera at the top right after opening the Camera app.
First, you must install the webcam driver. Once installed, you can now turn on your webcam. After that, you must make sure to update all drivers for your webcam.
Leave a Reply