
How to Enable SSL in Windows 10
SSL is a security feature that enables websites to send and receive secure data. Windows 10 comes with a built-in feature that helps you enable SSL. When you browse the web, you can see a padlock icon in the address bar. When you click on the icon, a pop-up window will display the current certificate validity.
To disable SSL v3 in Windows 10, you can open the Windows Registry. This is found in the Control Panel, and it can be accessed via the Start menu. Press the Windows key (or Start if you are using a tablet or mobile device), and then select Run. In the Run dialog box, type regedit and press OK. The Registry Editor window should look like the following Google:
Click the Advanced option. Select the Disable SSL v3 option. If it is enabled, the command should show a warning. Otherwise, run the command again. This should reset the encryption settings. After the change, reboot your computer. After changing the settings, you’ll need to re-enable SSLv3 before your changes take effect.
How To Disabling SSL V3:
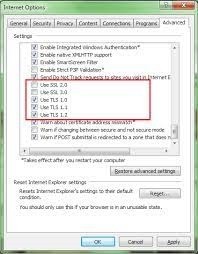
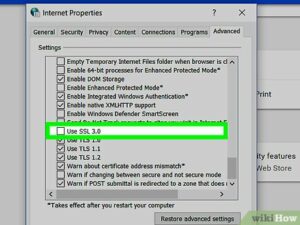
Disabling SSL v3 in Windows will also remove any existing certificates from your PC. You can disable the SSL protocol in older versions of Internet Explorer as these don’t support the TLS 1.1.2 protocols. To disable SSL v3, go to the Internet Options window and click the Advanced tab. Go to the Security section. Double-click the value in the right pane and click OK.
Once the certificate has been installed, you can enforce SSL by using the Computer Management console. To do this, you need to click the Advanced icon in the options window and choose the SSL tab. Select the “Encryption” section. On the Encryption tab, click the “View Certificates” and “Import” options. Once you have selected the correct certificate, you will need to enter your master password and then enter the certificate password.
How To Installing A Certificate:
You can check the validity of the SSL certificate by using the Certificate Manager. Alternatively, you can use the aircheck Windows Sysinternals utility to view the trusted Microsoft root certificate list. The certificate you install must be issued by a Certificate Authority (CA). To apply an SSL certificate, you will need to generate a CSR, which is a document that is submitted to the CA.
Once you have the certificate, you can install it on the site. The process to install an SSL certificate is easy. First, go to the Server Certificates page. Go to the Actions panel and click the “Complete Certificate Request” button. In the next window, you will see the Certificate Manager, which will allow you to browse and choose the certificate you want to install. You should now be able to visit the website.
How To Configuring A Web Server:
In Windows 10, you can configure a web server to enable SSL. To do this, you need to use the Server Configuration dialog box. In the Server Configuration dialog box, select the SSL tab. Choose the appropriate SSL certificate. There are several different types of certificates, including internal and wildcard certificates.
Generally, SSL is used by many websites to secure the connection between the website and the browser. This protects the privacy of users, and encrypts data. To use SSL, you need to use a certified certificate and bind the website to the https protocol.
How To Changing The Registry Key:
Choosing a certificate for your website is a critical step for protecting data. An SSL certificate is a sign of authenticity. When choosing an SSL certificate, you need to work with your IT department and web host to select the appropriate certificate. Next, you need to configure your Windows server to use the new certificate.
The easiest way to enable SSL in Windows 10 is to change a single key in the Windows registry. It is recommended to consult your System Administrator first before making any changes to the registry. Open the Registry Editor by pressing the Windows key + R. In the registry editor window, right-click the Protocols folder and select New. Next, create a new folder called “TLS 1.2.” Inside the folder, add a new key called “Client.” After adding the key, select it and then click Modify. Then, set the Base to Hexadecimal.
SSL Port On Windows Firewall:
- Start > Settings > Control Panel.
- Click the Windows Firewall icon. A window will appear.
- Click the Exceptions tab.
- Add Port button. A window will appear.
- Enter a name in the Name field.
- In the Port field, enter the port number of the Administration Server.
- Select the TCP option.
- Click the OK button.
The registry contains two basic elements: keys and values. Each key has a corresponding subkey. The key names are case-insensitive and must be at least two characters long. For example, if you want to enable HTTPS in Windows 10, the registry key name must begin with ‘https://’.
Leave a Reply