How To Enable Auto Clicker On ChromeOS
Enable Auto Clicker On ChromeOS Despite the fact that assuming you contemplate work areas and PCs you presumably think Windows or Macintosh, or perhaps Linux, there is a fourth player on the block that has been gradually taking over behind the scenes – – ChromeOS. With how much extraordinary Chromebooks present in schools and in our homes these days, numerous youngsters’ most memorable PC experience is with machines fueled by Google’s operating system, and not the conspicuous huge weapons.
Likewise, throughout the long term, the framework has made considerable progress from something with scarcely any highlights running on most reduced grade equipment, to a skilled, lightweight working framework that upholds electronic applications as well as Android applications, Linux programming, and even Steam – – for (generally) an extraordinary cost.
With the ascent of the prevalence of ChromeOS comes expanding assumptions for its clients. A while ago when it was only a very barebones experience, you truly wouldn’t anticipate that it should do substantially more – – or have a lot more extra elements – – than simply perusing the web. These days, you can find a great deal of cool and incredibly helpful increases heated squarely into the framework.
One of the most valuable, whether you need to involve it as an openness highlight, or as a method for making your sluggish looking over meeting significantly more chill, is the capacity to turn on the auto-clicker straight in the product. This is the way to turn the programmed taps on when you need to utilize them on your Chromebook.
How Accomplishes Auto-Clicker Work In ChromeOS
The auto-clicker capability, as the name proposes, allows your product to deal with the mouse clicks for you once the cursor sits inactive for a measure of time. This is a helpful element both for individuals with engine hindrances or those hoping to work on specific undertakings that they need to finish over the course of the day. Enable Auto Clicker On ChromeOS
ChromeOS accompanies the auto-clicker worked in as an openness capability, and it tends to be empowered in only a couple of steps. The entire element is incredibly simple to utilize. When empowered, the auto-clicker plays out a tick once your mouse pointer quits moving, so you can naturally choose what you’ve directed your mouse pointer toward.
The most effective method to turn on auto-clicker in ChromeOS
As we’ve referenced, empowering the auto-clicker in ChromeOS is truly more or less simple. To do it, you simply have to follow these straightforward advances:
- Begin at the work area of your ChromeOS gadget.
- Click on the time in the base right corner.
- In the spring up menu, select Settings.
- In Settings, go to the Availability tab.
- Go to the Cursor and touchpad segment.
- Turn on Consequently click when the mouse cursor stops.
Step by step instructions to tweak your auto-clicker
Nonetheless, essentially turning on your auto-clicker isn’t all that you can do with this openness highlight. Just setting your mouse to click once the cursor stops may be all in all too restricting for you, yet ChromeOS allows you to dig somewhat more profound and set some further developed click choices.
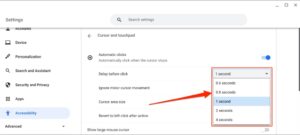
- In the first place, follow the means in the main segment above – – up to the place where you go the auto-click highlight on.
- When it’s on, you can get to extra programmed click settings.
- By tapping the Postponement before click choice, you can set how long the mouse cursor needs to remain stable for the auto-snap to kick in.
- You can likewise Balance out click area, which keeps your snaps inside a set reach until the cursor moves outside its limit.
- You can likewise set your auto-snap to Return to left-click after activity. This intends that subsequent to completing an optional activity, for example, a right-snap or look over, your auto-clicker returns to the default left-click.
- At long last, you can likewise set a Development limit, which is answerable for consequently clicking specific items inside a set ring around your cursor. This choice permits you to redo the size of that ring.
The most effective method to turn on various kinds of auto-clicks
Far superior, redoing when and how your auto-clicker connects with isn’t the main utility that your Chromebook has coming up for its auto-clicker. You might set the component to accomplish in excess of a basic snap. In the wake of empowering programmed clicks, in the base right corner of your screen you’ll see the auto-click menu, with different snap choices to look over. This is the thing they empower from left to right:
- Pick the principal symbol to one side to empower Left-click.
- Pick the second symbol to the left to empower Right-click.
- Pick the third symbol to empower Double tap.
- Next is the Snap and drag choice.
- The fifth capability of the auto-clicker is the Parchment choice. While turning on the parchment choice, you’ll see another spring up window with looking over choices. You can utilize them to explore different locales. It is likewise setting delicate, so in the event that your cursor moves to another window, you will actually want to look there also without reactivating the parchment capability.
- At long last, you can likewise stop programmed clicking by squeezing the No activity symbol.
You can likewise move the auto-click menu by tapping the furthest right symbol, which allows you to dock it to different corners of the screen.
Leave a Reply