How Do I Enable Wi-Fi Calling on My Phone?
Enable Wi-Fi Calling On My Phone lets you use your carrier-branded smartphone to make and receive phone calls over a WiFi connection, even when you don’t have a cellular signal. It’s available on most major carriers and devices.
Unlike apps like FaceTime, Skype, Kik, and WhatsApp, WiFi calling doesn’t use your mobile data plan.
Enabling Wi-Fi Calling on your phone can be a useful feature, especially in areas with weak cellular signals. Wi-Fi Calling allows you to make and receive calls over a Wi-Fi network instead of relying solely on cellular towers. The steps to enable Wi-Fi Calling may vary slightly depending on your device and carrier, but I’ll provide you with a comprehensive guide that covers the general process on both Android and iOS devices.
Android:
Step 1: Check Compatibility
Before enabling Wi-Fi Calling, ensure that your device and carrier support this feature. Most modern Android devices and major carriers offer Wi-Fi Calling, but it’s always a good idea to check the specifications or contact your carrier for confirmation.
Step 2: Update Software
Make sure your device is running the latest software version. Manufacturers often release updates that include bug fixes and improvements, and having the latest version can enhance the stability of Wi-Fi Calling.
Step 3: Enable Wi-Fi Calling
- Open the “Settings” app on your Android device.
- Scroll down and select “Connections” or a similar option depending on your device model.
- Look for “Wi-Fi Calling” or “Call Settings” and tap on it.
- Toggle the switch to enable Wi-Fi Calling.
Step 4: Set Preferred Network
Some Android devices allow you to set your preferred network type. If applicable, navigate to the Wi-Fi Calling settings and choose the option that prioritizes Wi-Fi Calling over cellular networks.
Step 5: Confirm Address for Emergency Calls
For emergency services, Wi-Fi Calling may require your address for accurate location information. Confirm or enter your address in the provided settings to ensure that emergency services can locate you if needed.
Step 6: Verify with Carrier
Depending on your carrier, you may need to register or activate Wi-Fi Calling. Contact your carrier’s customer support or check their website for specific instructions.
iOS (iPhone):
Step 1: Confirm Compatibility
Ensure that your iPhone and carrier support Wi-Fi Calling. iPhones running iOS 9 or later generally support this feature, but it’s best to check with your carrier for compatibility.
Step 2: Update iOS
Keep your iPhone’s operating system up-to-date by installing the latest iOS updates. This ensures that you have the latest features and security patches.
Step 3: Enable Wi-Fi Calling
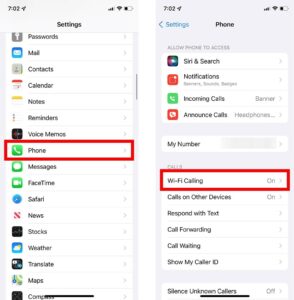
- Open the “Settings” app on your iPhone.
- Scroll down and tap on “Phone.”
- Select “Wi-Fi Calling” and toggle the switch to enable it.
- Follow any on-screen prompts to complete the setup.
Step 4: Set Preferred Network
iOS devices usually prioritize Wi-Fi Calling when connected to a Wi-Fi network. However, you can double-check this by going to “Settings” > “Cellular” > “Wi-Fi Calling” and ensuring it is turned on.
Step 5: Confirm Emergency Address
Similar to Android, make sure your emergency address is registered for accurate location information during emergency calls.
Step 6: Carrier Activation
Some carriers may require additional activation steps. If prompted, follow the on-screen instructions or contact your carrier for assistance.
General Tips:
- Check Carrier Compatibility: Confirm with your carrier that Wi-Fi Calling is supported and available for your plan.
- Verify Network Connection: Ensure a stable and reliable Wi-Fi connection before enabling Wi-Fi Calling to avoid call quality issues.
- Troubleshooting: If you encounter issues, restart your device, update carrier settings (if applicable), and contact your carrier’s support for assistance.
- Emergency Services: Keep in mind that emergency services might require your registered address for location purposes. Confirm that your address is accurate in the Wi-Fi Calling settings.
- Data Usage: Wi-Fi Calling typically uses a small amount of data, but it’s essential to be aware of your data plan, especially if you have limited data.
By following these steps, you should be able to enable Wi-Fi Calling on your Android or iOS device successfully. If you encounter any issues, don’t hesitate to reach out to your device manufacturer or carrier for additional support.
iPhone
Sometimes there’s a room in your house that just doesn’t get good cellular coverage. Using WiFi calling on your iPhone, you can make calls over your home’s Wi-Fi network when cell service is weak or unavailable. You can also use this feature if you’re traveling overseas and want to avoid international roaming charges.
To enable WiFi calling on your iPhone, you’ll need to have a wireless network with download speeds of at least 2Mbps. Then, open Settings and toggle the switch next to “Wi-Fi Calling” on. You’ll be prompted to input an e911 address for your phone so emergency dispatchers can locate you.
After you’ve enabled WiFi calling, calls and texts made over WiFi will appear to come from your cellular number. This helps people who receive your calls and texts know that you’re not on a VoIP service like Skype or WhatsApp. You can also use this feature to reach landlines and toll-free numbers.
If you’re having trouble making or receiving calls over WiFi, try connecting to a different network or restarting your phone. It may also help to check if Airplane Mode is on (which disables Wi-Fi). If this doesn’t solve your problem, contact us online or through the Samsung Members App. We’re always happy to help!
Android
If your Android phone supports Wi-Fi Calling, you’ll find the option to enable it in your Wireless and Network Settings. After you’ve enabled it, calls and texts will be routed through the Wi-Fi calling connection instead of the cellular network. Calls and texts that you make over WiFi don’t cost anything extra, but they do deduct from your monthly minutes allotment if you have a limited plan. Additionally, you may still be charged a fee to make calls or texts to international numbers.
With WiFi Calling, your calls and text messages will be crystal clear and reliable, even when you don’t have a signal. It’s a great way to transition from the corner of the back office to the subway deep underground or even to rural areas where you don’t have cell coverage. You’ll still be able to reach your family, friends and coworkers, plus landline numbers, customer service lines and 911 emergency dispatchers.
If you’re experiencing problems with WiFi calling, there are a few things you can try. First, check that your phone and Wi-Fi are both working properly. If the problem persists, try restarting your wireless router and modem. You can also reset your network settings on your device, but this will delete all saved Wi-Fi networks and passwords. If that doesn’t fix the problem, contact your carrier for assistance.
T-Mobile
There are apps like Skype, WhatsApp and Kik that allow users to make calls using a Wi-Fi connection rather than a cellular network. And phone networks that prioritize Wi-Fi calling, such as Google Fi and Republic Wireless, have a similar feature baked into their services. AT&T, Sprint and Verizon all sell phones that support Wi-Fi calling too, though it may not be turned on by default.
In order to use T-Mobile’s branded version of Wi-Fi Calling, you need to have an active account with the carrier and a device that supports it. You also need to be connected to a Wi-Fi network and have your device’s software updated to the latest version. If you’re unsure whether your device has T-Mobile’s Wi-Fi Calling capability, check this list of eligible devices.
T-Mobile’s branded version of the service is available on iPhones, iPads and Apple Watches that are running iOS 10 or later. It also works on Macs that have the latest version of OS X El Capitan or later. To get started, make sure that you’re signed in to iCloud and FaceTime with the same Apple ID on all of your devices. Then, enable Wi-Fi Calling on your iPhone. Finally, turn on the Wi-Fi Calling option on your other devices to start making and receiving phone calls over a Wi-Fi network.
Sprint
Sprint’s Wi-Fi Calling feature allows users to make and receive calls using their smartphone over a secure wireless connection instead of the cellular network. This can be useful in areas with poor cellular coverage or when your device is out of cellular range, such as when you’re at home or the office. Wi-Fi calling works with both cellular and VoIP phones and doesn’t count against your Sprint phone plan’s minutes.
To activate the service, follow the instructions in your phone’s Settings menu. This is accessible on Android devices by swiping down from the top of the screen and clicking on the icon that looks like a gear or cogwheel. On iOS, open the Phone app and click on Wi-Fi Calling to enable it.
You can also use your phone’s cellular data to make and receive calls if you don’t have access to Wi-Fi, but this will incur higher voice and data rates. You can check your carrier’s rate plans to see if you need to make changes before traveling or conducting business overseas.
If you’re a frequent traveler, you may want to consider signing up for a new plan with a more flexible data cap. This will allow you to save on roaming fees and stay in touch with home or the office. You can also sign up for a low-cost alternative to traditional cellular plans by joining Google Fi or Republic Wireless.
Leave a Reply