How Do I Enable SSL in Windows 10?
In order to enable SSL on your computer, you must assign a certificate to your computer. In order to do this, you need to be logged on as an administrator. After logging on, select the Certificates option. Then, click the Computer account or the local computer and click the Finish button. You should see a window asking you to confirm that you want to assign a certificate to your computer. Enable SSL Certificate In Windows 10
While using a self-signed certificate can be useful, it has some limitations. Most browsers don’t trust such certificates. Browsers will display a warning to visitors if they can’t verify a website’s identity. In some cases, it can also lead to a loss of traffic to the website, which can negatively affect its e-commerce business Google.
If you are running an internal website, you may want to use a self-signed certificate. These certificates are created without the help of a Certificate Authority (CA). Instead, the website owner signs them with his or her own private key. These certificates are free and could work for internal sites, but they can expose an organization to serious security risks.
How Do I Enable An SSL Certificate In Windows:
Self-signed certificates authenticate a website’s identity by encrypting communications between a website and its users. Because they contain a private and public key in the same entity, self-signed certificates are difficult to revoke. This makes it difficult to detect security breaches. Enable SSL Certificate In Windows 10
Self-signed certificates can be created free of charge and customized. However, they don’t provide the same level of security as certificates issued by trusted Certificate Authorities. Since self-signed certificates don’t require third-party authentication, they’re often viewed as less trustworthy than CA certificates. However, they’re still an acceptable alternative for internal communications.
How Do I Enable SSL Settings:
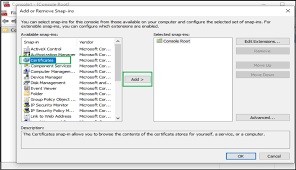
If you’ve recently purchased a self-signed certificate and want to add it to the Trusted Root Certificate Authorities in Windows 10, you can follow the steps below to do it. First, ensure that User Account Control is enabled. Then, open the Console window and click File>Add/Remove Snap-in. Locate and select the Computer account.
The trusted root certificate list is updated regularly on Windows. However, if you don’t have access to Windows Update, you won’t be able to update the list. This can lead to problems when you try to browse websites that use untrusted CAs, download signed scripts, or run signed apps.
How Do I Enable SSL Certificate:
You can also use a self-signed certificate to increase your security. Self-signed certificates have the advantage of being trustworthy to the machine that generated them. The trust chain is the most important component of any certificate. If you’re trying to avoid man in the middle attacks, you need to trust your machine’s certificate. Adding a self-signed certificate to the Trusted Root Certificate Authorities in Windows 10 is a good way to protect yourself from these attacks.
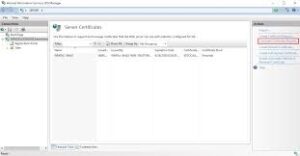
To import a self-signed certificate to the Trusted Root Certificate Authorities in Windows 10, you need to navigate to the Microsoft Management Console. From there, you need to navigate to the Certificates node. The Certificate Import Wizard will display a confirmation message. You can choose to place the certificate in the Certificate Store or leave it as-is. You can also choose to import a PKCS7 file containing several certificates.
How To Importing SSL Certificate To Server Storage:
The first step in importing an SSL certificate is to mark it as exportable. Typically, this involves using the IIS manager and entering the certutil command. Once this has been done, you will see a new entry in the Server Certificates page. The server certificate should be a self-signed certificate or one issued by an internal certificate authority.
You must export your SSL certificate before importing it in Windows Server. You can do this by double-clicking the Server Certificates option. Alternatively, you can also right-click in a blank area and select Import. You will then be prompted to type a certificate file name and password.
how to Enable SSL On Server:
Once you have selected the file to import, you must now assign it to the website. To do this, open the “Server Certificates” window and click the entry for your website. You can also assign the certificate to the website. To assign the certificate to the website, expand the “Sites” sub-menu and then select “Bindings.” In the “Type” and “IP address” fields, type “https” and “IP address” respectively. If you’re unsure of what the IP address is, you can use the default “All Unassigned” value. The “Port” field should be set to 443.
Follow These Steps:
- Select the Directory Security tab.
- Edit is now available in the Secure Communication section. Select Edit.
- Select Require secure channel (SSL). Note.
Certificates are stored in a variety of locations. Windows users can see their certificates and configure them for different purposes. First, they can check whether or not redirect is enabled. Alternatively, they can delete the certificate completely by running the Remove-Item cmdlet. This option requires that you have installed IIS 10 on the server.
Leave a Reply