How Do I Enable SMB On Windows
If you want to share files from your computer with other computers, you will need to enable SMB 1.0/CIFS File Sharing support. However, there are ways to disable this feature and control it using the registry editor. Let’s look at these methods. To disable SMB, go to the Settings menu, then to the Apps category. Then, open the More Windows Features menu. Enable SMB On Windows
SMB (Server Message Block Protocol) is a file-sharing protocol developed by Microsoft. The CIFS protocol, formerly known as SMB, was introduced in Windows 95. It added support for larger file sizes, direct transport over TCP/IP, symbolic links and hard links. In addition, CIFS also improved scalability and reduced chattiness. Currently, Windows supports SMB 1.0 and CIFS Google.

Disabling SMB 1.0/CIFS File Sharing support on Windows will cause a variety of issues. For example, users may encounter the error “Network path not found” when trying to access shared SMB folders. Moreover, users may experience difficulties in discovering networks unless they use the Discovery Service instead of the Computer Browser service.
How To SMB 1.0/CIFS File Sharing Support On Windows:
SMB is a network protocol that enables computers to share files, folders, and other resources among them. uses the Kerberos or NTLM authentication protocols to authenticate clients and servers. SMB also supports opportunistic file locking, which helps improve performance.
Opportunistic locking improves performance by controlling caching of network files. In contrast to traditional locks, opportunistic locking does not require file locking or mutual exclusion. Instead, it allows clients to cache changes and minimize the number of round-trips to the server. This type of lock is used to protect shared data between different devices. However, it requires the use of a certificate from the server.
How To Controlling SMB On Windows:
The SMB protocol is a client-server network protocol used to share files and printers between computer systems. It has been in use for many years to connect Windows computers with other computers. Most other operating systems also have client components to connect to SMB resources.
The SMB protocol is a client-server communication protocol that has been around for many years. It works by using the Kerberos or NTLM protocols to authenticate users and access shared resources between computers. SMB also supports opportunistic locking of files to improve performance. As of Windows 11 there are several new features that you can use to control the SMB protocol on Windows.
How Do I Enable SMB Protocol In Windows 10:
The first option to control SMB on Windows 10 involves opening the Control Panel, which is available in the Start menu. From there, open the Programs and Features section. The SMB Windows 10 support option can be found here, and there are three sub-options. The first refers to the SMB client, the second to the SMB server, and the third is the automatic removal function, which disables SMBv1 when not in use.
Another option is to use LDAP for access control. This will allow users from your LDAP server to access your SMB share, and the local TrueNAS user account will no longer have access to the share. Once you’ve established this, you’ll need to set the ACL accordingly. Many home users simply add an entry to the built-in users group and set the flags to INHERIT, but you can adjust the ACL to ensure that only the users who need it can access your data.
How To Enabling SMB From The Registry Editor:
Another option to control SMB on Windows is to disable encryption for SMB shares. In SMB 3.0 and older, the SMB protocol used the Secure Negotiate protocol to limit access by attackers. In SMB 3.1.1, Microsoft introduced pre-authentication integrity (SHA-512), which is an added security feature that limits attackers’ access to the data transmitted by SMB clients.
To enable SMB on your PC, first open the Registry Editor and type “regedit” into the search box. Next, you need to find the SMB 1.0/CIFS File Sharing Support entry. Locate the value data and set it to 1. The value 0 indicates that SMB is disabled. You can then set SMB1 to 1.
How Do I Use SMB On Windows:
Alternatively, you can use the PowerShell command to edit the SMBv1 support entry. Regardless of the method you choose, you will need administrator rights to access the registry editor. After locating the EnableSMB1Protocol value, select the appropriate value to enable SMBv1 support on your PC.
You can also enable digital signatures for SMBv1 and SMBv2 from the Registry Editor. When a Windows 2000 or Windows Server 2003 server is connected to a network, it will sign the packets that are sent from the client to it. The default setting for SMBv1 and SMBv2 is to enable digital signatures for all connections.
SMB 1 In Windows 10:
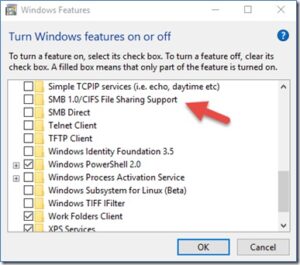
- Go to the Windows Optional Features window.
- Press Windows key + R to bring up the run dialog and type: optionalfeatures.
- Enable SMB Features 1.
- In the Turn Windows Features on or off window, expand “SMB 1.0/CIFS File Sharing Support” and then check the box next to “SMB 1.0/CIFS Client”.
Typically, Lanman Server is part of a domain or workgroup network. Hence, disabling it will lead to admin headaches. In addition to Lanman Server, there are also other SMB implementations. One of the most popular ones is Samba. It is open source and is widely used in Linux and macOS. Another one is NQ, developed by Visuality Systems.
Leave a Reply