
How Do I Enable My Webcam?
Enable My Webcam Sometimes hardware problems are caused by missing, outdated or incorrect device drivers. To resolve these issues, try running Windows Update or installing the latest drivers from the device manufacturer.
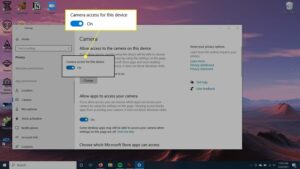
Also, make sure that apps have permission to use your camera. To do this, go to the Privacy menu (Windows 10) or Security & Privacy menu (Windows 11) and ensure that “Camera access for this device” is toggled on.
Enable My Webcam involves a series of steps that depend on the operating system you are using, the specific webcam model, and the applications you intend to use it with. In this comprehensive guide, I’ll cover the general steps for enabling a webcam on Windows, macOS, and Linux, along with troubleshooting tips.
Enabling Webcam on Windows:
1: Check Webcam Connection
- Ensure your webcam is properly connected to your computer via USB or built-in.
- Check for any physical switches on the webcam or laptop that may disable the camera.
2: Device Manager
- Right-click on the Start button and select “Device Manager.”
- Look for the “Imaging devices” or “Cameras” category.
- Find your webcam, right-click on it, and choose “Enable” if available.
3: Privacy Settings
- Go to “Settings” and select “Privacy.”
- Under “Camera,” toggle the switch to allow apps to access your camera.
4: Application Settings
- Open the application you want to use with your webcam.
- Look for settings or preferences related to video or webcam.
- Ensure the correct webcam is selected if you have multiple cameras.
Enabling Webcam on macOS:
1: Check Webcam Connection
- Confirm that your webcam is securely connected.
- If using an external webcam, check for any power switches or physical covers.
2: System Preferences
- Click on the Apple menu and select “System Preferences.”
- Choose “Security & Privacy.”
- Click on the “Privacy” tab.
- Select “Camera” on the left, then check the box next to the application that needs access to the camera.
3: Application Settings
- Open the application you want to use.
- Check the application preferences for webcam settings.
- Verify the correct camera is selected if you have multiple cameras.
Enabling Webcam on Linux:
1: Terminal Commands
- Open a terminal window.
- Type the following command to check if the system recognizes your webcam:
bash
ls /dev/video*
- If your webcam is listed, it’s detected by the system.
2: Permissions
- Ensure your user account has permission to access the webcam.
- You may need to add your user to the “video” group:
bash
sudo usermod -aG video $USER
- Log out and log back in for changes to take effect.
3: Application Usage
- Open the application you want to use with your webcam.
- Check the application settings for webcam preferences.
Troubleshooting Tips:
- Update Drivers: Ensure your webcam drivers are up-to-date.
- Reboot: Sometimes, a simple restart can resolve camera issues.
- Check Software Conflicts: Other applications or security software may block the webcam. Temporarily disable them to check.
- Hardware Issues: If the webcam is integrated, consult your device’s manual. For external webcams, try a different USB port or cable.
By following these steps, you should be able to enable your webcam on Windows, macOS, or Linux. If issues persist, refer to your webcam’s manual or support resources for specific troubleshooting guidance.
1. Turn on your webcam
Enable My Webcam are used for video chat, recording videos, and other purposes. They can be built into a computer or connected to a separate device. A webcam can help you communicate with friends and family who are far away or to teach online classes. It is important to have a high-speed internet connection and good lighting. You can use webcam software to adjust the image quality, brightness, and contrast. A camera with a wider field of view (FOV) allows you to capture more of the background.
If you are using a laptop, the camera may be turned on automatically when you open certain apps or visit websites. This is a security feature to prevent malware from taking control of the camera and spying on you or your home. However, some users may prefer to disable the camera for certain apps or services. For example, parents might want to disable the camera for instant messaging or interactive websites that are not child-friendly or appropriate.
If you are having trouble with your webcam, try restarting the computer and reinstalling the software that came with it or downloaded from the manufacturer’s website. You can also use the Microsoft Windows System Restore to return your computer to a date when the webcam worked properly. If the problem persists, you may need to replace the webcam’s driver.
2. Open the camera app
Certain HP notebooks, monitors and All-in-One computers have a built-in webcam, which you can use to take pictures and videos. You can also connect an external camera to your computer, which you can then use to take photos or record video.
If you’re having trouble using your webcam, the problem may be a software conflict. Make sure that you’re not using more than one program to use the webcam (such as instant messaging and a video editing program) at the same time, and close your webcam-based software programs when you’re done.
Another possible cause of problems is the hardware itself. you’re using an external camera, try connecting it to a different USB port on your PC.
If you’re still having trouble, you can try to update the driver for your webcam. This process will vary depending on your operating system, but it’s typically as simple as opening the Device Manager, locating the imaging devices section, and right-clicking on your integrated webcam device. After this, you should be able to use the Camera app without any issues. If this doesn’t work, you can also try to uninstall the camera device in the Windows Device Manager.
3. Select the camera you want to use
If your laptop has an integrated webcam, you can use it for video chats with friends and family. You can also purchase external cameras to use with your computer. If your camera isn’t working, there may be an issue with the hardware or software. There are several troubleshooting steps you can try to fix the problem.
If it isn’t, you can enable it in the camera app. If it is, you can disable the camera by selecting it from the list of apps that have access to your camera and choosing Disable. You can also try using a program such as WebCam On-Off, which allows you to turn on and off your webcam with one click and create a hotkey shortcut for it.
Another possibility is that your camera isn’t installed properly. To check this, open the Device Manager and select the Cameras page. Right-click on your camera and select Properties. Under the Driver tab, you can uninstall the current driver and install a previous version.
Finally, some antivirus programs can prevent your webcam from working. If this is the case, you can change the settings in your antivirus software to allow it to work. If you are still having trouble, you can contact your antivirus software company for further assistance.
4. Select the settings you want to use
Integrated webcams are an invaluable feature on laptops that can help you make video calls to your friends, associates and family members. However, you may experience issues when using your webcam, like when it doesn’t turn on or shows up upside down. Often, these issues are caused by corrupt or outdated device drivers. It’s recommended that you use a reliable driver update software like Auslogics Driver Updater to ensure the correct version of your drivers is installed.
If your integrated camera isn’t working, the first thing to check is whether it is being used by another program. You can do this by opening the Task Manager and checking the list of processes. If you see an entry with a webcam icon, try to close it. It’s also worth checking the system tray apps, which are the programs that appear in the area of the taskbar with the clock and smaller icons.
If the problem persists, you may need to check the camera’s settings. It’s possible that the switch in the camera menu is set to the Off position, which would prevent it from turning on when you start your computer or open the Camera app. You may also need to disable sound effects and enhancements that can interfere with the camera’s ability to function properly. You can also try changing the lighting in the room where you’re attempting to use your webcam. Bright light is usually best, as it helps to focus the camera’s focusing lens.
Leave a Reply