
How Do I Enable My Webcam Driver?
Enable My Webcam Driver The first thing to do is make sure that your webcam isn’t disabled. Right-click on it and select “Enable device” from the context menu.
It also helps to ensure that the setting for Allow apps to access your camera is turned on. This is usually done through the Settings app.
Enable My Webcam Driver driver involves a series of steps that may vary depending on your operating system and device specifications. In this comprehensive guide, I’ll cover the general steps for enabling a webcam driver on Windows, macOS, and Linux systems. Please note that these instructions are meant to be a general guide, and specific steps may differ slightly based on your device model and operating system version.
1. Identify Your Webcam:
Before proceeding, it’s crucial to identify the make and model of your webcam. This information is often available in your device’s user manual or on the manufacturer’s website.
2. Check Device Manager (Windows):
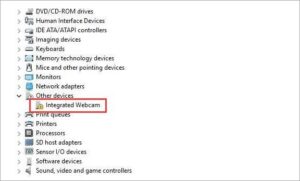
For Windows users, begin by checking the Device Manager. Right-click on the Start menu, select “Device Manager,” and look for the “Imaging devices” or “Cameras” category. If your webcam is listed, it is recognized by the system. If there’s an issue, a yellow triangle or exclamation mark might be displayed.
3. Update Webcam Driver (Windows):
Right-click on your webcam in Device Manager, select “Update driver,” and choose the option to search for updated driver software automatically. Windows will attempt to find and install the latest driver for your webcam.
4. Download Drivers (Windows):
If Windows cannot find a suitable driver, visit the manufacturer’s website, navigate to the support or downloads section, and download the latest driver for your webcam model. Follow the on-screen instructions to install the driver.
5. Enable Webcam in BIOS/UEFI (Windows):
If the webcam is not working, it might be disabled in the BIOS/UEFI settings. Restart your computer and enter the BIOS/UEFI by pressing the appropriate key (usually F2, Del, Esc) during startup. Look for an option related to integrated peripherals or devices and ensure that the webcam is enabled.
6. Privacy Settings (Windows):
In Windows 10, ensure that privacy settings allow access to the camera. Go to Settings > Privacy > Camera, and toggle the switch to enable camera access for applications.
7. Check System Preferences (Mac):
For macOS users, go to “System Preferences” and select “Security & Privacy.” Click on the “Privacy” tab and ensure that the checkbox next to “Camera” is checked. This grants permission for applications to access the camera.
8. Update Webcam Driver (Mac):
Ensure your macOS is up to date by going to “System Preferences” > “Software Update.” If updates are available, install them. macOS usually handles webcam drivers automatically, so manual updates may not be required.
9. Third-Party Applications (Mac):
If you’re using third-party applications that utilize the webcam, check their settings to ensure they have permission to access the camera.
10. Check System Information (Linux):
Linux users can open a terminal and use the following command to check the connected video devices:
ls /dev/video*
If your webcam is detected, it should be listed.
11. Install Webcam Driver (Linux):
Most Linux distributions come with a variety of webcam drivers. Ensure that your system is up to date by running:
sudo apt-get update

sudo apt-get upgrade
If your webcam is not working, you may need to install additional drivers. Search for drivers specific to your webcam model and install them using your package manager.
12. Adjust Permissions (Linux):
Linux systems often require appropriate permissions for users to access the webcam. Use the following command to add your user to the “video” group:
sudo usermod -aG video $USER
Log out and log back in for the changes to take effect.
13. Test Your Webcam:
After completing the steps above, test your webcam using the default camera application on your operating system or a third-party application. This will help verify that the webcam is now enabled and functioning properly.
Device Manager
Many newer HP notebook, monitor and All-in-One computers come with built-in webcams that use a special driver to function. Unfortunately, like other peripherals, these devices are not immune to hardware failures. Sometimes they stop working for a variety of reasons, such as driver problems, recent system updates or settings that have disabled the camera. If your computer’s camera has stopped working, you can fix the issue using Device Manager or setting changes in your computer’s settings and privacy controls.
Often, your camera will appear in the Imaging devices or Sound, video and game controllers categories in Device Manager. If it doesn’t, you may need to update the driver for your camera to make sure that it is functioning properly.
To do this, go to the manufacturer’s website and find the latest driver for your model of webcam. Then, download and install this driver to ensure that your camera is properly configured and working. After installing the driver, you can check whether the camera has been enabled by opening the Camera app and confirming that you see the words “Connect a camera” displayed on-screen. If you don’t, you can enable the camera by opening the settings for this app and ensuring that the camera access option is turned on.
Troubleshooting
If you still cannot enable your webcam, try unplugging it and then plugging it back in. This often fixes issues with USB devices by forcing the operating system to re-recognize and load the driver.
You can also try updating the camera driver. You can do this by opening Device Manager, expanding the Imaging devices or Cameras branch, and then right-clicking your camera device. Select the Update driver software option and follow the on-screen instructions to complete the process. If the problem persists, you can try using Microsoft System Restore to roll back your operating system to a point in time when the webcam worked correctly. See HP PCs – Using Microsoft System Restore for more information.
If you’ve tried all the above solutions, and your camera is still not enabled or working properly, please contact us with the details of your issue. We will be more than happy to help! We have a dedicated team of support agents available to handle all your enquiries, 24/7.
Uninstalling
Enable My Webcam Driver is a hardware device and like any other device or peripheral, it can become damaged, malfunction, or stop working for a number of reasons. You can troubleshoot it in the same way you would any other piece of hardware on your computer. This will display a list of all hardware devices connected to your computer. Locate the camera device and right-click on it. Select the option to update the driver software.
Once the driver has been updated, restart your computer and check if the camera is functioning properly. If it isn’t, you should try to reinstall the driver by following these steps:
First, open the Device Manager window (press the Windows key and type device manager in the search box). In the device manager window, expand Imaging devices or the Sound, video, and game controllers branch to find your camera. Right-click on the webcam device and choose Uninstall device from the context menu. You can also choose Delete the driver software for this device from the Action menu on the top of the window. Click OK to confirm the action and close the Device Manager window.
Rolling Back
Most of the devices you use with your computer are fitted with default drivers which come with your operating system upon installation. However, some devices such as your webcam require a more specific driver configuration to be able to work properly.
Sometimes a device might not be working well and this may be due to a bug in the driver. In such a situation, you can try rolling back the driver to a previous version. This feature is available in Windows’ Device Manager and is quite easy to use. First, locate your camera within the Device Manager and right-click on it. Select “Properties” and then choose the ‘Roll back driver’ option.
After this, restart your computer and then check if the camera is functioning. If not, then you can try using the camera on a different USB port in order to identify if your antivirus is blocking access or if it’s just a general problem with the webcam. If it still doesn’t work, then you will have to contact the software developer to get a new driver or to download one from their website. Also, you might want to try reinstalling the device’s software to see if that resolves the problem.
Summary
Enable My Webcam Driver involves identifying your device, checking system settings, updating drivers, and adjusting permissions. The specific steps may vary based on your operating system, so it’s essential to follow the guidelines provided for your particular platform. If you encounter issues, consult your device’s documentation or seek assistance from the manufacturer’s support resources.
Leave a Reply