
How Do I Enable a Disabled Webcam?
Enable A Disabled Webcam If you have a laptop computer that has an integrated webcam, you might want to disable it in order to protect your privacy. This is particularly important since hackers can use your camera to spy on you.
Disabling your camera through the device manager is a simple process. You can also use anti-virus software, physical coverings, virtual private networks and other techniques to prevent hacking.
Enable A Disabled Webcam involves troubleshooting the issue and addressing potential causes that may have led to the disabling of the camera. This process can vary depending on the operating system and device you are using. In this comprehensive guide, I will cover the steps for enabling a disabled webcam on Windows and macOS. Keep in mind that some steps might differ slightly based on the specific device or system version you are using.
For Windows:
- Check Device Manager:
- Press the
Windows key + Xand select “Device Manager” from the menu. - Look for the “Imaging devices” category, and find your webcam. It may be listed under “Cameras,” “Imaging devices,” or have a specific name.
- If there’s a yellow triangle or an error message next to your webcam, right-click on it and choose “Enable.”
- Press the
- Update Webcam Drivers:
- Right-click on your webcam in Device Manager and select “Update driver.”
- Choose “Search automatically for updated driver software” and follow the on-screen instructions to update your webcam drivers.
- Enable Webcam in BIOS/UEFI:
- Restart your computer and enter the BIOS/UEFI settings by pressing the designated key during the boot process (usually Del, F2, or Esc).
- Navigate to the “Advanced” or “Integrated Peripherals” section and ensure that the webcam is enabled.
- Check Privacy Settings:
- Go to “Settings” > “Privacy” > “Camera.”
- Ensure that the “Allow apps to access your camera” toggle is turned on.
- Use System Restore:
- If the issue started recently, you can use System Restore to revert your system to a point when the webcam was working.
- Type “Create a restore point” in the Windows search bar, open the System Properties, and click on the “System Restore” button.
- Reinstall Webcam Drivers:
- In Device Manager, right-click on your webcam and select “Uninstall device.”
- Restart your computer, and Windows should automatically reinstall the drivers.
For macOS:
- Check System Preferences:
- Click on the Apple logo and go to “System Preferences” > “Security & Privacy” > “Privacy” > “Camera.”
- Ensure that the checkbox next to the application you’re using the camera with is checked.
- Reset SMC and PRAM/NVRAM:
- Shut down your Mac.
- For Intel-based Macs: Reset the System Management Controller (SMC) by holding down Shift + Control + Option + Power button.
- For M1-based Macs: Shut down the Mac and wait 10 seconds, then turn it on.
- Reset PRAM/NVRAM by restarting your Mac and holding down Command + Option + P + R until you hear the startup sound twice.
- Update macOS:
- Ensure that your macOS is up-to-date by going to the Apple menu > “System Preferences” > “Software Update.”
- Check Third-Party Apps:
- If you’re using a third-party app with your webcam, ensure that it is updated to the latest version and has the necessary permissions.
- Reset Camera Permissions:
- Open the Terminal and enter the command
sudo tccutil reset Camera. - Enter your admin password when prompted.
- Open the Terminal and enter the command
- Check for Software Conflicts:
- Uninstall recently installed apps that might conflict with the webcam.
- Restart your Mac after uninstalling to see if the issue persists.
By following these steps, you should be able to troubleshoot and enable a disabled webcam on both Windows and macOS systems. If the issue persists, consider consulting the device or computer manufacturer’s support resources for further assistance.
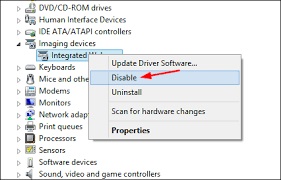
Device Manager
There are a number of reasons why you might want to disable the camera on your Dell laptop or desktop computer, including concerns about privacy and security. For example, if you have children using your computer, disabling the camera may help prevent them from accidentally broadcasting video to the world. Additionally, you might be concerned about malware or other online threats that could access your webcam. If so, there are a few ways that you can disable your computer’s camera, including the Device Manager and Registry Editor.
The easiest way to disable your camera is to use the Device Manager, which can be accessed from the Start menu by typing “Device Manager” into the search field and clicking the option when it appears in the results. Once in the Device Manager, expand the Imaging devices or Cameras category and right-click on your camera or webcam device to open a context menu. Select “Disable device” from the context menu.
The device will now be disabled and will no longer function in applications such as video conferencing software or photo editing programs. If you wish to enable the camera, you can return to the Device Manager and click the “Enable device” menu option from the context menu. Alternatively, you can use a third-party application such as the freeware WebCam On-Off to turn the camera on and off with a single click or create a hotkey shortcut for faster access.
Group Policy
If a webcam is disabled when connecting remotely with RDP, the problem could stem from other settings within a computer’s GPO. Both local GPOs that affect a specific remote desktop workstation and domain and server-wide GPOs could have policies in place that disable camera and other connection features, or hinder their functionality.
In some cases, IT may have pushed out updates to the computer that could have altered the default webcam or other device configuration settings. In addition, the GPO settings for the particular desktop virtualization product in use, such as Citrix, VMware or Parallels, may also impact the ability to access the webcam during an RDP session.
To check for such GPO settings, go to the Computer Configuration > Administrative Templates > Windows Components > Camera policy and double-click to edit it. Alternatively, you can open the registry to make changes manually, but this method is more complex and should only be used if necessary.
Another option is to go through the camera privacy setting in the Settings app, then toggle off the Let apps use my camera switch. This will prevent any installed Store apps from using the camera, but it will not limit which apps can access the webcam. However, some apps need access to the webcam and microphone in order to function properly.
Registry Editor
The Camera function on your Desktop PC, tablet or laptop is usually used for video conferencing or photo editing. However, some people prefer to disable the webcam on their computers for privacy reasons. Hackers can use remote access technologies to hack into your system and watch you live through your computer’s camera.
In addition to disabling the device in Windows 10, there are ways that you can enable a disabled webcam in the registry or by using Group Policy. You should create a system restore point before you make any changes to your registry. If you don’t, you could end up with a permanent damage to your operating system.
You can check if the device is enabled in Device Manager by looking at the “Camera” tab. If you see an option that says, “Camera access for this device is on,” then it’s enabled.
To enable the device in the Registry Editor, use the Windows key + R shortcut keys to open the Run command window and type regedit. In the left pane of the Registry Editor window, navigate to HKEY_LOCAL_MACHINE SOFTWARE Microsoft Windows Media Foundation Platform and right-click on the Platform folder. Create a new DWORD value and name it Enable Frame Server Mode. Right-click the value and select Modify. Change the value data to 1.
Another option is to look at your antivirus software or third-party security program settings. Many antivirus and security programs come with privacy settings that prevent apps from accessing your camera or microphone.
Troubleshooting
There are a number of reasons why your camera may have stopped working. Often, this happens when an update to your system changes device drivers and causes them to become incompatible. This can be a problem with either built-in or external devices, depending on the configuration of your laptop. Jiggling the cable or unplugging and plugging it in can sometimes fix this issue. You can also try a different USB port to see if this makes a difference.
Another potential problem is that the settings on your device have been changed to prevent access to the camera. If this is the case, you need to open the settings app and change the privacy settings to allow applications to access the camera. Once this has been done, you can enable the webcam again by returning to the settings app and selecting the “Choose which apps can use your camera” option.
If your problem persists, you can use the Dell Support Assist application to help troubleshoot your system. The application will run a hardware test on your system and recommend any necessary fixes.
Alternatively, you can use a driver update tool to automatically scan your computer for outdated or corrupt drivers and then download and install the correct version. This can resolve a number of issues, including those that prevent your camera from functioning.
Leave a Reply