
How to Enable Webcam Access
Enable Webcam Access a video camera that transmits images via USB to the host computer. Most webcams use CMOS sensors with supporting electronics integrated on the same chip.
Cybercriminals can infect your computer with malware that turns on your webcam without your knowledge or consent, allowing them to spy on you and steal sensitive information. It is essential to keep your operating system and software up to date.
Enabling webcam access involves configuring settings on your device, granting permissions to applications, and ensuring that your hardware is functioning properly. To help you enable webcam access on different platforms like Windows, macOS, and Linux.
Enabling Webcam Access on Windows:
1. Check Hardware Connection:
Before diving into software settings, ensure that your webcam is physically connected to your computer. If you’re using an external webcam, connect it to a USB port.
2. Update Webcam Drivers:
Keep your webcam drivers up-to-date. Go to the Device Manager, locate your webcam under “Imaging devices,” right-click, and select “Update driver.”
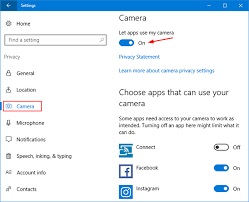
3. Adjust Privacy Settings:
Windows has privacy settings that control access to your webcam. Open “Settings,” go to “Privacy,” and select “Camera.” Enable the “Camera access for this device” toggle.
4. Check Application Permissions:
Some applications might require separate permissions. Open the application settings (e.g., Skype, Zoom), navigate to the privacy settings, and ensure camera access is allowed.
5. Troubleshoot with Device Manager:
If your webcam isn’t working, open Device Manager, right-click on your webcam, and select “Properties.” Check for any issues in the “General” and “Driver” tabs.
6. Use Webcam Troubleshooter:
Windows has a built-in troubleshooter. Go to “Settings,” select “Update & Security,” click on “Troubleshoot,” and run the “Hardware and Devices” troubleshooter.
7. Check Firewall Settings:
Firewalls might block webcam access. Review your firewall settings and ensure that the necessary ports and applications are allowed.
Enabling Webcam Access on macOS:
1. Verify Physical Connection:
Check if your webcam is connected properly. If it’s built into your Mac, ensure there are no hardware issues.
2. Update macOS:
Keep your operating system updated. Go to “System Preferences,” select “Software Update,” and install any pending updates.
3. Check Application Permissions:
Open “System Preferences,” go to “Security & Privacy,” and select the “Privacy” tab. Make sure the applications you want to use the webcam with have permission.
4. Reset SMC and PRAM:
Resetting the System Management Controller (SMC) and Parameter RAM (PRAM) can resolve hardware-related issues. Instructions vary depending on your Mac model; refer to Apple’s support documentation.
5. Verify User Account Settings:
Ensure your user account has the necessary permissions. Go to “System Preferences,” select “Users & Groups,” and check your account settings.
6. Run Apple Diagnostics:
Apple Diagnostics can identify hardware issues. Restart your Mac and hold down the ‘D’ key. Follow the on-screen instructions.
7. Reinstall Webcam Drivers:
If your webcam requires drivers, reinstall them. Check the manufacturer’s website for the latest drivers compatible with macOS.
Enabling Webcam Access on Linux:
1. Check Kernel Modules:
Ensure the necessary kernel modules are loaded. Use the lsmod command to list loaded modules. If your webcam’s module is missing, load it using modprobe.
2. Verify Physical Connection:
Check the physical connection of your webcam. If it’s an external webcam, try a different USB port.
3. Update Linux Distribution:
Keep your Linux distribution updated. Use the package manager (e.g., apt, yum, zypper) to update your system.
4. Install Webcam Software:
Some Linux distributions may not include webcam software by default. Install packages like “guvcview” or “cheese” to test and configure your webcam.
5. Adjust Permissions:
Ensure your user has the necessary permissions to access the webcam. Check the device’s permissions in /dev/video* and add your user to the appropriate group (often the “video” group).
6. Check Application Settings:
If your webcam isn’t working with specific applications, check their settings. Some applications might have separate configuration options for the camera.
7. Troubleshoot with Terminal:
Use command-line tools like dmesg and lsusb to troubleshoot hardware issues. Look for error messages related to your webcam.
General Tips:
1. Restart Your Computer:
Sometimes, a simple restart can resolve temporary glitches or conflicts.
2. Test with Multiple Applications:
Use different applications (e.g., video conferencing, webcam testing tools) to ensure the issue is not application-specific.
3. Check for Third-Party Security Software:
Security software may interfere with webcam access. Temporarily disable or configure it to allow webcam usage.
4. Review System Logs:
Check system logs for error messages related to your webcam. Logs can provide insights into the root cause of the issue.
By following these steps, you should be able to enable webcam access on your Windows, macOS, or Linux system. If issues persist, consider seeking help from the respective support forums or contacting the device manufacturer for further assistance.
Security
For security reasons, you should only allow sites you trust to access your webcam and microphone. Many malware and viruses gain access to webcams through unsecured websites, and it is easy for cybercriminals to spy on users or record them without their consent. You can take steps to protect against this, such as installing reputable antivirus software and keeping your operating system and software up to date. You can also use a webcam cover or turn off your Camera when not in use to further prevent unauthorized access.
Your operating system and web browser settings have features that let you control what apps can access your device’s Camera and microphone. For example, when you visit a website in Chrome that needs your microphone or Camera, a window will appear to ask you for permission before it uses your device’s resources. You can choose to allow, ask every time, or block access. You can also adjust these settings on a site-by-site basis in your browser’s Site Settings.
The process is similar if you’re using a different browser but may vary slightly. See the relevant help pages for more information. To start, click the three-dot icon in your browser and select Settings from the menu. In the left-hand sidebar, click Privacy and Security and then Camera or Microphone.
Privacy
Many people are concerned about unauthorized use of their webcams. Cybercriminals always look for ways to spy on users without their knowledge and consent, whether rogue websites or malware. One common way is through outdated software and operating systems that contain vulnerabilities that can be exploited.
Some antivirus and security suites can help to prevent unauthorized access to your webcam by checking for malware and blocking untrusted apps. However, you can also tweak some system settings to take more control and protect your Privacy.
On Windows 10 desktop computers, you can use the Camera permissions settings to manage which apps can access your Camera and microphone. However, this only applies to apps that use standard Windows APIs and doesn’t stop more sophisticated attacks that might involve installing a driver.
In Chrome, you can enable a setting requiring sites to ask for your permission to use your webcam before they access the Camera or microphone. The first time you visit a site, it will display a dialog box asking if you want to allow the site access. You can check the Remember this decision box to avoid having to make the choice every time you visit the site.
You can also enable a browser setting that blocks access to the Camera and mic by default for any site you visit. This can be particularly useful for children’s sites or sites where you are concerned about unauthorized access.
Enabling
If you’re using a Chromebook, you must enable camera access to take Blackboard Collaborate exams. You can allow camera access by checking your browser settings, granting permissions to specific websites, managing website permissions, and updating the browser. The process varies by device type and browser. Still, in most cases you can find the settings for Camera and microphone access in the “Privacy” or “Permissions” section of your device’s settings.
If the automated proctoring system cannot access your Camera or microphone, it may be because of blocked access. This can occur for many reasons, including hardware and software issues.
To enable camera access, open the :
- Open browser and click the three dots in the top right corner. Select Set
- ings and then click Advanced. In the Cam
- ra settings, make sure Allow Full Access is selected. You can also manage the camera and microphone permissions for individual websites by clicking Privacy and Security in the left menu, then Site Settings. You can ch
ose between Ask (to be prompted each time), Allow, or Block for each website. Deleting a site from the block list doesn’t move it to the allow list and vice versa. You can also set a default for cameras and microphones to be allowed or blocked by all sites. This can be useful if you use multiple devices to take Blackboard Collaborate exams or want to limit the access to certain apps and websites.
Disabling
If you’re concerned about hackers gaining access to your webcam, there are several ways you can disable it. Some are simple, like using a piece of tape over your webcam. Others involve changing your privacy settings or removing the Camera from your laptop.
In Windows, you can adjust your privacy settings by clicking the Start menu and selecting Settings. Click the Privacy tab, then scroll down and click Camera. If you see the toggle switch next to “Allow apps to use your camera” turned on, you can disable it. Some programs require this setting to function, including Internet browsers and video conferencing software. In addition, if you use Windows Hello to sign in to your PC, you must enable the setting for this to work.
You can also adjust the camera and microphone settings within your browser. For example, in Chrome, you can pause the Camera or microphone by clicking the lock icon in the address bar. You can also remove access for individual sites. This is especially helpful if you’re worried about websites with nefarious intent monitoring your behavior.
If you’re using a Dell computer with an integrated webcam, you can also disable the Camera in the BIOS or UEFI. This way, Windows and other operating systems will not be able to detect your device’s Camera.
Leave a Reply