
How to Enable Siri on Your iOS Device
Enable Siri Voice is a voice assistant that can control your iOS device with simple, natural commands. It can look things up, send messages and much more.
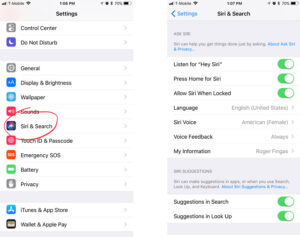
You can change some of Siri’s settings in the ‘Settings’ app. Tap ‘Siri & Search’, then select the ‘Hey Siri’ toggle switch to turn it on.
Enable Siri Voice on your Apple device involves a few straightforward steps, and I’ll guide you through the process in around 900 words. Siri is Apple’s virtual assistant that allows users to interact with their devices using natural language. The voice of Siri can be customized to suit your preferences, and you can choose from different accents and languages. Here’s a detailed guide on how to enable Siri voice on your Apple device.
1. Check Siri Compatibility:
Before you proceed, ensure that your device supports Siri. Siri is available on most Apple devices, including iPhones, iPads, Macs, Apple Watches, and HomePods. Ensure that your device is running the latest version of iOS, iPadOS, macOS, watchOS, or HomePod software.
2. Activate Siri:
To enable Siri, make sure it is activated on your device. On iPhones and iPads, go to “Settings” and tap on “Siri & Search.” Toggle the switch to turn on Siri. On a Mac, open “System Preferences,” select “Siri,” and check the box next to “Enable Ask Siri.”
3. Customize Siri Voice:
To customize Siri’s voice, follow these steps:
- On iPhone or iPad:
- Open “Settings.”
- Scroll down and tap on “Siri & Search.”
- Select “Siri Voice.”
- Choose the desired accent and gender. Siri offers a variety of voices, so explore the options and select the one you prefer.
- On Mac:
- Click on the Apple logo in the top-left corner and choose “System Preferences.”
- Select “Siri.”
- Click on the “Siri Voice” dropdown menu and choose the desired voice.
- On Apple Watch:
- Open the Watch app on your paired iPhone.
- Tap on “My Watch” and then go to “Siri.”
- Choose the “Siri Voice” option and select your preferred voice.
- On HomePod:
- Open the Home app on your iOS device.
- Tap on the home icon in the top-left corner.
- Select “Home Settings,” then choose your HomePod.
- Scroll down and tap on “Siri Voice.”
4. Choose Siri’s Language:
You can also change the language Siri responds to. Follow these steps:
- On iPhone or iPad:
- In “Settings,” go to “Siri & Search.”
- Tap on “Language” and choose the language you prefer.
- On Mac:
- In “System Preferences,” select “Siri.”
- Click on the “Language” dropdown menu and choose the desired language.
- On Apple Watch:
- In the Watch app on your iPhone, go to “My Watch” > “Siri.”
- Choose the language you want Siri to respond to.
- On HomePod:
- In the Home app, go to “Home Settings” > your HomePod.
- Tap on “Language” and select the language you want Siri to use.
5. Train Siri to Recognize Your Voice (Optional):
Training Siri to recognize your voice enhances its ability to understand your commands accurately. This step is optional but recommended for a personalized experience.
- On iPhone or iPad:
- In “Settings,” go to “Siri & Search.”
- Toggle on “Listen for ‘Hey Siri’” and follow the on-screen instructions to train Siri to recognize your voice.
6. Enable Type to Siri (Optional):
If you prefer typing your Siri commands instead of using your voice, you can enable the “Type to Siri” option.
- On iPhone or iPad:
- In “Settings,” go to “Accessibility.”
- Tap on “Siri” and toggle on “Type to Siri.”
7. Siri Shortcuts (Advanced):
For more advanced customization, explore Siri Shortcuts. Siri Shortcuts allow you to create personalized voice commands for specific actions or tasks. This feature is available in the Shortcuts app on iOS.
- On iPhone or iPad:
- Open the Shortcuts app.
- Tap on the “+” sign to create a new shortcut.
- Follow the on-screen instructions to set up your custom Siri Shortcut.
8. Test Siri:
Once you’ve customized Siri’s voice, language, and optional settings, it’s time to test it. Activate Siri using the “Hey Siri” command or the dedicated Siri button (on devices without ‘Hey Siri’). Ask Siri questions or give it commands to see how well it responds.
What is Siri?
Enable Siri Voice is a virtual assistant that lives in your iPhone, iPad or Mac. You activate it by saying “Hey Siri” (or just Siri) and it’ll answer questions, carry out tasks, schedule reminders or meetings, change settings on your device, identify music using Shazam, translate for you into another language, find nearby restaurants or businesses, check the weather and more.
It does all this through a three-step process: understanding your request, processing it and then delegating services. To understand what you’re asking, it uses Artificial Intelligence and Natural Language Processing algorithms. It also takes into account your accent, dialect and small nuances of speech. This is something that’s difficult enough for human beings, let alone a machine.
After it collects and converts your voice into a data file, it sends that information to Apple’s servers via your Internet connection. Here, it goes through a series of flowcharts that form the basis of its response.
The next stage is actually carrying out the task at hand. Here, Siri may communicate with other apps on your iPhone to achieve the desired deliverable – for example, it’ll talk to the Organiser app to set a reminder at a particular time. Finally, Siri presents the result to you either by speaking it or flashing a text on your screen.
How does Siri work?
Siri is a virtual assistant that can perform various tasks on your iPhone or iPad, such as sending text messages and email, making calls and taking voice notes, adding appointments to Calendar, setting reminders, getting directions, finding information, turning on home automation devices, playing music, and more. It uses Artificial Intelligence and Natural Language Processing to understand your queries and execute the desired functions.
Siri can also be used with the keyboard if you prefer not to speak out loud. It can also be activated by pressing the Home button or the “Hey Siri” activation phrase. Siri can then respond to your query out loud or silently (if the device is set to Silent mode).
Your query is interpreted by Apple’s intelligent software systems, which are programmed with different artificial intelligence models and trained to interpret different accents, slang words, and grammatical errors. Siri then sends the query to other apps on your device to perform the task requested by you. The results of the task are then presented to you by Siri either out loud or on-screen.
You can also control your Siri settings by opening the Settings app and tapping on “Siri & Search”. From here, you can configure different features of Siri such as the option to allow access to Siri even while the phone is locked (which can lower security), and the voice gender.
How do I enable Siri on my iPhone?
Apple’s Siri voice assistant is designed to help you do more hands-free, which can be a lifesaver when you’re busy or distracted. You can use your voice to set reminders, get directions, answer questions, control smart home devices, and more. Activating Siri is as easy as saying “Hey Siri” or pressing the Home or Side button on your iPhone.
If you haven’t enabled “Hey Siri” yet, open the Settings app and scroll down to Siri & Search. Tap the toggle switch next to Listen for “Hey Siri” to turn it on. You’ll be walked through a short setup process to teach the AI your voice.
Once you’ve trained Siri, you can activate her using the Home or Side button or by saying “Hey Siri.” You can also see her responses on screen if you want to.
Some people customize their Siri experience by changing the voice (not available in all languages). You can do this from the Settings app, then tapping Siri & Search, and selecting a different variety or a different male or female voice.
You can also change when Siri responds out loud or silently (with text onscreen) and whether you want to allow her to be activated from the Lock screen. This option enables you to ask Siri questions and give commands even when your iPhone is locked, but it can lower the security of your device.
How do I enable Siri on my iPad?
Siri is a personal assistant that can answer questions, make recommendations, and perform actions. It can also adapt to your voice over time. Siri is available on Apple’s iOS, macOS, watchOS, and tvOS operating systems. It is also available in some third-party apps for messaging, payments, ride sharing, and Internet calling.
You can activate Siri by pressing the Home button or using a command. You can change how Siri responds to certain buttons or commands, and prevent access when your iPad is locked. I can also control the volume of Siri’s responses or view them onscreen.
When you activate Siri with your voice, it beeps and displays a menu with your options. Say “Siri” or “Hey Siri” and your request or question. To avoid accidentally activating Siri when you’re trying to use your hands, you can turn off Listen for “Hey Siri” in Settings > Siri & Search, then tap the toggle switch.
If you’re having trouble pronouncing your name, you can teach Siri by tapping the microphone in the Siri menu and following the onscreen prompts to practice. You can also enable Type to Siri (in Settings Accessibility Siri) to allow you to enter requests by typing onscreen. This option is only available when your iPad is unlocked and has a keyboard or a supported USB keyboard connected.
Conclusion:
Enabling Siri voice on your Apple device is a simple yet customizable process. Whether you prefer a male or female voice, a specific accent, or a different language, Siri offers a range of options to suit your preferences. Additionally, training Siri to recognize your voice and exploring advanced features like Siri Shortcuts can further enhance your experience with this virtual assistant. Now that you’ve followed these steps, you should be all set to enjoy the convenience of Siri on your Apple device with your preferred voice and settings.
Leave a Reply