How Do I Access Microsoft Copilot?
Access Microsoft Copilot is an AI tool that boosts productivity in apps like Word, Excel and PowerPoint. It’s built with enterprise security and compliance in mind.
Admins can enable Copilot by applying licenses to users in the admin center. It’s a simple process, but some organizations might need additional guidance.
I’m sorry for any confusion, but as of my last knowledge update in January 2022, Microsoft Copilot is not a standalone product from Microsoft. However, GitHub Copilot, developed by GitHub in collaboration with OpenAI, is a code completion tool that uses machine learning to suggest entire lines or blocks of code as you type. It’s based on OpenAI’s Codex model, the same model that powers GPT-3.
Here Guide On How To Access And Use GitHub Copilot:
1. Prerequisites: Before using GitHub Copilot, ensure you have the following:
- Visual Studio Code (VS Code) installed on your system.
- A GitHub account and access to the internet.
2. Install Visual Studio Code: If you don’t have VS Code installed, download and install it from the official website: Visual Studio Code
3. Set Up a GitHub Account: If you don’t have a GitHub account, you’ll need to sign up for one at GitHub.
4. Install GitHub Copilot:
- Open VS Code.
- Go to the Extensions view by clicking on the Extensions icon in the Activity Bar on the side of the window or press
Ctrl+Shift+X. - Search for “GitHub Copilot” in the Extensions view search box.
- Click the Install button next to the GitHub Copilot extension.
5. Sign in to GitHub:
- After installing GitHub Copilot, sign in to your GitHub account within VS Code. You can do this by clicking on the GitHub icon in the Source Control view.
6. Using GitHub Copilot:
- Open a file in your project where you want to write or complete code.
- Start typing code, and GitHub Copilot will provide suggestions based on your context.
- Press
Tabto accept the suggestion, or use the arrow keys to navigate through suggestions.
7. Customize GitHub Copilot:
- GitHub Copilot can be customized to suit your preferences. To access settings:
- Press
Ctrl+,to open the Settings view. - Search for “GitHub Copilot” to find relevant settings.
- Press
8. Collaborative Coding:
- GitHub Copilot is designed for collaborative coding. You can use it in pair programming sessions or while working on a project with teammates.
9. Provide Feedback:
- GitHub Copilot is continuously evolving, and your feedback is valuable. If you encounter issues or have suggestions, you can provide feedback through the GitHub Copilot extension page on the VS Code marketplace or the GitHub repository.
10. Learn from Suggestions: – GitHub Copilot not only completes your code but also provides an opportunity to learn. Review the suggestions it provides to understand new coding patterns and techniques.
11. Known Limitations: – Be aware of GitHub Copilot’s limitations. While it is powerful, it may not always generate perfect or secure code. Always review and test the suggested code before integrating it into your project.
12. Stay Updated: – Keep your GitHub Copilot extension up-to-date to benefit from the latest improvements and bug fixes. Updates are typically delivered through the VS Code Extensions view.
In summary, GitHub Copilot is a powerful tool for code completion and generation within Visual Studio Code. By following these steps, you can easily access, install, and use GitHub Copilot in your coding projects. Keep in mind that updates and changes may occur, so always refer to the official documentation for the latest information.
How to use Copilot
Copilot helps you get more work done in the apps you use every day. It is a generative AI tool that works across the Microsoft ecosystem. It can create presentations, write documents, summarize whiteboard content, and much more.
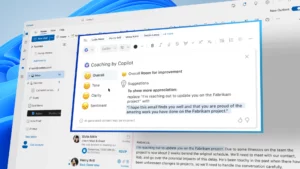
When you launch a supported app, the Copilot panel will appear on the right side of the screen. It will generate suggestions based on your context and previous patterns. You can select these from the panel to speed up your workflow. You can also provide feedback through the user interface to improve its accuracy.
To use Copilot, you must have a Microsoft 365 subscription and an eligible Office app installed. If you’re an admin, you can enable Copilot for your organization by assigning licenses through the Microsoft 365 admin center or using PowerShell. Your users must also be on the Current Channel or Monthly Enterprise Channel to access these features. For more information, see How do I get started with Copilot.
Getting started
Access Microsoft Copilot is an AI assistant that works across the Microsoft ecosystem. It can be accessed by using natural language prompts and instructions within apps or via a chatbot in Teams. It can help with tasks such as creating presentations, scheduling meetings and drafting emails, and it also provides data analysis and visualisation.
When you ask Copilot to do something, the request flies out to the Azure infrastructure where AI models compute the correct response and return it back to the app. It can be used in Word, Excel, PowerPoint, and Outlook, as well as in Teams and on the web.
If you want to test Copilot, select the Get started with copilot link and follow the instructions. If you’re happy with the experience, select Share with organisation in the app store to make it available to everyone in your organization. (Admin approval is required). You can see your Copilot in the Built by your org section of the Teams app store.
Using Copilot in Windows
Copilot in Windows joins Bing and Edge as an additional entry point for the AI experience. It supports the same commercial data protection as those experiences.
The feature uses the voice command functionality of Windows to let you ask it questions, record quick notes, or do a fact check. You can also use it with Office apps, like PowerPoint.
For example, you can ask Copilot to provide three key trends in a spreadsheet of business data. It then generates a new sheet and visualises the data for you.
You can enable the Copilot button in the taskbar by running a command using the Windows Search app or by using the gpedit and Registry methods (requires Administrator privileges). The button should appear when Copilot is enabled on your device. However, the feature isn’t available in Europe at this time. This is due to it not being compliant with the Digital Markets Act. Microsoft is working to resolve this issue.
Using Copilot in Office
Access Microsoft Copilot is a suite of AI features built into many of the most popular Microsoft apps. When a user invokes Copilot in any app, including Word, Excel, PowerPoint, Outlook, Teams and more, the request flies out to Azure infrastructure where the relevant AI models compute a response.
The results returned by Copilot can be used to help speed up processes and boost productivity. For example, Sarah, a marketing professional, uses Copilot in PowerPoint to create eye-catching slides that capture her audience’s attention and convey important data points in a compelling way.
To enable the tool, look for the distinctive Copilot icon or feature in each app. It may be located in the app’s intuitive ribbon menu or somewhere else within the interface. Then, simply click the feature to activate it and experience its capabilities. Before using Copilot, review the Microsoft 365 app and platform prerequisites and admin guidance to ensure that your organization is ready.
Leave a Reply