
How to Use MFA in Office 365
Use MFA Office 365 helps keep data secure against hacking attempts. It is one of the best defenses against cyber attacks, and strongly recommended by IT professionals.
CU Boulder faculty, students, and staff can use MFA to sign in to Office 365 and other applications. Learn how to get started with MFA with the help of our IT team at Simplicit Technologies.
Enabling Multi-Factor Authentication (MFA) in Office 365 is a crucial step to enhance the security of your organization’s data and user accounts. MFA adds an extra layer of protection by requiring users to provide multiple forms of verification before accessing their Office 365 accounts. Here’s a comprehensive guide on how to set up and use MFA in Office 365.
Step 1: Accessing the Office 365 Admin Center
- Log in to the Office 365 Admin Center using your administrator credentials.
- Once logged in, navigate to the Admin Center dashboard.
2: Selecting Users
- In the Admin Center, go to “Users” or “Active users,” depending on your Office 365 version.
- Select the user accounts for which you want to enable MFA.
3: Enabling Multi-Factor Authentication
- Click on the selected user account and navigate to the “More” button.
- Choose “Multifactor Authentication.”
- In the Multi-Factor Authentication page, select the user accounts and click on “Enable.”
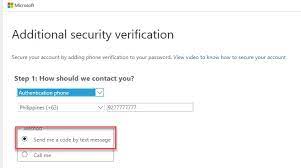
4: Choosing Verification Methods
- Once MFA is enabled, users will be prompted to set up their verification methods. They can choose from options like phone call, text message, or mobile app authentication.
- Users may need to register their mobile numbers and install the Microsoft Authenticator app for app-based verification.
5: Testing MFA Setup
- After setting up verification methods, conduct a test to ensure everything is working correctly. Try logging in with the selected user account to verify the MFA process.
6: Administering MFA Settings
- Return to the MFA settings in the Admin Center to review and adjust policy settings.
- Customize MFA settings such as allowing users to create app passwords for non-browser applications.
7: App Passwords for Non-Browser Applications
- Some applications, like Outlook on older versions, may not support modern authentication. In such cases, users can create app passwords for these applications.
- In the MFA settings, select “App passwords” to generate and manage application-specific passwords.
8: Managing Trusted Devices
- Users have the option to mark devices as trusted, reducing the frequency of MFA prompts on those devices.
- Encourage users to mark their personal and frequently used devices as trusted.
9: Monitoring and Reporting
- Regularly check the MFA usage reports available in the Admin Center to monitor authentication attempts and detect any suspicious activity.
- Utilize the Azure AD Identity Protection dashboard for more advanced threat analytics.
10: Training and Communication
- Educate users on the importance of MFA and provide training on how to use it effectively.
- Communicate any changes or updates to the MFA policy to keep users informed.
11: Troubleshooting
- Create a troubleshooting guide for users who may encounter issues during the MFA setup process.
- Provide contact information for IT support in case users need assistance.
By following these steps, you can successfully implement and manage Multi-Factor Authentication in Office 365, significantly strengthening the security posture of your organization’s digital assets.
What is MFA?
MFA is a security feature in Office 365 that adds an extra verification step after passwords to safeguard accounts. It provides an additional layer of defense against cyber attacks and is an integral component of a comprehensive security strategy.
The College uses MFA to help protect student and employee data from unauthorized access. Stolen credentials are frequently used not only to impersonate a user, but also to gain entry into an organization’s systems and access critical business data. MFA helps prevent this type of breach by requiring an additional form of authentication, beyond just the user’s login information, to verify the identity of a user at log-in time.
To enable MFA, you need to manage the MFA settings on the Office 365 Admin center. MFA can be enabled by either using conditional access or setting it as the default through Security Defaults. It is recommended that you set it as the default because it will provide the greatest benefit to your organization.
How do I set up MFA?
A person who has been assigned MFA must use it to sign in to their Office 365 account on all devices and locations. The first step is to verify the user’s identity by entering a verification code sent to their phone or authenticator app. Once the verification code is entered, the user will be able to access their account and email.
Microsoft requires MFA to be enabled for all users to ensure the security of their accounts. Admins can configure MFA for their entire organization in the Azure Active Directory Multi-Factor Authentication settings page. They can also choose to enforce MFA for certain groups of people based on conditions such as device, location and risk level.
Once MFA is enabled, the system automatically identifies the most secure MFA method and prompts it for users during their sign in process. This offers comprehensive protection against common cyber attacks such as password spraying and credential stuffing.
Admins can select individual users to enable MFA by using the check box next to their display name on the multi-factor authentication page. They can also manage the MFA status for multiple users at a time by uploading a CSV file in the bulk update section of the same page. They can also choose to enable app passwords, which let people create a secure 16-character code that lets them access their account in apps and services that don’t support MFA.
What are the benefits of MFA?
As organizations move more work to the cloud and employees work remotely, it becomes even more critical that they have strong authentication strategies in place. MFA is the linchpin for these strategies, providing an extra layer of security that protects against cyber threats that attack passwords and accounts.
Passwords are a hassle for everyone, from the employee who needs to change their password after it expires to the IT admin who is trying to protect their network and systems against another brute force attack (921 password spray attacks per second). But MFA reduces these risks by making it far harder for hackers to get in with just your weak password.
MFA also helps IT teams stay compliant with industry regulations like GDPR and NIST. It allows them to implement more stringent password policies without the hassle of dealing with the aftermath of lost phones or forgotten password resets.
MFA is one of the best ways to secure your business from modern threats, including malware, phishing, and credential harvesting. It can be used in combination with other security tools to create a complete security ecosystem that makes it much more difficult for threat actors to breach your sensitive information or your customer’s data. To get started with MFA, visit your multi-factor authentication page in the Admin portal and select users to enable it for. You can select multiple users or upload a CSV file to enable MFA in bulk.
How do I disable MFA?
As cyber threats evolve, a well-executed MFA deployment acts as a fortified shield, tirelessly safeguarding accounts from malicious intruders. Its seamless integration with cloud platforms like Office 365 promises an even more robust security posture.
Despite this, there are circumstances when the need arises to disable MFA for specific accounts. These exceptional cases may include when the account is being used as a break glass to access corporate resources or when running unattended scripts that could potentially expose data. Luckily, there are ways to circumvent MFA for these rare occasions without compromising the overall security posture.
One way is to use MFA exclusion policies, which allow administrators to create and update user accounts based on specific criteria. Admins can manage these policies using the Office 365 Admin center or the Azure PowerShell module.
Another option is to use the Microsoft Online MFA troubleshooting tool, which allows users to identify and resolve common MFA issues. The tool can also be used to help users reset or alter MFA preferences. Additionally, the tool can be used to verify whether MFA is working properly or not.
Lastly, the Azure MFA portal allows admins to bulk enable or disable MFA for users by uploading a CSV file. Admins can then select the checkbox for the users they want to enable or disable MFA for, and click the “Bulk Update” button.
Leave a Reply