
How to Enable MFA in Office 365
Enable MFA Office 365 multi-factor authentication (MFA) provides an extra layer of protection against cyber attacks. It requires users to verify their identity by using a verification method such as a text message, call or Microsoft Authenticator app.
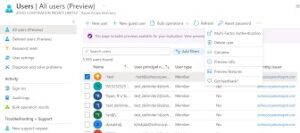
To enable MFA for selected users, sign in to the Azure Active Directory Admin Portal. Then, select the people you want to protect.
Enabling Multi-Factor Authentication (MFA) in Office 365 is a crucial step to enhance the security of your organization’s data and accounts. MFA adds an extra layer of protection by requiring users to verify their identity through multiple verification methods. Follow these steps to enable MFA in Office 365.
Step 1: Sign in to the Office 365 Admin Center
- Open a web browser and navigate to the Office 365 Admin Center (https://admin.microsoft.com).
- Sign in with your Office 365 administrator credentials.
2: Access the Azure Active Directory (AAD) Portal
- In the Admin Center, go to the left navigation pane and select “Admin centers.”
- Click on “Azure Active Directory” to access the Azure AD portal.
3: Navigate to Security
- In the Azure AD portal, select “Security” from the left navigation pane.
4: Set Up Conditional Access
- Under the “Security” section, select “Conditional Access.”
- Click on the “+ New Policy” button to create a new conditional access policy.
- Configure the policy settings:
- Assign users or groups: Choose the users or groups to which the policy applies.
- Cloud apps or actions: Select “Office 365” or the specific Office 365 apps you want to protect.
- Conditions: Set conditions that trigger the policy (e.g., location-based).
- Grant: Choose “Grant access” and select “Require multi-factor authentication.”
5: Enable MFA for Users
- In the Azure AD portal, go to “Users” in the left navigation pane.
- Select “Multi-Factor Authentication.”
- Select the users you want to enable MFA for.
- Click on “Enable” in the right-hand pane.
6: Notify Users
- Communicate the MFA activation to your users.
- Inform them of the steps they need to take to set up MFA on their accounts.
7: User Enrollment
- Users will receive prompts to set up MFA upon their next login.
- They can choose from various verification methods, such as text messages, phone calls, or the Microsoft Authenticator app.
8: Monitor and Manage
- Regularly review MFA reports in the Azure AD portal to ensure proper implementation.
- Use the “Sign-ins” and “MFA usage” reports to monitor user activities.
9: Troubleshooting
- In case users encounter issues, provide them with guidance on troubleshooting MFA.
- The Azure AD portal offers logs and reports to help diagnose and resolve issues.
10: Establish Policies and Training
- Develop and communicate security policies regarding MFA usage.
- Provide training for users on MFA best practices and the importance of safeguarding their accounts.
How to Enable MFA in Office 365
Adding MFA provides an additional layer of security to protect your account from cyber threats. MFA requires that you verify your identity by using a second verification method, such as an SMS text message or an authenticator app, when logging in to your Office 365 account. This helps prevent unauthorized access and data breaches. To enable MFA for your account, sign in to the Office 365 admin center and then go to the Multi-factor authentication page.
You can select the checkbox next to a user’s display name and then choose Enable MFA. You can also click the Bulk update option to enable or disable MFA for multiple users at once.
Once you enable MFA, the next time someone tries to sign in to their Office 365 account from an untrusted device, they will be prompted to set up the MFA verification method. They will be asked to provide a one-time code sent to their authenticator app or phone to complete the log in process.
By requiring MFA for all admins and users, this policy mitigates common cyber attacks like password spraying and credential stuffing. It also helps block old authentication methods that may be vulnerable to exploitation. The MFA policy can be customized to meet your organization’s needs, but the default settings are very effective.
Enabling MFA for Individual Users
You can enable MFA for individual users by selecting the check box next to their names. You can also select multiple people and choose the action to take for all of them: Enable MFA, Disable MFA, or Manage user settings (you can also bulk update their status using a CSV file). If you’re an admin in ADManager Plus, you can use out-of-the-box reports to get insights into MFA-related information for your Microsoft 365 tenants.
When you select Enable MFA, users will be required to enter a verification code when they sign in to Office 365 for the first time. This helps protect their accounts from being accessed by cybercriminals. It’s important that you provide training or resources for your users so they can understand and navigate the MFA setup process.
After you enable MFA, your users will have to use a verification method for every sign-in to Office 365 except when they sign in from a trusted IP address or use the feature that remembers MFA on trusted devices. This can be frustrating for some users and can slow down productivity.
To prevent users from being prompted to use MFA for non-browser apps, you can allow them to create app passwords to sign into those apps. However, they will still be required to use a verification method for sign-ins from untrusted IP addresses and the app password won’t work in those apps.
Enabling MFA for Multiple Users
As cyberattacks become more sophisticated and more targeted, the need to safeguard user accounts and information becomes more urgent. While passwords provide a first layer of defense, multi-factor authentication (MFA) offers an extra measure of protection and can help prevent data breaches that result from compromised or stolen credentials.
Enabling MFA in Office 365 is simple and straightforward. Admins can set up MFA for users individually or in bulk. They can also configure additional MFA settings, including trusted IPs, remember multi-factor authentication for trusted devices, and app passwords (required for older versions of Microsoft Outlook on desktop and native iPhone and Android email apps).
Once MFA is enabled and enforced for a user, the next time that user signs in, they will be required to enter a verification code in addition to their email address and password. This code can be sent to the user via text message, phone call, or authenticator application.
Alternatively, administrators can enable MFA for all users by creating a security default in the Azure AD Admin Center. This setting will require MFA for all admins and requires them to register for an MFA method within two weeks of their next interactive login. However, this option has some limitations, such as the fact that it will require all users to use the same MFA method and is inflexible in terms of which methods can be selected for MFA.
Disabling MFA
If you need to disable MFA for some users, you can do so using the admin portal or Windows PowerShell. This will stop them from receiving MFA prompts when they sign in to the system. Then, they can use other methods of verification for logins. For example, they can use their mobile phone number or authenticator app to verify.
The MFA feature protects your Office 365 environment by requiring additional authentication verification at login. This prevents hackers from accessing your accounts, which protects your confidential data and business information. Moreover, you can also use this feature to help prevent account takeover attacks. In addition, you can enable MFA for individual users and groups. This will boost the security of your Exchange online account.
You can enable MFA for the entire organization by creating a Conditional Access policy. You must have an Azure AD P1 or P2 license to create a Conditional Access policy. In the policy, you must include the MFA requirement and specify a group. The group must be excluded from the MFA requirement.
By disabling MFA for a group, you can remove the need for them to authenticate with multiple factors. This can make your organization more secure, and it can also reduce the time they spend logging in to their accounts. In addition, you can also disable MFA for individual users using the Microsoft Authenticator app or another authentication service.
Conclusion
Enabling Multi-Factor Authentication in Office 365 is a critical security measure to protect your organization’s sensitive data. By following these steps, you can implement MFA and enhance the overall security posture of your Office 365 environment. Regularly review and update security policies to adapt to evolving threats and ensure a robust defense against unauthorized access.
Leave a Reply