How to Turn on DRM on Chrome Mobile
Turn On DRM On Chrome Mobile is a security feature that helps protect digital content from piracy and prevents it from being shared without permission. It also allows for secure content playback and enhanced monetization opportunities.
DRM is used by streaming services like Netflix, Disney+, and HBO to protect their premium video content. In this article, we will explore the process of enabling DRM on Chrome mobile.
Enabling Digital Rights Management (DRM) on Chrome mobile involves ensuring that the necessary components are in place to support protected content, such as streaming videos and other media that require DRM protection. Here’s a comprehensive guide with detailed steps, explanations.
A Comprehensive Guide to Enabling DRM on Chrome Mobile
Introduction: Digital Rights Management (DRM) plays a crucial role in securing and protecting digital content, ensuring that only authorized users can access and consume it. Enabling DRM on Chrome mobile is essential for streaming services, online media, and other content that require protection. This guide will walk you through the process in a step-by-step manner.
1. Understanding DRM: Before diving into the technical details, it’s essential to understand the basics of DRM. DRM is a set of technologies that control the use, modification, and distribution of digital content. It prevents unauthorized copying and sharing, safeguarding the intellectual property of content creators.
2. Check Chrome Version: Ensure that you are using the latest version of the Chrome browser on your mobile device. Updates often include improvements and bug fixes, and having the latest version can help in resolving compatibility issues with DRM components.
3. Supported Platforms: DRM relies on specific platforms and technologies. Confirm that your mobile device and operating system support the necessary DRM components. Chrome mobile generally supports Widevine, a popular DRM solution developed by Google.
4. Widevine DRM: Widevine is the DRM technology used by Chrome to protect content. It offers three security levels: L3, L2, and L1. L1 is the highest level, providing hardware-based security. To check your device’s Widevine level, visit “chrome://gpu” in the Chrome address bar and look for the Widevine section.
5. Enable Hardware Security: For the best DRM protection, ensure that your device has hardware security features enabled. This is particularly relevant for achieving Widevine L1 support. Check your device’s settings for options related to hardware security and enable them if available.
Follow This Steps
6. Secure Connection (HTTPS): DRM relies on a secure connection to prevent unauthorized access to content. Ensure that the websites you visit and the content you consume are served over HTTPS rather than HTTP. This encryption is a fundamental aspect of content protection.
7. Check DRM Settings in Chrome: Open the Chrome settings on your mobile device and navigate to “Site settings” or a similar section. Look for DRM-related settings and ensure that they are enabled. This may include options for Widevine or other DRM technologies.
8. Update Widevine Content Decryption Module: Chrome uses a component called the Widevine Content Decryption Module to handle DRM. Ensure that this module is up to date. You can check and update it by typing “chrome://components/” in the address bar, finding “Widevine Content Decryption Module,” and selecting “Check for update.”
9. Check for Plugin Conflicts: Sometimes, other plugins or extensions in Chrome can conflict with DRM components. Disable unnecessary plugins or extensions and check if the DRM-protected content works. This can help identify and resolve conflicts that may hinder DRM functionality.
10. Clear Browser Cache: Cached data can sometimes interfere with DRM functionality. Clear your browser cache by going to Chrome settings, selecting “Privacy and security,” and then “Clear browsing data.” Choose to clear cached images and files.
1. Go to Settings
Chrome mobile supports DRM on Android devices through the Widevine DRM system. To enable DRM, click on the three-dot menu button in the top-right corner of the browser and select Settings. Then, click on ‘Privacy and security’ and then ‘Additional Content Settings’.
Picture-in-picture is a handy feature that can help you multitask on your Chrome for mobile device. To activate this feature, tap on the three-dot menu button and toggle it on. This will allow you to watch videos while working on other sites.
2. Click on Security & Privacy
Chrome has a variety of privacy settings to help protect your security and privacy while online. Some of these are turned on by default, but you can change them if you wish.
The simplest way to ensure your security is by clearing browsing data. This includes browsing history, download history, cookies and site data, cached images and files, passwords, and more. You can clear this data manually or through the ‘Clear Browsing Data’ option in the settings menu.
3. Click on Site Settings
DRM is a way for content providers to ensure their intellectual property remains protected. It prevents people from copying or sharing their content without permission.
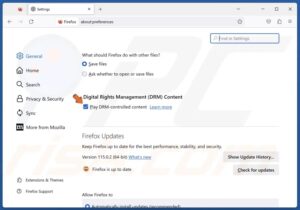
To enable DRM on chrome mobile, you must first go to about:preferences and make sure that the box next to “Play DRM-controlled content” is checked. After that, you must click on Additional Content Settings and then click on Protected Content IDs.
This will allow you to remove the request popup for websites that want to use your device’s microphone or camera. You can also change your privacy settings to customize the amount of personal information a website can access.
4. Click on Additional Content Settings
DRM is a system that protects copyrighted media accessed on the web by encrypting it and limiting access to authorized users. This prevents unauthorized sharing or distribution of content.
You can also change your DRM preferences in the omnibar by clicking on the lock icon and selecting Site Settings. Keep in mind that this only works on a site-by-site basis and does not affect all sites. It is still best to use Google Chrome’s Settings for global permission changes.
5. Click on Protected Content IDs
DRM allows content providers to protect their intellectual property from being copied or shared without authorization. It works by encrypting media files and requiring a license key to play them. This prevents anyone from downloading the video or sharing it on other websites. Google Chrome uses Widevine DRM to protect online video and audio content.
Chrome runs all plugins in a sandboxed environment, which means they can’t access your computer’s core functions. However, some plugins require unrestricted access to do their work. In those cases, you may want to allow them to run outside the sandbox.
Conclusion:
Enabling DRM on Chrome mobile involves a combination of hardware support, secure connections, and up-to-date components like Widevine. Following the steps outlined in this guide will help ensure a smooth experience when accessing DRM-protected content. Always stay vigilant about keeping your browser and related components updated to benefit from the latest security features and improvements in DRM technology. By taking these steps, you can enjoy a secure and seamless experience when consuming protected digital content on your mobile device through the Chrome browser.
Leave a Reply