
How to Enable Webcam in Windows 10
Enable Webcam In Windows 10 camera, either on a laptop or desktop computer, doesn’t work correctly. It could be because of recent system updates, antivirus software, or privacy settings.
There are several ways to resolve this issue using the Camera app or Device Manager. In this article, we’ll walk through the process of fixing the problem by enabling the camera.
Enable Webcam In Windows 10 is a straightforward process that involves checking hardware connections, adjusting system settings, and ensuring that necessary drivers are installed. Here’s a detailed guide with step-by-step instructions:
Step 1: Check Webcam Hardware
Before enabling your webcam, make sure it is physically connected to your computer. If you are using an external webcam, ensure that it is properly plugged into a USB port. For built-in webcams, ensure that they are not disabled in the device manager.
Step 2: Update Webcam Drivers
Outdated or incompatible webcam drivers may cause issues. Follow these steps to update your webcam drivers:
- Right-click on the Start button and select “Device Manager.”
- Locate the “Imaging devices” or “Cameras” category and find your webcam.
- Right-click on your webcam and select “Update driver.”
- Choose the option to search for updated driver software automatically.
Step 3: Check Webcam Privacy Settings
Windows 10 includes privacy settings that control access to your webcam. Ensure these settings are configured correctly:
- Go to “Settings” by pressing
Windows + I. - Select “Privacy.”
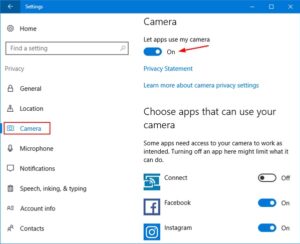
- Choose “Camera” from the left sidebar.
- Ensure that “Allow apps to access your camera” is turned on.
- Scroll down to the “Choose which apps can access your camera” section and enable access for the applications you want.
Step 4: Enable Webcam in System Settings
Once the drivers are updated and privacy settings are configured, proceed to enable your webcam in system settings:
- Open “Settings” by pressing
Windows + I. - Select “Devices.”
- Click on “Cameras” from the left sidebar.
- Toggle the switch to turn on “Let apps use my camera hardware.”
Step 5: Test Webcam in the Camera App
Windows 10 comes with a built-in Camera app that allows you to test your webcam:
- Open the “Camera” app from the Start menu or search bar.
- If prompted, grant the app permission to use your camera.
- Your webcam’s feed should now appear on the screen. This confirms that your webcam is working correctly.
Step 6: Troubleshoot Common Issues
If your webcam is still not working, consider these troubleshooting steps:
- Restart your computer to apply changes and ensure that any pending updates are installed.
- Check if other applications (such as Zoom or Skype) can access your webcam.
- If using an external webcam, try connecting it to a different USB port.
- Disable and re-enable your webcam in the Device Manager.
- Consult the manufacturer’s website for your computer or webcam to download and install the latest drivers.
1. Go to Settings
Modern laptops, 2-in-1s and desktop computers come with a built-in camera that allows you to communicate with other people via video calls on services like Microsoft Teams or Skype. Sometimes, however, your camera might stop working properly. This could be because of a bug in a newer driver, a problem with the camera itself or because of a change in your privacy settings that prevents apps from accessing your webcam.
Fortunately, it is usually easy to resolve most of these issues. You can use the Camera app in Windows to check your camera’s quality and performance and adjust your privacy settings. The privacy settings vary between different versions of the operating system, so you should consult the documentation for your specific device to find out how to access and change these settings.
If your camera has stopped working, you can try restarting the computer or opening the Camera app to see if it turns on. You can also open the Settings app and go to Privacy to check your camera’s privacy settings. Here, you can choose which apps have access to your webcam and turn on the toggle switch for the apps you want to be able to use it. You can also review the history of changes made to your privacy settings. This will help you figure out if the changes were made intentionally or if there was a bug in the system that prevented apps from using your webcam.
2. Select Privacy
Using the Settings app, you can change many settings on your Windows computer, including camera privacy. You can control which apps have access to the microphone, camera, location, photos and videos. The Camera settings page lays out the options in much the same way as the others — it lists the hardware that is available to apps, and gives you a switch to control access on an app-by-app basis.
You can also change the amount of data that Microsoft collects from your device. While Microsoft says that it gathers this information to improve its services, it is not without concern for users who have privacy concerns. You can prevent some of this collection by using a local account instead of a Microsoft account, and you can prevent data from being sent to your device by disabling Cortana and other features.
The next setting you will need to enable is the “Choose which apps can access this device” option. Make sure the toggle switch is turned on, and then scroll down to the “Camera” section and turn on the switch for any programs you want to use the camera with. You can also check out our article on how to disable webcams on desktop computers, laptops and all-in-ones. If your camera is not working on Windows, it may be due to a missing driver after an update or because of antivirus software blocking access to the camera.
3. Select App Permissions
Webcams allow you to communicate face to face (virtually) with other users over video calls in apps like Microsoft Teams, Skype, and Zoom. They are often integrated on laptops, all-in-ones, and select Dell monitors, or attached to desktops via a USB cable. If your camera isn’t working in these apps, it might be due to missing drivers after a recent update, or a conflict between antivirus software and an app trying to use the camera.
In Windows 10, you can control permissions for individual apps by selecting the app in the Start menu or using the keyboard shortcut Windown key + i, then choosing More App Settings. The options vary depending on the application, but you can adjust the toggle switches under App Permissions to enable or disable permissions.
You can also disable camera access for specific apps to prevent unauthorized use of your webcam, or to improve security. The new method only works with applications downloaded from the Store in Windows 10. If you use an older version of Windows, or if your device doesn’t have a camera option in the Settings app, you can still disable your camera through Device Manager. This method doesn’t prevent your camera from functioning in other programs, or in hardware outside of Windows, so you should still consider covering it with tape or a physical switch when not in use.
4. Select Camera
The Camera app is a great way to capture images and videos on your computer. The app is very efficient and has a variety of settings to choose from. However, there are some issues that can occur with the app or your camera. These can be easily fixed with the help of a few easy steps.
The first step is to check the status of your camera. You can do this by clicking on the camera icon in the taskbar or by opening the app. If the status is set to “Off,” then your webcam is disabled. It is on, then the camera is enabled and working properly. If the status is set to “Disabled,” you can enable it by following these steps:
You can also change your camera and microphone settings from the device menu. These changes will affect all apps and websites, not just the Camera app.
You can use a few different methods to troubleshoot and fix a malfunctioning camera in Windows 10. These methods include using Device Manager, changing privacy settings, and installing updates. Once you’ve made these changes, restart your computer and test the camera to see if it is functioning correctly. If you still have trouble, try reinstalling the camera driver or disabling it altogether. If the problem persists, you should contact the manufacturer for support.
Conclusion:
Enabling your webcam on Windows 10 involves ensuring hardware connectivity, updating drivers, configuring privacy settings, and testing the camera using the built-in Camera app. Following these steps should help you successfully enable and use your webcam for various applications on your Windows 10 system. If issues persist, further troubleshooting may be required, and you may consider seeking assistance from the manufacturer’s support or community forums.
Leave a Reply