
How to Enable SSH on Ubuntu 16.04
To enable SSH, you need to set up a private key. Usually, the default port number is 22. However, some firewalls may require you to send traffic to a public IP address. Regardless, SSH provides a reliable, secure, and convenient method for interacting with remote devices. In addition, it allows you to perform a variety of sysadmin tasks. Enable SSH On Ubuntu 16.04.
One of the first steps in configuring your SSH server is to configure the SSH port. This can help you improve your server’s security. If you want to enable the password-login feature, change the Port setting to something else. The best choice is to use a random port, not 1024, since most hacking attempts will try this default port first. You can also change the password login settings in the SSHD config file Google.
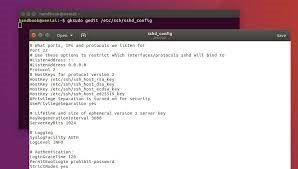
The sshd configuration file has many directives that control different aspects of the SSH service. Among them are the authentication mode and communication settings. This file can be found in /etc/ssh/sshd_confirm. It is recommended that you make a read-only backup of this file so that it remains in a known-good state when you change configurations.
How To Authenticating With A Private Key:
The next step in configuring the SSH server is to configure the IP address. By default, the port is 2222, but some firewalls may require a public IP address. You must also configure up on your firewall to allow SSH connections.
If you are using Ubuntu 16.04 and you want to disable password authentication, you can use key-based authentication. After creating a private key and a passphrase, you can use this method to log into your remote server. When you log into a remote server using key-based authentication, you will not be able to see any keystrokes from your terminal session. Instead, your keystrokes will appear in a new shell session that you have configured.
How To Changing The Default Port Number From 22 to 7575:
You can create a new key pair by executing the SSH-keygen command. The command will generate a public and private RSA key pair. This pair can be used to log into a remote server and use the corresponding private key to log in. This method is more secure than using a password, because it uses a digital signature to identify the remote user.
To change the default port for SSH on Ubuntu, you should first change the configuration file /etc/ssh/sshd_confirm. This file is edited in a text editor such as nano. Once you have made your changes, you should save and close the file.
How To Setting Up Port Forwarding:
The default port for SSH is 22. However, you can change this port to make it harder for unauthorized users to access your server. Changing the default port number for SSH is optional, but it adds another layer of security. It’s a good idea to change the default port of your SSH service to avoid being targeted by brute-force attacks.
In order to set up port forwarding on Ubuntu 16.04, first start by connecting to the router. Next, right-click on the network connection icon and select Connection Information. You will see your router’s IP address. Next, choose the type of service you want, either TCP or UDP, or both. If you are not sure, select Both. Enter the name of your Ubuntu device and its IP address here.
How Do I Enable SSH On Ubuntu:
If your router does not already have port forwarding set up, you will need to reset it. The default port forwarding settings will not apply to your router. If this happens, you can use a preconfigured or custom port-forwarding configuration. Depending on your router, you can also configure port-forwarding for specific applications.
SSH supports dynamic port-forwarding. This feature leverages the SOCKS protocol to send relevant traffic through SSH connections. However, you will need a SOCKS-aware client to enable dynamic port-forwarding. To do this, you can use a web browser or configure it to use SOCKS v5 instead of TCP.
Leave a Reply